1. Introduction
This manual provides essential information for the proper installation, operation, and maintenance of your TYC Right Headlight Assembly, Model 20-9301-00. This product is designed as a direct replacement for the right-side headlight on 2011-2014 Mazda Mazda2 vehicles. Adhering to these instructions will help ensure the longevity and optimal performance of the headlight assembly.
2. Product Overview
2.1 Key Features
- OE-Comparable Harness: Designed for hassle-free installation without the need for pigtail connectors.
- OE-Comparable Mounting Provisions: Ensures a precise, drop-in fitment.
- Rigorous Testing: Undergoes accelerated cycling tests for product service quality and durability.
- Special Lens Coating: Prevents hazing and fading, maintaining proper illumination and operational safety.
- DOT/SAE Standards: Meets or exceeds Department of Transportation (DOT) and Society of Automotive Engineers (SAE) standards for photometric and safety compliance.
2.2 What's in the Box
- One (1) TYC Right Headlight Assembly (Model 20-9301-00) with pre-installed bulbs.

Figure 1: Front view of the TYC Right Headlight Assembly, showing the clear lens and amber turn signal reflector.
3. Safety Information
Always prioritize safety when working on your vehicle. Failure to follow safety precautions can result in injury or damage to the vehicle.
- Ensure the vehicle is parked on a level surface with the parking brake engaged.
- Turn off the engine and remove the key from the ignition.
- Disconnect the negative terminal of the vehicle's battery before beginning any electrical work to prevent accidental short circuits or electrical shock.
- Wear appropriate personal protective equipment, such as safety glasses and gloves.
- If you are unsure about any step, consult a qualified automotive technician.
4. Installation Instructions
The following steps outline a general procedure for replacing a headlight assembly. Specific vehicle disassembly may vary. Refer to your vehicle's service manual for precise instructions.
4.1 Tools Required
- Socket wrench set
- Screwdriver set (Phillips and flathead)
- Plastic trim removal tools (optional, but recommended)
- Gloves and safety glasses
4.2 Step-by-Step Installation
- Prepare the Vehicle: Ensure the vehicle is off and the parking brake is engaged. Disconnect the negative terminal of the battery.
- Access the Headlight: Depending on your Mazda2 model, it may be necessary to partially remove the front bumper cover, grille, or fender liner to access the headlight mounting bolts and electrical connectors. Carefully remove any clips, screws, or bolts securing these components.
- Remove the Old Headlight:
- Locate and disconnect all electrical connectors attached to the rear of the headlight assembly (e.g., main headlight bulb, turn signal, parking light).
- Unscrew or unbolt the mounting fasteners that secure the headlight assembly to the vehicle frame. There are typically 2-4 mounting points.
- Carefully pull the old headlight assembly out of its housing.

Figure 2: Rear view of the headlight assembly, showing the electrical connectors and bulb access points.
- Install the New Headlight:
- Position the new TYC Right Headlight Assembly into the vehicle's headlight opening, ensuring all mounting tabs align correctly.
- Secure the assembly using the original mounting fasteners. Do not overtighten.
- Reconnect all electrical connectors to their corresponding ports on the new headlight assembly. Ensure connections are secure.

Figure 3: Side view of the headlight assembly, illustrating its form factor and mounting points.
- Reassemble Vehicle Components: Reinstall any bumper covers, grilles, or fender liners that were removed. Ensure all clips, screws, and bolts are reattached securely.
- Reconnect Battery and Test: Reconnect the negative battery terminal. Turn on the vehicle's headlights (low beam, high beam, parking lights, turn signals) to verify proper function.
- Adjust Headlight Aim (if necessary): If the headlight aim appears incorrect, consult your vehicle's service manual for instructions on how to adjust the headlight beam pattern. Proper aiming is crucial for visibility and to avoid blinding oncoming drivers.
5. Operating Instructions
Once properly installed, the TYC Right Headlight Assembly operates in conjunction with your vehicle's existing electrical system and controls. No special operation is required for the headlight assembly itself.
- Headlight Activation: Use your vehicle's standard headlight switch to turn on the low beams, high beams, and parking lights.
- Turn Signal Activation: Use your vehicle's turn signal stalk to activate the integrated turn signal.
- Daytime Running Lights (if applicable): If your vehicle is equipped with DRLs, the headlight assembly will function accordingly.
6. Maintenance
Regular maintenance helps preserve the clarity and functionality of your headlight assembly.
- Cleaning: Clean the exterior lens regularly with a soft cloth and mild automotive soap or glass cleaner. Avoid abrasive cleaners or harsh chemicals, as these can damage the lens coating.
- Inspection: Periodically inspect the headlight assembly for any signs of damage, cracks, or condensation inside the lens. Address any issues promptly.
- Bulb Replacement: This assembly comes with pre-installed bulbs. If a bulb fails, consult your vehicle's service manual for specific bulb types and replacement procedures. Ensure the vehicle is off and the battery is disconnected before attempting bulb replacement.

Figure 4: Angled front view of the headlight assembly, highlighting the lens clarity.
7. Troubleshooting
If you encounter issues with your headlight assembly, consider the following common troubleshooting steps:
- Headlight Not Working:
- Check the vehicle's fuse box for a blown headlight fuse.
- Verify that all electrical connectors are securely attached to the headlight assembly.
- Inspect the bulb filament for breakage (if accessible).
- Dim or Flickering Light:
- Ensure the battery connections are clean and tight.
- Check for loose or corroded wiring connections at the headlight.
- A failing bulb can also cause dimness or flickering.
- Condensation Inside Lens:
- Minor condensation can occur due to temperature changes and usually dissipates.
- If condensation persists or appears as large water droplets, inspect the headlight for cracks or improper sealing. Ensure the rear bulb covers are securely in place.
If these steps do not resolve the issue, it is recommended to consult a professional automotive technician.
8. Specifications
| Brand | TYC |
| Model Number | 20-9301-00 |
| OEM Part Number | DR61-51-0K0D |
| UPC | 762405661582 |
| Vehicle Service Type | Car (Mazda Mazda2, 2011-2014) |
| Specific Uses For Product | Head Lights |
| Lens Color | Clear |
| Lens Material | Polycarbonate |
| Special Feature | Waterproof |
| Item Weight | 7 pounds |
| Assembly Required | No (Full assembly with bulbs) |
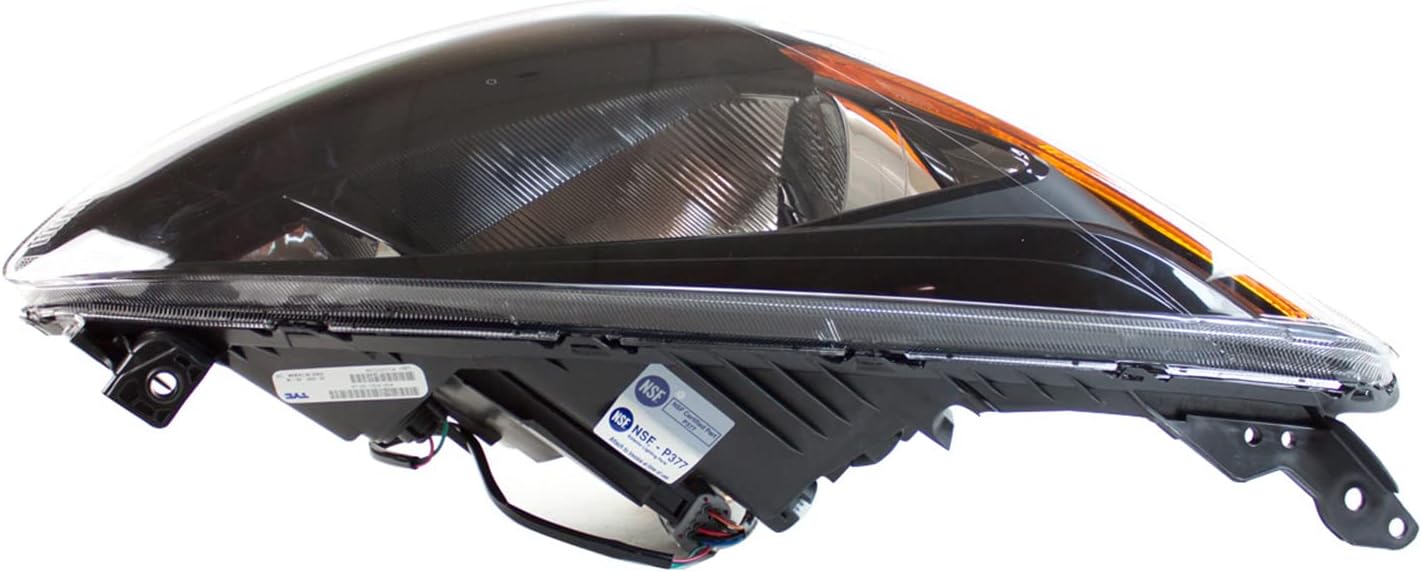
Figure 5: Top view of the headlight assembly, showing its overall shape and dimensions.
9. Warranty and Support
For specific warranty information regarding your TYC Right Headlight Assembly, please refer to the documentation provided at the time of purchase or contact your retailer. TYC products are designed to meet or exceed industry standards, ensuring quality and durability.
For technical support or further assistance, please contact TYC customer service or the authorized dealer from whom the product was purchased. Keep your purchase receipt and model number (20-9301-00) readily available.


