
Introduction
Thank you for choosing a Whirlpool appliance. This instruction manual provides essential information for the safe and efficient use of your new Whirlpool AKT 486/S gas hob. Please read this manual thoroughly before installation and operation, and keep it for future reference.
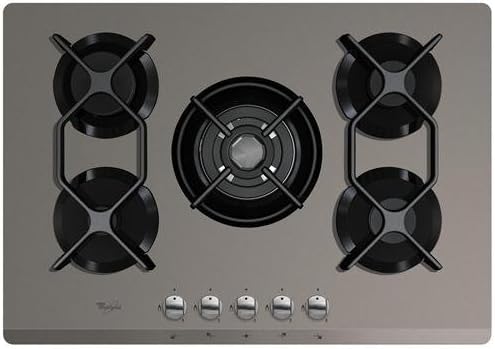
This image displays the Whirlpool AKT 486/S built-in gas hob from above. It features a sleek silver-grey glass surface with five black gas burners. The central burner is a large wok burner, flanked by two smaller burners on each side. Below the burners, five silver rotary control knobs are visible on the front panel.
Important Safety Information
Always follow basic safety precautions when using this appliance to reduce the risk of fire, electric shock, or injury to persons.
- Read all instructions before using the appliance.
- Ensure proper ventilation in the kitchen.
- Do not store flammable materials near the hob.
- Supervise children when the appliance is in use.
- Do not use the hob as a space heater.
- Only use the appliance for its intended purpose: cooking.
- In case of a gas leak, close the main gas valve, open windows, and do not operate electrical switches.
Setup and Installation
Installation must be carried out by a qualified technician in accordance with local regulations and standards. Incorrect installation can lead to hazards.
Unpacking
- Remove all packaging materials.
- Inspect the hob for any damage. Do not install if damaged.
- Keep packaging materials out of reach of children.
Location Requirements
- Install the hob in a kitchen environment with adequate ventilation.
- Ensure sufficient clearance from adjacent walls and overhead cabinets as specified in the installation guide (separate document).
Gas Connection
The gas connection must comply with local regulations for gas appliances. Use appropriate gas hoses and fittings. Check for leaks after connection using soapy water, never an open flame.
Electrical Connection
The hob requires an electrical supply (230 Volts, 1750 Watts) for the electronic ignition system and controls. Ensure the electrical installation is earthed and complies with local electrical safety standards.
Operating Instructions
Igniting a Burner
- Place a suitable cooking utensil on the chosen burner's pan support.
- Push down and turn the corresponding control knob counter-clockwise to the maximum flame position (large flame symbol).
- Hold the knob down for a few seconds to allow the thermocouple to heat up. This activates the flame failure safety device.
- If the flame extinguishes when releasing the knob, repeat the process, holding the knob down for a longer duration.
Adjusting the Flame
Once ignited, you can adjust the flame size by turning the control knob between the maximum flame position and the minimum flame position (small flame symbol). Do not turn the knob past the minimum setting, as this will extinguish the flame.
Turning Off a Burner
To turn off a burner, turn the control knob clockwise to the "OFF" position (dot symbol). Ensure the flame is completely extinguished.
Pan Supports
Always use the provided pan supports. Ensure they are correctly positioned over the burners before placing cookware. Use cookware appropriate for the burner size to maximize efficiency and safety.
Care and Maintenance
Regular cleaning and maintenance will ensure the longevity and optimal performance of your hob.
Cleaning the Hob Surface
- Allow the hob to cool completely before cleaning.
- Use a soft cloth and a mild detergent or a specialized glass hob cleaner.
- Avoid abrasive cleaners, scouring pads, or harsh chemicals that can scratch the glass surface.
- Wipe spills immediately to prevent staining, especially acidic foods.
Cleaning Burner Components
- Remove the pan supports, burner caps, and burner rings when cool.
- Wash these components in warm soapy water. For stubborn residue, a non-abrasive brush can be used.
- Ensure all components are thoroughly dry before reassembling them. Incorrect reassembly can affect burner performance.
- Periodically check the burner holes for blockages and clean them carefully if necessary.
Troubleshooting
Before contacting customer service, refer to the following common issues and solutions:
| Problem | Possible Cause | Solution |
|---|---|---|
| Burner does not ignite. | No gas supply, power outage, clogged burner, wet ignition electrode. | Check gas valve. Verify power. Clean burner components. Dry ignition electrode. |
| Flame is irregular or yellow. | Clogged burner holes, incorrect gas type, dirty burner. | Clean burner holes. Ensure correct gas supply. Clean burner components. |
| Flame extinguishes when releasing knob. | Thermocouple not heated sufficiently, faulty thermocouple. | Hold knob down longer. If issue persists, contact service. |
If the problem persists after attempting these solutions, contact Whirlpool customer support.
Product Specifications
| Feature | Detail |
|---|---|
| Model | AKT 486/S |
| Brand | Whirlpool |
| Type | Built-in Gas Hob |
| Number of Burners | 5 |
| Surface Material | Glass |
| Control Type | Rotary Knobs (Front-mounted) |
| Dimensions (W x D x H) | 73 x 51 x 4.9 cm |
| Weight | 14 kg |
| Electrical Voltage | 230 Volts |
| Electrical Wattage (for ignition) | 1750 Watts |
| GTIN (EAN/UPC) | 08003437826115 |
Warranty and Support
Warranty Information
Your Whirlpool appliance is covered by a manufacturer's warranty. The terms and conditions of this warranty are provided in a separate warranty document included with your purchase. Please retain your proof of purchase for warranty claims.
Customer Support
For technical assistance, spare parts, or to schedule a service appointment, please contact Whirlpool customer service. You can find contact details on the official Whirlpool website or in the warranty booklet.
When contacting support, please have your appliance model number (AKT 486/S) and serial number ready. The serial number is typically located on a label underneath the hob.


