1. Introduction
This manual provides detailed instructions for the installation, configuration, and operation of the Supermicro MBD-X9DBL-IF-O / X9DBL-iF server motherboard. Designed for high-performance server applications, this motherboard supports Intel Xeon E5-2400 v2 processors and features the Intel C602 chipset. Please read this manual thoroughly before proceeding with installation to ensure proper setup and functionality.
2. Key Features
- Dual socket B2 (LGA 1356) supports Intel Xeon processor E5-2400 v2
- Intel C602 chipset
- Up to 384GB DDR3 1600MHz LRDIMM / 192GB RDIMM across 6 DIMM slots
- Expansion slots: 1 PCI, 3 PCI-E 3.0 x8, 1 PCI-E 3.0 x16, 1 PCI-E 3.0 x4 (in x8 slot)
- Intel 82574L GbE LAN, 2 ports
- 8x SATA2 and 2x SATA3 ports
- Integrated IPMI 2.0 and KVM with Dedicated LAN
- 7x USB 2.0 ports (2 rear, 4 via header + 1 Type A)
3. Setup and Installation
Proper installation is crucial for the stability and performance of your server system. Follow these steps carefully.
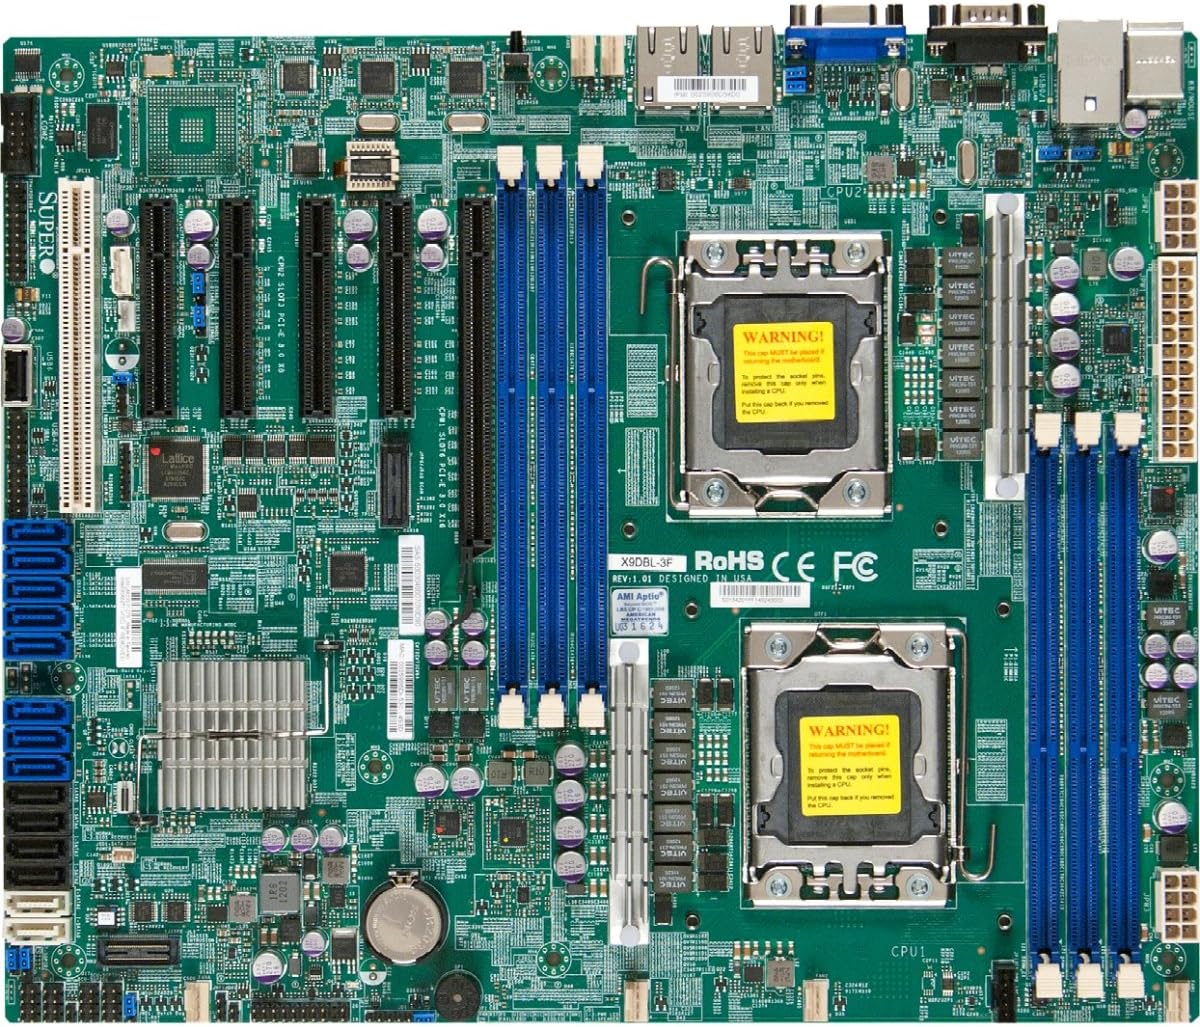
Figure 1: Overview of the Supermicro MBD-X9DBL-IF-O / X9DBL-iF Server Motherboard. This image displays the dual LGA 1356 CPU sockets (labeled CPU1 and CPU2), six DDR3 DIMM slots (blue and black), multiple PCI-E expansion slots, SATA ports (blue), and various connectors and chipsets. The CPU sockets feature a yellow warning label indicating proper handling procedures.
3.1. CPU Installation
The motherboard features two LGA 1356 sockets for Intel Xeon E5-2400 v2 series processors. Ensure the CPU and socket are correctly aligned before installation.
- Carefully open the CPU socket retention mechanism.
- Align the CPU with the socket, matching the golden triangle on the CPU to the triangle on the socket. Ensure the CPU is seated correctly without force.
- Close the retention mechanism to secure the CPU. Refer to the 'WARNING!' label on the socket for proper handling instructions, which typically advise against touching the pins and to replace the cap only when removing the CPU.
- Apply thermal paste and install the appropriate CPU cooler for each processor.
3.2. Memory Installation
The motherboard supports up to 384GB of DDR3 1600MHz LRDIMM or 192GB of RDIMM across six DIMM slots. For optimal performance, consult the motherboard's qualified vendor list (QVL) for compatible memory modules.
- Open the clips at both ends of the DIMM slot.
- Align the memory module with the slot, ensuring the notch on the module matches the key in the slot.
- Press down firmly on both ends of the memory module until the clips snap into place.
3.3. Motherboard Mounting
Install the motherboard into a compatible server chassis using the provided standoffs and screws. Ensure all mounting holes are aligned and secured to prevent short circuits.
3.4. Power Connections
Connect the main 24-pin ATX power connector and the 8-pin (or 4-pin) CPU power connectors from your power supply unit (PSU) to the corresponding ports on the motherboard.
3.5. Storage and Expansion Card Installation
Connect your storage devices (HDDs, SSDs) to the SATA2 (8 ports) or SATA3 (2 ports) connectors. Install any necessary expansion cards (e.g., RAID controllers, network cards) into the available PCI-E or PCI slots.
4. Operating Instructions
4.1. Initial Boot-Up and BIOS Configuration
After completing hardware installation, connect a monitor, keyboard, and mouse. Power on the system and press the designated key (usually DEL or F2) to enter the BIOS/UEFI setup utility. Configure boot order, date/time, and other system settings as required.
4.2. Operating System Installation
Insert your operating system installation media (USB drive or DVD) and follow the on-screen prompts to install the OS. Ensure all necessary drivers, especially for the chipset and network, are installed after the OS is set up.
4.3. IPMI 2.0 Remote Management
The integrated IPMI 2.0 with KVM over IP allows for remote management of the server. Connect the dedicated LAN port to your network. Access the IPMI interface via a web browser using the assigned IP address to monitor system status, perform remote power control, and access KVM functionality.
5. Maintenance
Regular maintenance helps ensure the longevity and reliability of your server motherboard.
- Dust Removal: Periodically clean dust from the motherboard and cooling components using compressed air. Ensure the system is powered off and unplugged before cleaning.
- Firmware Updates: Check the Supermicro website for the latest BIOS/UEFI and IPMI firmware updates. Apply updates as recommended to improve stability and add new features.
- Cable Management: Ensure all cables are neatly routed to promote optimal airflow and prevent interference.
6. Troubleshooting
This section provides solutions to common issues you might encounter.
- No Power: Verify all power cables (24-pin ATX, 8-pin CPU) are securely connected. Check the power supply unit (PSU) and power outlet.
- No Display/POST: Ensure the CPU(s), memory modules, and graphics card (if applicable) are correctly installed. Listen for POST beep codes, which can indicate specific hardware issues.
- System Instability: Check CPU and memory compatibility. Ensure proper cooling for all components. Update BIOS/UEFI firmware.
- Storage Not Detected: Verify SATA/SAS cable connections. Check BIOS settings for storage controller configuration.
- Network Issues: Confirm LAN cable connection. Check network driver installation in the operating system. Verify IPMI network settings if using the dedicated LAN port.
7. Specifications
| Feature | Specification |
|---|---|
| Brand | Supermicro |
| Model Number | MBD-X9DBL-IF-O |
| CPU Socket | LGA 1356 (Dual) |
| Compatible Processors | Intel Xeon E5-2400 v2 series |
| Chipset Type | Intel C602 |
| RAM Memory Technology | DDR3 |
| Memory Clock Speed | 1600 MHz |
| RAM Memory Maximum Size | 192 GB (RDIMM) / 384 GB (LRDIMM) |
| SATA Ports | 8x SATA2, 2x SATA3 |
| Expansion Slots | 1x PCI, 3x PCI-E 3.0 x8, 1x PCI-E 3.0 x16, 1x PCI-E 3.0 x4 (in x8) |
| LAN | 2x Intel 82574L GbE LAN |
| Integrated Management | IPMI 2.0 with KVM and Dedicated LAN |
| USB Ports | 7x USB 2.0 (2 rear, 4 via header, 1 Type A) |
| Product Dimensions | 18.2 x 14.2 x 5.2 inches |
| Item Weight | 3 pounds |
| Date First Available | October 21, 2013 |
8. Warranty and Support
For warranty information and technical support, please refer to the official Supermicro website or contact your authorized Supermicro reseller. Keep your proof of purchase for warranty claims.


