Introduction
This manual provides essential instructions for the safe and effective installation, operation, and maintenance of the Carrier HK61EA005 OEM Replacement Furnace Control Board. Please read this manual thoroughly before proceeding with any installation or service procedures. Retain this manual for future reference.
Safety Information
WARNING: Installation and servicing of heating, ventilation, and air conditioning (HVAC) equipment can be hazardous due to system pressure, electrical components, and equipment location. Only trained and qualified service personnel should install, repair, or service HVAC equipment. Failure to follow these instructions could result in property damage, personal injury, or death.
- Always disconnect power to the furnace before installing or servicing the control board.
- Verify all wiring connections are secure and correct according to the furnace manufacturer's specifications.
- Wear appropriate personal protective equipment (PPE), including safety glasses and gloves.
- Ensure proper grounding of the furnace system.
Product Overview
The Carrier HK61EA005 is an OEM replacement furnace control board designed to manage the operational sequences of a furnace, including ignition, fan control, and safety monitoring. This board is compatible with various Carrier furnace models.
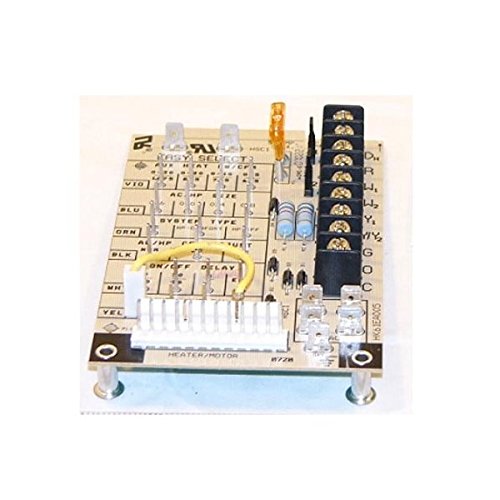
Figure 1: Carrier HK61EA005 Furnace Control Board. This image displays the circuit board with various terminals, jumpers, and components. Key features include the "EASY SELECT" jumper settings for system type, ON/OFF DELAY settings, and terminal blocks for wiring connections such as D, R, W, W2, Y, Y2, G, O, and C. A yellow jumper wire is visible connecting two pins on the board.
Setup and Installation
- Power Disconnection: Turn off all electrical power to the furnace at the main service panel. Verify power is off using a voltage meter.
- Access Old Board: Open the furnace access panel to locate the existing control board.
- Document Wiring: Before disconnecting any wires, take clear photographs or make a detailed diagram of all wiring connections to the old control board. Note the position and color of each wire.
- Disconnect Wires: Carefully disconnect all wires and connectors from the old control board.
- Remove Old Board: Unmount the old control board from the furnace chassis. Note how it was secured (screws, clips, etc.).
- Install New Board: Mount the new HK61EA005 control board in the same location and orientation as the old board. Ensure it is securely fastened.
- Connect Wiring: Refer to your photographs or diagram and carefully reconnect all wires and connectors to the corresponding terminals on the new control board. Double-check each connection for accuracy and tightness.
- Jumper Settings: Configure the "EASY SELECT" jumpers and ON/OFF DELAY jumpers on the new board to match the settings of the original board or the furnace manufacturer's specifications. These settings typically determine the system type (e.g., AC, HP) and fan delay times. Refer to the furnace wiring diagram for specific requirements.
- Close Access Panel: Once all connections are verified, close and secure the furnace access panel.
- Restore Power: Restore electrical power to the furnace at the main service panel.
Operating Instructions
After successful installation and power restoration, the furnace control board will initiate its normal operating sequence. The board manages the following functions:
- Ignition Sequence: Controls the gas valve and igniter for safe furnace startup.
- Fan Control: Manages the indoor blower motor operation based on heating or cooling demands and delay settings.
- Safety Monitoring: Continuously monitors various safety sensors (e.g., flame sensor, limit switches) and will shut down the furnace if a fault is detected.
- Thermostat Interface: Communicates with the thermostat to receive heating and cooling calls.
For specific operational details, refer to your furnace's primary instruction manual.
Maintenance
The HK61EA005 control board itself requires no routine maintenance. However, regular maintenance of the overall furnace system is crucial for its longevity and proper function. This includes:
- Air Filter Replacement: Replace or clean the furnace air filter regularly (typically every 1-3 months) to ensure proper airflow.
- Annual Professional Inspection: Have a qualified HVAC technician inspect and service your furnace annually.
- Clean Flame Sensor: A dirty flame sensor can cause intermittent furnace operation. This should be cleaned by a qualified technician.
Always disconnect power to the furnace before performing any maintenance.
Troubleshooting
If the furnace is not operating correctly after installing the new control board, consider the following troubleshooting steps:
- No Power:
- Check the circuit breaker for the furnace.
- Ensure the furnace disconnect switch is in the "ON" position.
- Verify all low-voltage and high-voltage connections to the control board are secure.
- Furnace Not Igniting:
- Confirm the thermostat is set to "HEAT" and the temperature is above the ambient room temperature.
- Check for error codes on the control board (if applicable, refer to your furnace manual for code interpretations).
- Ensure the gas supply valve is open.
- Verify the flame sensor is clean and properly positioned.
- Fan Not Operating Correctly:
- Check the "ON/OFF DELAY" jumper settings on the control board.
- Ensure the thermostat fan setting is correct (AUTO/ON).
- Verify the fan motor connections to the control board.
- Error Codes: Many control boards have diagnostic LEDs that flash codes to indicate specific faults. Consult your furnace's original manual for a list of error codes and their meanings.
If troubleshooting steps do not resolve the issue, contact a qualified HVAC technician for assistance.
Specifications
| Model Number | HK61EA005 |
| Alternate Model Number | CECOMINOD058414 |
| Brand | Carrier (OEM Replacement) |
| Product Dimensions | 6 x 6 x 6 inches |
| Weight | 0.01 ounces |
| Date First Available | October 8, 2013 |
Warranty and Support
For warranty information regarding this OEM replacement part, please refer to the terms provided by your original point of purchase or the specific warranty documentation included with the product. For technical support, it is recommended to consult a qualified HVAC technician or the original furnace manufacturer's support resources.


