Introduction
This manual provides comprehensive instructions for the operation, maintenance, and troubleshooting of your SINGER Mechanical Sewing Machine, Model 1409. Please read this manual thoroughly before using the machine to ensure safe and efficient operation.
The SINGER Promise 1409 is designed as an entry-level sewing machine, known for its lightweight construction, which facilitates easy transport. It includes a versatile range of accessories, such as a darning plate, enabling free-motion sewing.

Figure 1: Overview of the SINGER Mechanical Sewing Machine 1409.
Setup and Assembly
1. Unpacking
Carefully remove the sewing machine and all accessories from the packaging. Retain the original packaging for future storage or transport. Ensure all components listed in the packing list are present.
2. Power Connection
Place the machine on a stable, flat surface. Connect the power cord to the machine and then to a suitable electrical outlet. Ensure the foot controller is also connected.
3. Bobbin Winding
- Place a spool of thread on the spool pin.
- Guide the thread through the upper thread guide and around the bobbin winding tension disc.
- Place an empty bobbin onto the bobbin winder spindle.
- Push the bobbin winder spindle to the right.
- Press the foot controller to wind the bobbin. Stop when the bobbin is full.
- Cut the thread and remove the wound bobbin.
4. Inserting the Bobbin
Open the bobbin cover. Insert the wound bobbin into the bobbin case, ensuring the thread unwinds in the correct direction (usually counter-clockwise). Pull the thread through the tension spring and out through the bobbin case opening. Close the bobbin cover.
5. Threading the Upper Thread
Follow the numbered threading path indicated on the machine. This typically involves guiding the thread through the upper thread guide, down through the tension discs, up and around the take-up lever, and finally down to the needle.

Figure 2: Detailed view of the upper threading path on the SINGER 1409, showing numbered guides for correct thread placement.
6. Needle Installation
Ensure the machine is turned off. Loosen the needle clamp screw. Insert the new needle with the flat side facing the back of the machine. Push the needle up as far as it will go, then tighten the needle clamp screw securely.
Operating Instructions
1. Stitch Selection
The SINGER 1409 offers 9 stitch options, including 6 utility stitches, 2 decorative stitches, and a 1 four-step buttonhole. Rotate the Stitch Selector Dial to choose your desired stitch.

Figure 3: Close-up of the Stitch Selector Dial, illustrating the various stitch patterns available on the SINGER 1409.
2. Stitch Width and Length Adjustment
Adjust the stitch length using the Stitch Length Dial. For stitch width, refer to the stitch selection dial as some stitches have fixed widths or are adjusted in conjunction with the stitch length.

Figure 4: Close-up of the Stitch Length Dial, used to control the length of stitches for different sewing needs.
3. Reverse Stitch
To reinforce seams, press and hold the oversized reverse stitch button. The machine will sew in reverse as long as the button is held down. Release the button to resume forward sewing.
4. Free Arm Sewing
Remove the accessory storage compartment to reveal the free arm. This feature is ideal for sewing cylindrical items such as cuffs, sleeves, and pant hems.
5. Twin Needle Capacity
The machine supports twin needle sewing for decorative stitching or creating parallel lines of stitching. Ensure you use a twin needle designed for your machine and thread both needles correctly.
6. Included Accessories
Your SINGER 1409 comes with a variety of accessories to enhance your sewing experience. These include various presser feet, bobbins, needles, a seam ripper, and a darning plate for free-motion sewing.
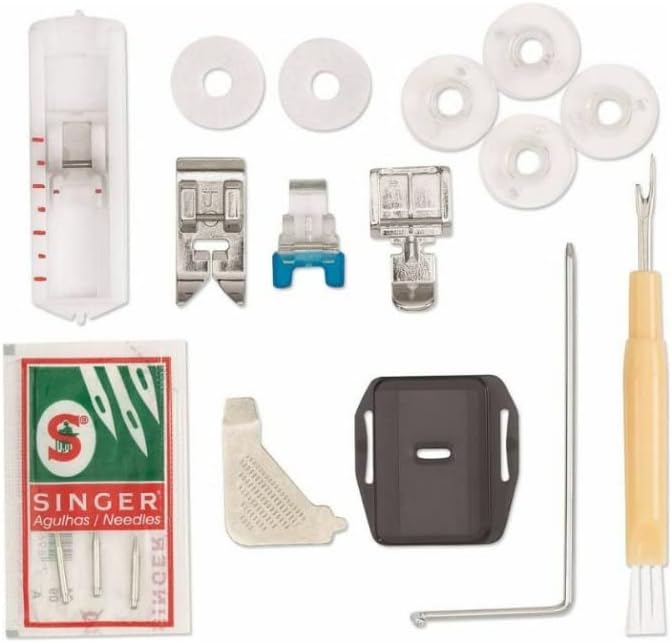
Figure 5: A selection of accessories included with the SINGER 1409, such as various presser feet, bobbins, needles, and a seam ripper.
Maintenance
1. Cleaning the Machine
Regularly clean lint and dust from the bobbin area and feed dogs using the small brush provided or a lint brush. Disconnect the machine from power before cleaning. Do not use compressed air, as it can push lint further into the machine.
2. Needle Replacement
Replace the needle frequently, especially after 8-10 hours of sewing or if it becomes bent or dull. A dull or bent needle can cause skipped stitches, fabric damage, or thread breakage.
3. General Care
Keep the machine covered when not in use to protect it from dust. Avoid pulling fabric forcefully through the machine; let the feed dogs do the work. Use only high-quality sewing machine oil if lubrication is required, following specific instructions in a full service manual if available (this model typically does not require user lubrication).
Troubleshooting
| Problem | Possible Cause | Solution |
|---|---|---|
| Thread Jamming | Incorrect threading, bobbin incorrectly inserted, lint in bobbin case. | Re-thread the machine completely (both upper and bobbin). Ensure bobbin is inserted correctly. Clean the bobbin case area. |
| Needle Breaking | Bent needle, incorrect needle size for fabric, pulling fabric while sewing. | Replace with a new, correct size needle. Do not pull fabric; let the feed dogs guide it. |
| Skipped Stitches | Bent or dull needle, incorrect needle insertion, improper threading. | Replace needle, ensure flat side of needle faces back. Re-thread machine. |
| Uneven Stitching / Poor Tension | Incorrect tension settings, improper threading, lint in tension discs. | Adjust tension dial. Re-thread machine. Clean tension discs. |
| Machine Not Starting | Power cord not connected, foot controller not connected, bobbin winder engaged. | Check all power connections. Ensure bobbin winder spindle is disengaged. |
If problems persist after attempting these solutions, it is recommended to consult a qualified service technician.
Specifications
- Model Number: 1409
- Brand: SINGER
- Color: White
- Product Dimensions: 9.06 x 16.54 x 14.17 inches
- Item Weight: 13.64 pounds
- Stitch Options: 9 (6 utility, 2 decorative, 1 four-step buttonhole)
- Features: Twin needle capacity, Free arm, Adjustable stitch width and length, Oversized reverse stitch button
- UPC: 037431883094
- Date First Available: October 17, 2010
- Manufacturer: Singer
Warranty and Support
Specific warranty information for the SINGER Mechanical Sewing Machine 1409 is not provided in this document. Please refer to the warranty card included with your product or visit the official SINGER website for detailed warranty terms and conditions.
For technical support, service, or to purchase replacement parts, please contact SINGER customer service through their official channels. Contact information can typically be found on the SINGER website or in the product packaging.
You can visit the SINGER Store for more information: SINGER Store on Amazon.


