
1. Introduction
Thank you for choosing the EMB EB6500 Professional Power Amplifier. This 2-channel amplifier is designed for reliable performance in various audio applications, including live events, DJ setups, and PA systems. This manual provides essential information for the safe and efficient operation of your amplifier. Please read it thoroughly before use and retain it for future reference.
2. Safety Instructions
- Power Source: Ensure the amplifier is connected to a 230V AC power supply. Verify the voltage before plugging in the unit.
- Ventilation: Do not block ventilation openings. Ensure adequate airflow around the unit to prevent overheating.
- Moisture: Keep the amplifier away from water, rain, and excessive humidity. Do not operate with wet hands.
- Cleaning: Disconnect power before cleaning. Use a dry, soft cloth. Do not use liquid cleaners or aerosols.
- Servicing: Refer all servicing to qualified service personnel. Do not attempt to open or repair the unit yourself.
- Placement: Place the amplifier on a stable, level surface. Avoid placing it near heat sources or in direct sunlight.
3. Package Contents
Upon unpacking, please ensure all items are present and in good condition:
- EMB EB6500 Professional Power Amplifier
- Power Cable
- User Manual (this document)
4. Product Overview
4.1. Overall View

Figure 1: Overall view of the EMB EB6500 amplifier, displaying both the front control panel and the rear connection panel.
4.2. Front Panel
The front panel provides access to essential controls and indicators for monitoring and adjusting the amplifier's performance.
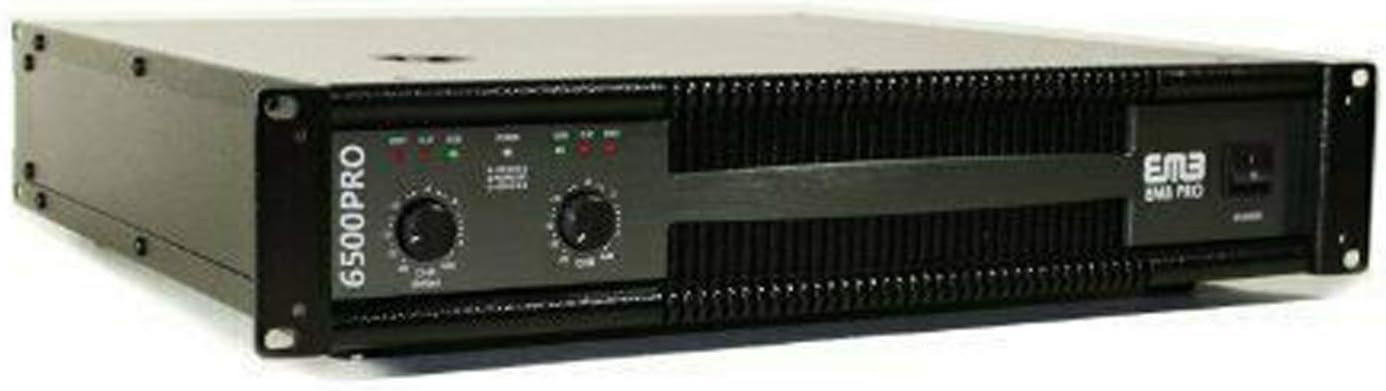
Figure 2: Front panel of the EMB EB6500 amplifier.
- Power Switch: Turns the amplifier on or off.
- Channel 1 & 2 Level Controls: Rotary knobs to adjust the output level for each channel.
- LED Indicators:
- Power LED: Illuminates when the unit is powered on.
- Signal LED: Indicates the presence of an audio signal.
- Clip LED: Illuminates when the output signal is clipping, indicating potential distortion. Reduce input or output levels if this LED lights up frequently.
- Protect LED: Illuminates if the amplifier enters protection mode due to overheating or other faults.
4.3. Rear Panel
The rear panel houses all input, output, and power connections.

Figure 3: Rear panel of the EMB EB6500 amplifier.
- AC Power Input: Connects the amplifier to the main power supply using the provided power cable.
- Input Connectors (XLR & 1/4" TRS): Balanced audio inputs for connecting mixers, preamplifiers, or other audio sources.
- Output Connectors (Speakon & Binding Posts): Speaker outputs for connecting passive loudspeakers. The amplifier supports two modes of speaker connection.
- Cooling Fan: Ensures proper heat dissipation. Keep clear of obstructions.
5. Setup
Follow these steps to set up your EMB EB6500 amplifier:
- Placement: Position the amplifier on a stable, flat surface. Ensure there is at least 4 inches (10 cm) of clear space around all ventilation openings for proper cooling. This unit is designed for surface mounting.
- Power Connection:
- Ensure the amplifier's power switch is in the "OFF" position.
- Connect the provided AC power cable to the AC Power Input on the rear panel of the amplifier.
- Plug the other end of the power cable into a grounded 230V AC power outlet.
- Input Connections:
- Connect your audio source (e.g., mixer, preamplifier) to the Input Connectors (XLR or 1/4" TRS) on the rear panel. Use high-quality shielded cables for optimal signal integrity.
- Connect Channel 1 input to your left audio source and Channel 2 input to your right audio source for stereo operation.
- Output Connections (Speakers):
- Connect your passive loudspeakers to the Output Connectors (Speakon or Binding Posts) on the rear panel.
- Ensure correct polarity (+ to + and - to -) when using binding posts.
- The amplifier supports two modes of speaker connection. Refer to your speaker's manual for recommended wiring configurations and impedance matching. Ensure the total impedance of connected speakers does not fall below the amplifier's minimum rated impedance.
6. Operating Instructions
- Initial Power On:
- Before powering on, ensure all level controls on the front panel are set to their minimum (fully counter-clockwise) position.
- Turn on your audio source (mixer, etc.) first.
- Flip the Power Switch on the amplifier to the "ON" position. The Power LED should illuminate.
- Adjusting Levels:
- Start playing audio from your source.
- Slowly increase the Channel 1 and Channel 2 Level Controls on the amplifier until the desired volume is reached.
- Monitor the Signal and Clip LEDs. The Signal LED should flicker with audio presence. If the Clip LED illuminates frequently or stays lit, reduce the level to prevent distortion and potential speaker damage.
- Powering Off:
- Turn down all level controls on the amplifier to their minimum.
- Flip the Power Switch on the amplifier to the "OFF" position.
- Turn off your audio source.
7. Maintenance
- Cleaning: Regularly wipe the amplifier's exterior with a dry, soft cloth. Do not use harsh chemicals or abrasive cleaners.
- Ventilation: Periodically check that the ventilation openings and cooling fan are free from dust and debris. Use compressed air to gently clear any blockages.
- Cable Connections: Ensure all audio and power cables are securely connected and free from damage.
8. Troubleshooting
| Problem | Possible Cause | Solution |
|---|---|---|
| No power | Power cable disconnected; power outlet faulty; amplifier fuse blown. | Check power cable connection; try a different outlet; consult qualified service personnel for fuse replacement. |
| No sound output | Input cables disconnected; speaker cables disconnected or incorrect polarity; amplifier level controls too low; audio source not playing. | Verify all cable connections; ensure level controls are adjusted; check audio source. |
| Distorted sound | Input signal too high (clipping); amplifier overloaded; faulty speaker. | Reduce input level from source; lower amplifier level controls; check speaker impedance and condition. |
| Amplifier overheats / Protect LED on | Insufficient ventilation; impedance mismatch with speakers; internal fault. | Ensure clear ventilation; verify speaker impedance; power off and allow to cool; if problem persists, seek service. |
9. Specifications
| Feature | Detail |
|---|---|
| Model | EB6500 |
| Brand | EMB |
| Number of Channels | 2 |
| Maximum Output Power | 6500 Watts |
| Frequency Response | 20Hz-20kHz |
| Signal to Noise Ratio | > 103dB |
| Voltage | 230 Volts |
| Item Dimensions (L x W x H) | 6.5 x 20 x 21 inches |
| Item Weight | 6.6 Pounds |
| Mounting Type | Surface Mount |
| Speaker Connection Modes | 2 Modes |
10. Warranty and Support
The EMB EB6500 Professional Power Amplifier comes with a 1-year limited warranty from the date of purchase. This warranty covers manufacturing defects and workmanship under normal use. It does not cover damage caused by misuse, accidents, unauthorized modifications, or improper installation.
For warranty claims, technical support, or service inquiries, please contact your authorized EMB dealer or visit the official EMB website for contact information. Please have your purchase receipt and product model number ready when contacting support.