
1. Introduction
This manual provides comprehensive instructions for the setup, operation, maintenance, and troubleshooting of your Meraki Cloud Managed MS220 Series 8 Port Gigabit PoE Switch. The MS220-8P is a powerful, cloud-managed network switch designed for seamless integration and simplified management of your network infrastructure.
The Meraki MS220-8P offers 8 Gigabit Ethernet ports with Power over Ethernet (PoE) capabilities, along with 2 SFP ports for 1G uplinks. Its 100% cloud-managed architecture enables features such as seamless cloud updates, zero-touch deployments, and remote management from any location. It also supports Meraki's industry-first virtual stacking technology, allowing for centralized management of numerous switch ports across multiple physical switches.

Figure 1.1: Angled view of the Meraki MS220-8P Cloud Managed Switch, showcasing its compact design and port layout.
2. Setup
2.1. Unboxing and Package Contents
Carefully unbox your Meraki MS220-8P switch. Ensure all components are present and undamaged. The standard package contents include:
- Meraki MS220-8P Cloud Managed Switch
- Power Cable
- Integrated mounting brackets
- Kensington security slot
- Rack Mounting Kit (screws and cage nuts)

Figure 2.1: Illustration of typical package contents, including the power cable and rack mounting kit.
2.2. Physical Installation
The MS220-8P can be placed on a desktop or mounted in a rack using the included brackets.
- Desktop Placement: Place the switch on a flat, stable surface, ensuring adequate ventilation around the device.
- Rack Mounting:
- Attach the integrated mounting brackets to the sides of the switch using the provided screws.
- Secure the switch into a standard 19-inch rack using the rack mounting kit. Ensure the switch is level and securely fastened.

Figure 2.2: Bottom view of the MS220-8P, illustrating the integrated mounting points for rack or wall installation.
2.3. Connecting Power
Connect the provided power cable to the power input on the rear of the switch and then to a suitable power outlet. The switch will power on automatically.
2.4. Network Connections
Connect your network devices (computers, access points, IP phones, etc.) to the 8 Gigabit Ethernet ports (1-8) on the front of the switch using standard Ethernet cables. For uplink connections to your core network or router, use the 2 SFP ports (9 and 10) with compatible SFP transceivers and fiber optic cables.
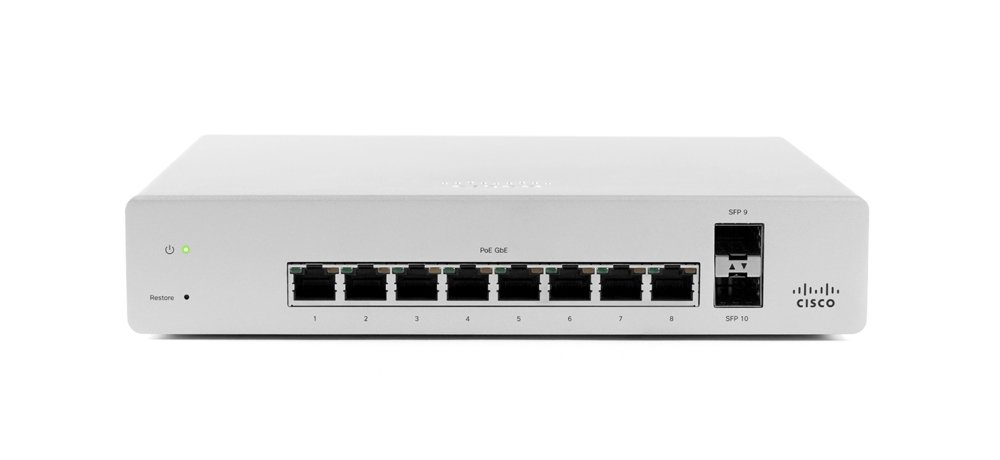
Figure 2.3: Front view of the MS220-8P, highlighting the 8 PoE Gigabit Ethernet ports and the 2 SFP uplink ports.
2.5. Cloud Management and Licensing
The Meraki MS220-8P requires a cloud license (sold separately) for full functionality and cloud management. Once connected to the internet, the switch will automatically connect to the Meraki cloud. You can then add the device to your Meraki dashboard account for configuration and monitoring.
- Visit the Meraki dashboard at dashboard.meraki.com.
- Log in or create a new account.
- Add your device by entering its serial number, which can be found on the bottom of the switch.
- Configure network settings, VLANs, QoS, and other features through the intuitive cloud interface.
3. Operating the Switch
3.1. LED Indicators
The MS220-8P features several LED indicators on the front panel to provide status information:
- Power LED: Indicates the power status of the device.
- Solid Green: Device is powered on and operating normally.
- Off: Device is powered off.
- Port LEDs (per Ethernet port): Indicate link status and activity.
- Solid Green: Link established.
- Flashing Green: Data activity.
- Off: No link.
3.2. Cloud Management Features
Leverage the Meraki cloud dashboard for comprehensive management of your switch:
- Remote Configuration: Adjust settings, create VLANs, and configure QoS policies from anywhere.
- Monitoring and Analytics: View real-time network usage, port statistics, and client information.
- Alerts: Set up email and text message alerts for critical events such as port status changes or power loss.
- Firmware Updates: Automatic, seamless firmware updates ensure your switch always has the latest features and security patches.
- Virtual Stacking: Manage multiple Meraki switches as a single logical unit, simplifying large-scale deployments.
4. Maintenance
4.1. Cleaning
To ensure optimal performance and longevity, periodically clean the exterior of the switch. Use a soft, dry cloth. Do not use liquid or aerosol cleaners, as they may damage the device.
4.2. Firmware Updates
Meraki switches receive automatic firmware updates via the cloud. These updates are typically non-disruptive and ensure your device benefits from the latest features, performance enhancements, and security fixes. You can schedule maintenance windows for updates through the Meraki dashboard.
4.3. Resetting the Switch
The MS220-8P features a "Restore" button on the front panel. This button can be used for specific troubleshooting scenarios, such as restoring factory defaults or initiating a firmware re-download. Consult Meraki documentation or support before performing a factory reset, as this will erase all local configurations.
5. Troubleshooting
This section provides solutions to common issues you might encounter with your Meraki MS220-8P switch.
5.1. No Power
- Check Power Cable: Ensure the power cable is securely connected to both the switch and a working power outlet.
- Verify Outlet: Test the power outlet with another device to confirm it is supplying power.
- Power Supply: If the power LED remains off, the internal power supply may be faulty. Contact Meraki support.
5.2. No Network Connectivity
- Cable Connection: Ensure Ethernet cables are securely plugged into both the switch port and the connected device. Check for damaged cables.
- Port LED Status: Verify that the corresponding port LED on the switch is solid green (link established). If not, try a different port or cable.
- Device Configuration: Ensure the connected device's network settings (IP address, subnet mask) are correct or set to obtain automatically via DHCP.
- Uplink Connection: Confirm that the SFP uplink ports are properly connected to your router or core network and that the uplink is active.
- Cloud Connectivity: Ensure the switch has an active internet connection to reach the Meraki cloud. Check your firewall rules if necessary.
5.3. Slow Network Performance
- Cable Quality: Use high-quality Ethernet cables (Cat5e or Cat6) for Gigabit speeds.
- Port Speed: Verify that connected devices are negotiating at Gigabit speeds. Check the Meraki dashboard for port statistics.
- Network Congestion: Use the Meraki dashboard to monitor network traffic and identify any highly utilized ports or devices.
- QoS Settings: Review Quality of Service (QoS) settings in the Meraki dashboard to ensure critical traffic is prioritized.
6. Specifications
The following table outlines the key technical specifications for the Meraki MS220-8P Cloud Managed Switch:
| Feature | Description |
|---|---|
| Model Number | MS220-8 |
| Number of Ports | 8 x 1GbE (Gigabit Ethernet) PoE ports, 2 x SFP for 1G uplink |
| Dimensions (L x W x H) | 9.06 x 8.66 x 1.73 inches |
| Weight | 2.43 Pounds |
| Power Input | 100-240V AC, 50-60Hz |
| Management | 100% Cloud-managed via Meraki Dashboard |
| Features | Voice and Video QoS, Low noise, fanless, Non-blocking switch fabric, Virtual stacking, Zero touch provisioning, Email and text message alerts |
| Included Components | Integrated mounting brackets, Kensington security slot |
| Color | White |
| First Available Date | October 12, 2013 |
7. Warranty and Support
7.1. Manufacturer Warranty
The Meraki MS220-8P switch, when purchased new from an authorized reseller, typically comes with a full lifetime warranty from Meraki. This warranty covers defects in materials and workmanship under normal use. Please retain your proof of purchase for warranty claims.
Important Note: Meraki will generally not honor the warranty on products that are not brand new or have been delivered to a customer in the past, or if purchased from unauthorized sellers. Ensure your purchase is from a reputable source to guarantee warranty coverage.
7.2. Technical Support
For technical assistance, troubleshooting beyond this manual, or warranty inquiries, please contact Meraki support directly. You can find support resources, documentation, and contact information on the official Meraki website, typically accessible through your Meraki dashboard account.
For general information about Cisco products, you can visit the Cisco Store on Amazon.