Introduction
This manual provides detailed instructions for the installation, operation, and maintenance of your RadonAway RP145c Radon Fan with the included 4x4 White Fan Installation Kit and Mounting Bracket. This system is designed to effectively mitigate radon gas in your home, ensuring a safer indoor environment. Please read all instructions carefully before proceeding with installation or operation.
Setup and Installation
Included Components:
- (1) RadonAway RP145 Radon Fan
- (2) 4x4 White Rubber Flex Couplings
- (1) U-tube Manometer
- System Labels
- Mounting Bracket
General Installation Overview:
The RadonAway RP145c fan is designed for easy integration into existing or new radon mitigation systems. While replacing an existing fan can be a straightforward process, new installations or complex setups may require professional assistance to ensure proper sealing and electrical connections. The fan is rated for both indoor and outdoor use.
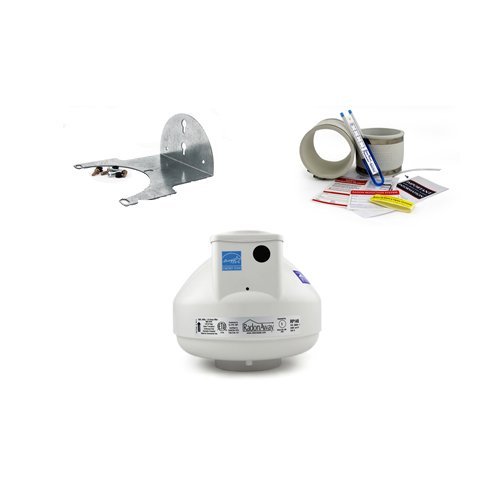
Image: The RadonAway RP145c fan unit, showing its compact design and connection points for piping.
Installation Steps (Fan Replacement):
- Preparation: Turn off the fan switch and the corresponding circuit breaker to ensure safety.
- Disconnect Wiring: Disconnect the three electrical wires from the old terminal box. Remove the locknut from the cable fitting and carefully remove the wires from the box.
- Remove Old Fan: Loosen the hose clamps securing the old fan to the piping and carefully remove the old fan unit.
- Install Couplers: For 5-inch or smaller ducts, loosen the hose clamps on the new rubber flex couplers and place them onto the system piping. For models with 6-inch or larger ducts, it is often easier to connect the couplers to the fan first, then install both the fan and couplers onto the system pipe.
- Connect New Fan: Position the new RadonAway RP145c fan between the couplers and tighten the hose clamps to secure it.
- Electrical Connection: Feed the electrical wires through the terminal box knockout hole on the new fan and tighten the locknut. Insert the wires into the Wago lever nuts (white to blue, green/yellow to green/bare copper, black to black) and close the levers to secure the connections. Ensure all wiring connections are secure.
- Reinstall Cover: Reinstall the terminal box cover.
- Restore Power: Turn the circuit breaker and fan switch back on.
Video: This video demonstrates the steps for replacing a radon fan, including electrical disconnection, fan removal, and installation of a new unit with couplers and wiring.
Coupler Installation Tip:
6x4" Couplers can be tricky to get on, especially in cold weather. To ease installation:
- Remove the lower metal band.
- Push the coupler all the way down on one side.
- Stretch the coupler on the opposite side until it is around the inlet and press down into place (do not try to line it up perfectly initially).
- Put the metal band back on and tighten.
- If still difficult, soak the coupler in warm water or remove metal bands and microwave for 30 seconds. Warming the coupler will make it more malleable and easier to install.
Operating Instructions
The RadonAway RP145c Radon Fan is designed for continuous operation, running 24 hours a day, 7 days a week, 365 days a year, to maintain consistent radon mitigation. Once installed and powered, the fan operates automatically.
Quiet Operation:
The RP145c is engineered for quiet performance. You should hear minimal noise during operation, primarily the sound of air moving through the exhaust system.
Manometer Monitoring:
The included U-tube manometer provides a visual indication of the system's operational status and pressure. After installation, check the manometer to ensure it shows a differential pressure, indicating the fan is actively drawing air from beneath your home's foundation. Refer to your system's specific guidelines for expected pressure readings.
Video: This video illustrates the manometer's function in a radon mitigation system and shows a digital radon detector displaying significantly reduced radon levels after the fan's installation.
Maintenance
The RadonAway RP145c fan is designed for durability and long-term performance. Regular maintenance is minimal but crucial for continued effectiveness.
Fan Lifespan and Replacement:
The average lifespan of a radon fan is typically 5 to 10 years. Excessive noise from the fan is a primary indicator that the unit may need to be replaced. If your fan becomes noticeably louder, it is recommended to inspect it for wear or malfunction.
Coupler Inspection:
If your fan has been installed for an extended period, the rubber flex couplers may also require inspection and potential replacement due to wear or degradation.
Manometer Check:
Periodically check the U-tube manometer to ensure it continues to display a stable pressure reading, confirming the system is operating correctly. Any significant change in the reading may indicate an issue with the fan or the piping system.
Troubleshooting
If you encounter issues with your RadonAway RP145c system, consider the following troubleshooting steps:
- Noisy Operation: If the fan becomes excessively noisy, it is likely a sign of internal wear and indicates that the fan unit needs to be replaced.
- No Manometer Reading: If the U-tube manometer shows no differential pressure, first check if the fan is powered on and if the circuit breaker has tripped. If power is confirmed, inspect the piping for any blockages or leaks that might prevent proper airflow.
- Reduced Radon Levels: If radon levels remain high after installation, ensure all cracks and openings in the foundation are properly sealed. Verify that the fan is operating continuously and that the manometer indicates proper suction.
- Electrical Issues: Ensure all electrical connections are secure and that the fan is receiving adequate power. If you are unsure about electrical wiring, consult a qualified electrician.
For persistent issues or concerns, it is recommended to contact a qualified radon mitigation professional.
Specifications
| Feature | Detail |
|---|---|
| Brand | RadonAway |
| Model Name | RP145c |
| Item Model Number | RP145 |
| Color | White |
| Electric Fan Design | Exhaust Fan |
| Power Source | Battery Powered (Note: Requires wiring to power source, not battery operated for primary function) |
| Wattage | 75 watts |
| Voltage | 120 Volts |
| Efficiency | Energy Efficient |
| Indoor/Outdoor Usage | Indoor, Outdoor |
| Installation Type | Fixed |
| Mounting Type | Wall Mount, Ceiling Mount |
| Control Method | Remote (Note: This refers to the fan's operational control, not necessarily a physical remote control unit) |
| Motor Type | Brushless |
| Item Weight | 9.15 pounds |
| Package Dimensions | 20 x 20 x 15 inches |
| Material | Rubber (for couplers) |
| UPC | 720825263793 |
Warranty
The RadonAway RP145c Radon Fan comes with a 5-Year No Cost To The Customer Warranty. This warranty covers defects in material and workmanship for a period of five (5) years from the date of purchase. Please retain your proof of purchase and refer to the warranty certificate for full terms and conditions.

Image: A sample Certificate of Warranty, indicating a 5-year no-cost warranty for Festa Radon products.
Support
For technical assistance, installation guidance, or to address any concerns regarding your radon mitigation system, it is recommended to:
- Contact Your Installer: If your system was professionally installed, please contact your radon system installer for support.
- Online Resources: Visit FestaRadonTech.com for additional information and resources.


