1. Introduction
This manual provides detailed instructions for the installation, operation, and maintenance of the VEMER VN170700 KEO-B Flush-Mounting Thermostat. This battery-operated thermostat is designed for precise temperature control in both heating and air conditioning systems. Its user-friendly design features a rotary knob for temperature adjustment and a selector switch for mode selection.
2. Product Overview
The VEMER KEO-B thermostat is a flush-mounted device featuring a simple interface for temperature management.
Key Features:
- Flush-mounted design, suitable for standard electrical boxes.
- Battery-powered (2 x 1.5V AAA batteries).
- Rotary knob for intuitive temperature setting.
- Selector switch for choosing between heating (winter) or air conditioning (summer) modes.
- Integrated system for limiting the set temperature range, useful for public installations.
- Digital input for external device connection, allowing a 3°C reduction in the set temperature.
- Supplied with a frame for adaptation to various switch boxes or panels.

Figure 1: Front view of the VEMER KEO-B thermostat, showing the rotary knob and mode selector.
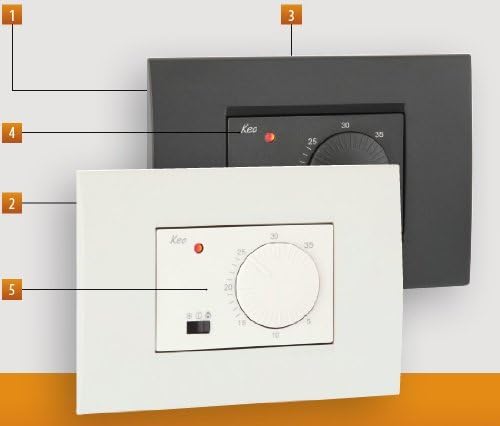
Figure 2: VEMER KEO-B thermostat in both white and anthracite grey color options, demonstrating the interchangeable frames.
3. Installation
3.1 Safety Precautions
- Ensure the main power supply to the heating/cooling system is turned off before beginning installation.
- Installation should be performed by a qualified electrician or technician.
- Adhere to all local electrical codes and regulations.
3.2 Mounting the Thermostat
- The KEO-B thermostat is designed for flush-mounting in a standard 3-module electrical box.
- Carefully remove the front cover and rotary knob from the thermostat unit.
- Connect the wiring as per the diagram provided in section 3.3.
- Secure the thermostat base into the electrical box using the provided screws.
- Attach the desired color frame (white or anthracite grey) to the thermostat base.
- Reattach the front cover and rotary knob.

Figure 3: Exploded view of the VEMER KEO-B thermostat, showing the main unit, front cover, and rotary knob for assembly.
3.3 Wiring Diagram
Refer to the diagram below for correct wiring connections. The thermostat operates on a battery supply and controls the heating/cooling system via a relay contact.
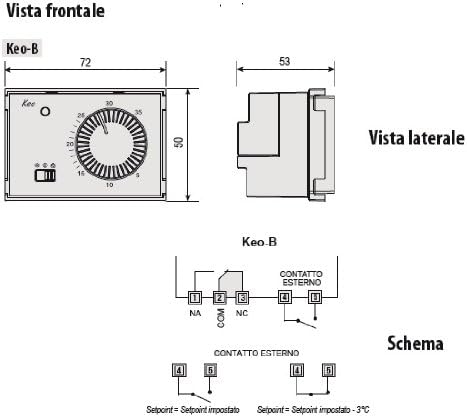
Figure 4: Wiring diagram for the KEO-B thermostat, indicating connections for the external contact and relay terminals (NA, NC, COM). Dimensions are also shown.
Wiring Terminals:
- 1 (NA): Normally Open contact
- 2 (COM): Common contact
- 3 (NC): Normally Closed contact
- 4, 5 (CONTATTO ESTERNO): External contact input
The external contact input (terminals 4 and 5) can be used to reduce the set temperature by 3°C when activated.
3.4 Battery Installation
The thermostat requires two 1.5V AAA batteries.
- Remove the front cover of the thermostat.
- Locate the battery compartment.
- Insert two AAA batteries, ensuring correct polarity (+/-).
- Replace the front cover.
4. Operating Instructions
4.1 Setting the Temperature
The desired temperature is set using the large rotary knob on the front of the thermostat. Rotate the knob clockwise to increase the temperature and counter-clockwise to decrease it. The current setpoint is indicated by the position of the knob.
4.2 Selecting Operating Mode
A selector switch, typically located below the rotary knob, allows you to choose the operating mode:
- Heating Mode (Winter): Activates the heating system when the ambient temperature falls below the setpoint.
- Air Conditioning Mode (Summer): Activates the cooling system when the ambient temperature rises above the setpoint.
- Off Mode: Disables both heating and cooling.
4.3 Limited Set Value System
The thermostat includes a patented system to limit the adjustable temperature range. This feature is particularly useful in public or commercial settings to prevent unauthorized persons from setting extreme temperatures. Consult the installation section or a qualified technician for details on how to configure this limit.
4.4 Digital Input Function
The digital input (terminals 4 and 5) allows connection of an external device (e.g., a timer or remote switch). When this input is activated, the thermostat will automatically reduce the set temperature by 3°C. This can be used for energy saving during specific periods or for remote control.
5. Maintenance
5.1 Battery Replacement
The thermostat is powered by two 1.5V AAA batteries. When the batteries are low, an indicator (if present) may illuminate or the thermostat's operation may become erratic.
- Carefully remove the front cover of the thermostat.
- Locate the battery compartment.
- Insert new 1.5V AAA batteries, ensuring correct polarity.
- Replace the front cover.
Dispose of used batteries according to local regulations.
5.2 Cleaning
Clean the thermostat's exterior with a soft, dry cloth. Do not use abrasive cleaners, solvents, or excessive moisture, as these can damage the device.
6. Troubleshooting
If you encounter issues with your VEMER KEO-B thermostat, refer to the following common problems and solutions:
| Problem | Possible Cause | Solution |
|---|---|---|
| Thermostat not responding / No display. | Dead or incorrectly installed batteries. | Replace batteries with new 1.5V AAA batteries, ensuring correct polarity. |
| Heating/Cooling system not turning on/off. | Incorrect mode selected (Heating/Cooling/Off). Wiring issue. Temperature setpoint not reached. | Verify the selector switch is in the correct mode. Check wiring connections (refer to Section 3.3). Adjust the set temperature to be above/below the current ambient temperature as required. |
| LED indicator not working. | Possible internal fault or specific LED function. | While the thermostat may still function, if the LED is critical, contact VEMER support. Ensure batteries are fresh. |
| Temperature control is inaccurate. | Thermostat location. Drafts or direct sunlight affecting the sensor. | Ensure the thermostat is not exposed to direct sunlight, drafts, or heat sources that could affect its temperature readings. |
If the problem persists after attempting these solutions, please contact VEMER customer support.
7. Specifications
| Feature | Detail |
|---|---|
| Brand | VEMER |
| Model Name | VN170700 (KEO-B) |
| Controller Type | Knob |
| Color | White / Grey (Anthracite) |
| Special Features | Limited Set Value System, Sensor Integration for Temperature Adjustment |
| Specific Uses | Heating, Air Conditioning |
| Temperature Control Type | Manual |
| Power Source | Battery Powered (2 x 1.5V AAA batteries required) |
| Voltage | 1.5 Volts (per battery) |
| Display Type | LED or LCD (implied by product image, no explicit LCD) |
| Control Method | Knob, Switch |
| Mounting Type | Flush Mount (3-module housing) |
| Item Weight | 0.11 Kilograms (approx. 3.87 ounces) |
| Product Dimensions | 2.76 x 1.97 x 1.97 inches (approx. 70 x 50 x 50 mm) |
| Manufacturer | Vemer SpA |
| Made In | Italy |
8. Warranty and Support
8.1 Customer Support
For technical assistance, troubleshooting beyond this manual, or warranty inquiries, please contact VEMER customer support. Refer to the official VEMER website or product packaging for the most current contact information.
8.2 Warranty Information
Specific warranty terms and conditions are provided by the manufacturer, VEMER SpA. Please retain your proof of purchase for warranty claims.


