
Introduction
This manual provides comprehensive instructions for the Ideal Standard Built-in Shower Mixer Renovation Kit 1, model A963801NU. This kit is specifically designed to facilitate the replacement and upgrade of existing concealed single-lever shower mixers, ensuring compatibility with modern cartridge systems and extending the lifespan of your shower installation.
The A963801NU renovation kit is an original Ideal Standard replacement part, featuring an integrated housing and a 47mm ceramic cartridge. It allows for the conversion of older built-in single-lever mixers to accommodate current cartridge technology, providing reliable performance and water-saving capabilities.
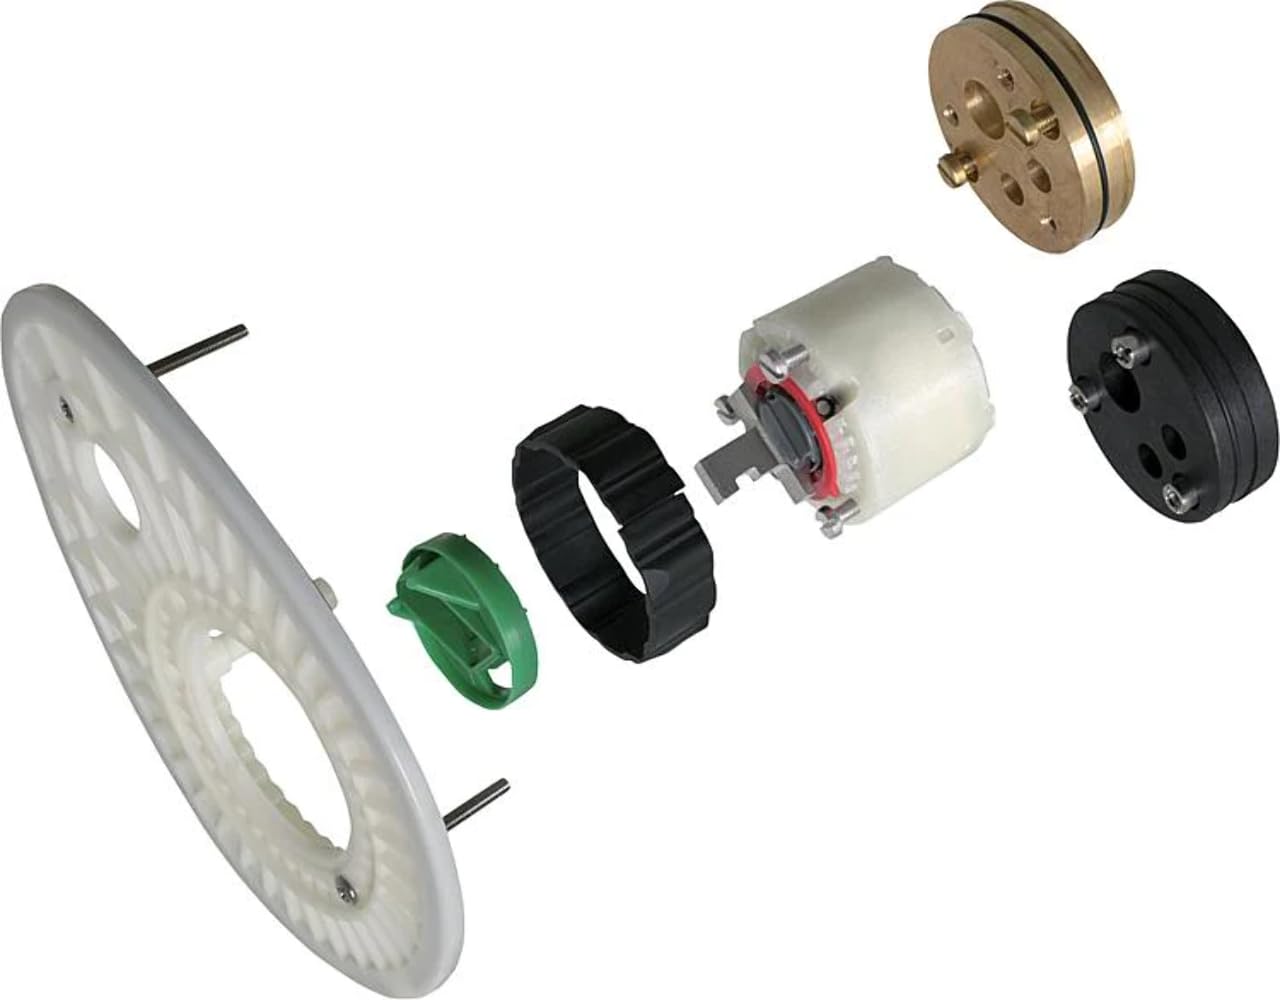
Image: Components of the Ideal Standard Built-in Shower Mixer Renovation Kit 1. This image displays the various parts included in the kit, such as the integrated housing and the 47mm cartridge, essential for replacing an existing shower mixer mechanism.
Setup and Installation
Installation of the Ideal Standard A963801NU renovation kit requires basic plumbing knowledge. If you are unsure, it is recommended to consult a qualified plumber.
- Safety First: Before beginning any work, ensure the main water supply to your bathroom is completely shut off. Open a tap to relieve any residual pressure in the pipes.
- Access the Mixer: Carefully remove the existing shower mixer handle, trim plate, and any other visible components to expose the built-in mixer body and cartridge.
- Remove Old Cartridge: Identify and carefully remove the old cartridge and its housing from the mixer body. Note the orientation and any securing clips or screws.
- Prepare New Kit: Unpack the A963801NU renovation kit. It includes a new integrated housing and a 47mm ceramic cartridge. Ensure all seals and O-rings are correctly seated on the new components.
- Install New Kit: Insert the new integrated housing and 47mm cartridge into the built-in mixer body. Ensure it is correctly aligned and securely fastened according to the original mixer's design.
- Reassemble: Reattach the trim plate, handle, and any other removed components. Ensure they fit snugly and operate smoothly.
- Test for Leaks: Slowly turn the main water supply back on. Check for any leaks around the mixer and connections. Operate the shower mixer to ensure proper water flow and temperature control.

Image: An example of a shower system with a built-in mixer. This illustrates the typical environment where the renovation kit would be installed, showing the aesthetic integration of the mixer components.
Operating Instructions
Once the A963801NU renovation kit is successfully installed, your built-in shower mixer will operate as a standard single-lever mixer. The single lever controls both water flow and temperature.
- Water Flow: Move the lever up to increase water flow and down to decrease or shut off the water.
- Temperature Control: Move the lever left for hot water and right for cold water. Adjust the lever position to achieve your desired water temperature.
- Water Saving Feature: The integrated aerator and cartridge design contribute to water efficiency.
Maintenance
Proper maintenance will ensure the longevity and optimal performance of your Ideal Standard shower mixer.
- Cleaning: Clean the visible parts of the mixer regularly with a soft cloth and mild soap or a non-abrasive bathroom cleaner. Avoid harsh chemicals, abrasive sponges, or cleaners containing acids, alcohol, or ammonia, as these can damage the finish.
- Leak Checks: Periodically inspect the mixer for any signs of leaks. Address any leaks promptly to prevent water damage.
- Cartridge Longevity: The 47mm ceramic cartridge is designed for durability. If you experience persistent dripping or difficulty controlling water flow/temperature, the cartridge may eventually need replacement. The A963801NU kit itself serves as a replacement for the internal mechanism.
Troubleshooting
Here are some common issues and their potential solutions:
| Problem | Possible Cause | Solution |
|---|---|---|
| No water flow or low pressure | Main water supply off, clogged aerator, blocked pipes, faulty cartridge. | Check main water supply. Clean or replace aerator. Inspect pipes for blockages. Consider cartridge replacement if other solutions fail. |
| Water temperature issues (too hot/cold, inconsistent) | Incorrect cartridge installation, faulty cartridge, issues with water heater. | Verify cartridge is installed correctly. If problem persists, the cartridge may be faulty and require replacement. Check water heater settings. |
| Leaking from handle or spout | Worn seals/O-rings, loose connections, faulty cartridge. | Tighten connections. Inspect and replace worn seals/O-rings. If leaking continues, the cartridge may need replacement. |
If these troubleshooting steps do not resolve the issue, please contact Ideal Standard customer support or a qualified plumber.
Specifications
- Model Number: A963801NU
- Brand: Ideal Standard
- Product Dimensions (L x W x H): 17 x 14.1 x 7.5 cm
- Item Weight: 650 Grams
- Material: Brass (mixer body), Stainless Steel (handle material)
- Cartridge Size: 47mm
- Number of Handles: 1 (Single-lever)
- Installation Type: Wall Mount (for built-in mixers)
- Special Features: Water saving, integrated aerator
- Recommended Use: Bathroom (Shower)
Warranty Information
For detailed warranty terms and conditions applicable to the Ideal Standard Built-in Shower Mixer Renovation Kit 1 (A963801NU), please refer to the official Ideal Standard website or the warranty documentation provided with your purchase. Warranty coverage typically includes manufacturing defects and material faults under normal use.
Support
Should you require technical assistance, have questions about installation, or need to order spare parts, please contact Ideal Standard customer support.
- Official Website: Visit the Ideal Standard official website for product information, FAQs, and contact details.
- Customer Service: Refer to the contact section on the Ideal Standard website for phone numbers or email support in your region.
When contacting support, please have your product model number (A963801NU) and purchase details readily available.


