
Product Overview
This manual provides instructions for the MICTUNING LED Light Bar Wiring Harness (2 Lead), Model MIC-B1001. This kit is designed to power LED light bars up to 180W, featuring a 40A relay, inline blade fuse, and an ON-Off switch for convenient control. It is suitable for various off-road LED lighting applications.

Image: Illustration of the flexible twisted copper wire, thermoplastic insulation, and premium durable tube construction of the harness, designed for up to 180W load capacity.
Safety Precautions
- Professional installation is recommended to ensure correct and safe wiring.
- Ensure the total power consumption of connected lights does not exceed 180W to prevent overheating and potential damage to the harness.
- Wrap all exposed wires with electrical tape or use heat shrink tubing to prevent short circuits and protect against environmental elements.
- Always disconnect the vehicle's battery before performing any installation, maintenance, or troubleshooting.
Package Contents
The MICTUNING LED Light Bar Wiring Harness kit includes the following components:
- 1x Wiring Harness (10ft length) with integrated 40A Relay and Inline Blade Fuse
- 1x ON-Off Button Switch with indicator lights
- Necessary connectors and additional blade fuses

Image: Overview of the MICTUNING LED Light Bar Wiring Harness Kit, showing the coiled harness, ON-Off switch, 40A relay, inline blade fuse, and various connectors.

Inline Blade Fuse

40A Safeguard Relay

ON/OFF Switch
Setup and Installation
The wiring harness is designed for straightforward installation. The 10-foot length provides flexibility for placement within your vehicle.
- Connect to Battery: Connect the red wire from the fuse holder directly to the positive (+) terminal of your vehicle's battery. Connect the black wire from the relay to the negative (-) terminal of your vehicle's battery.
- Connect to Light Bar(s): Connect the white and black output wires from the relay to your LED light bar(s). Ensure the red wire corresponds to the positive terminal of the light bar and the black wire to the negative. This harness supports two light outputs.
- Connect Switch Power: Connect the red and black wires of the ON-Off switch to a suitable 12V power source in your vehicle's electrical system. This powers the switch's indicator lights and control circuit.
- Test Functionality: Once all connections are secure, turn on the ON-Off switch to test the connected LED light bar(s).
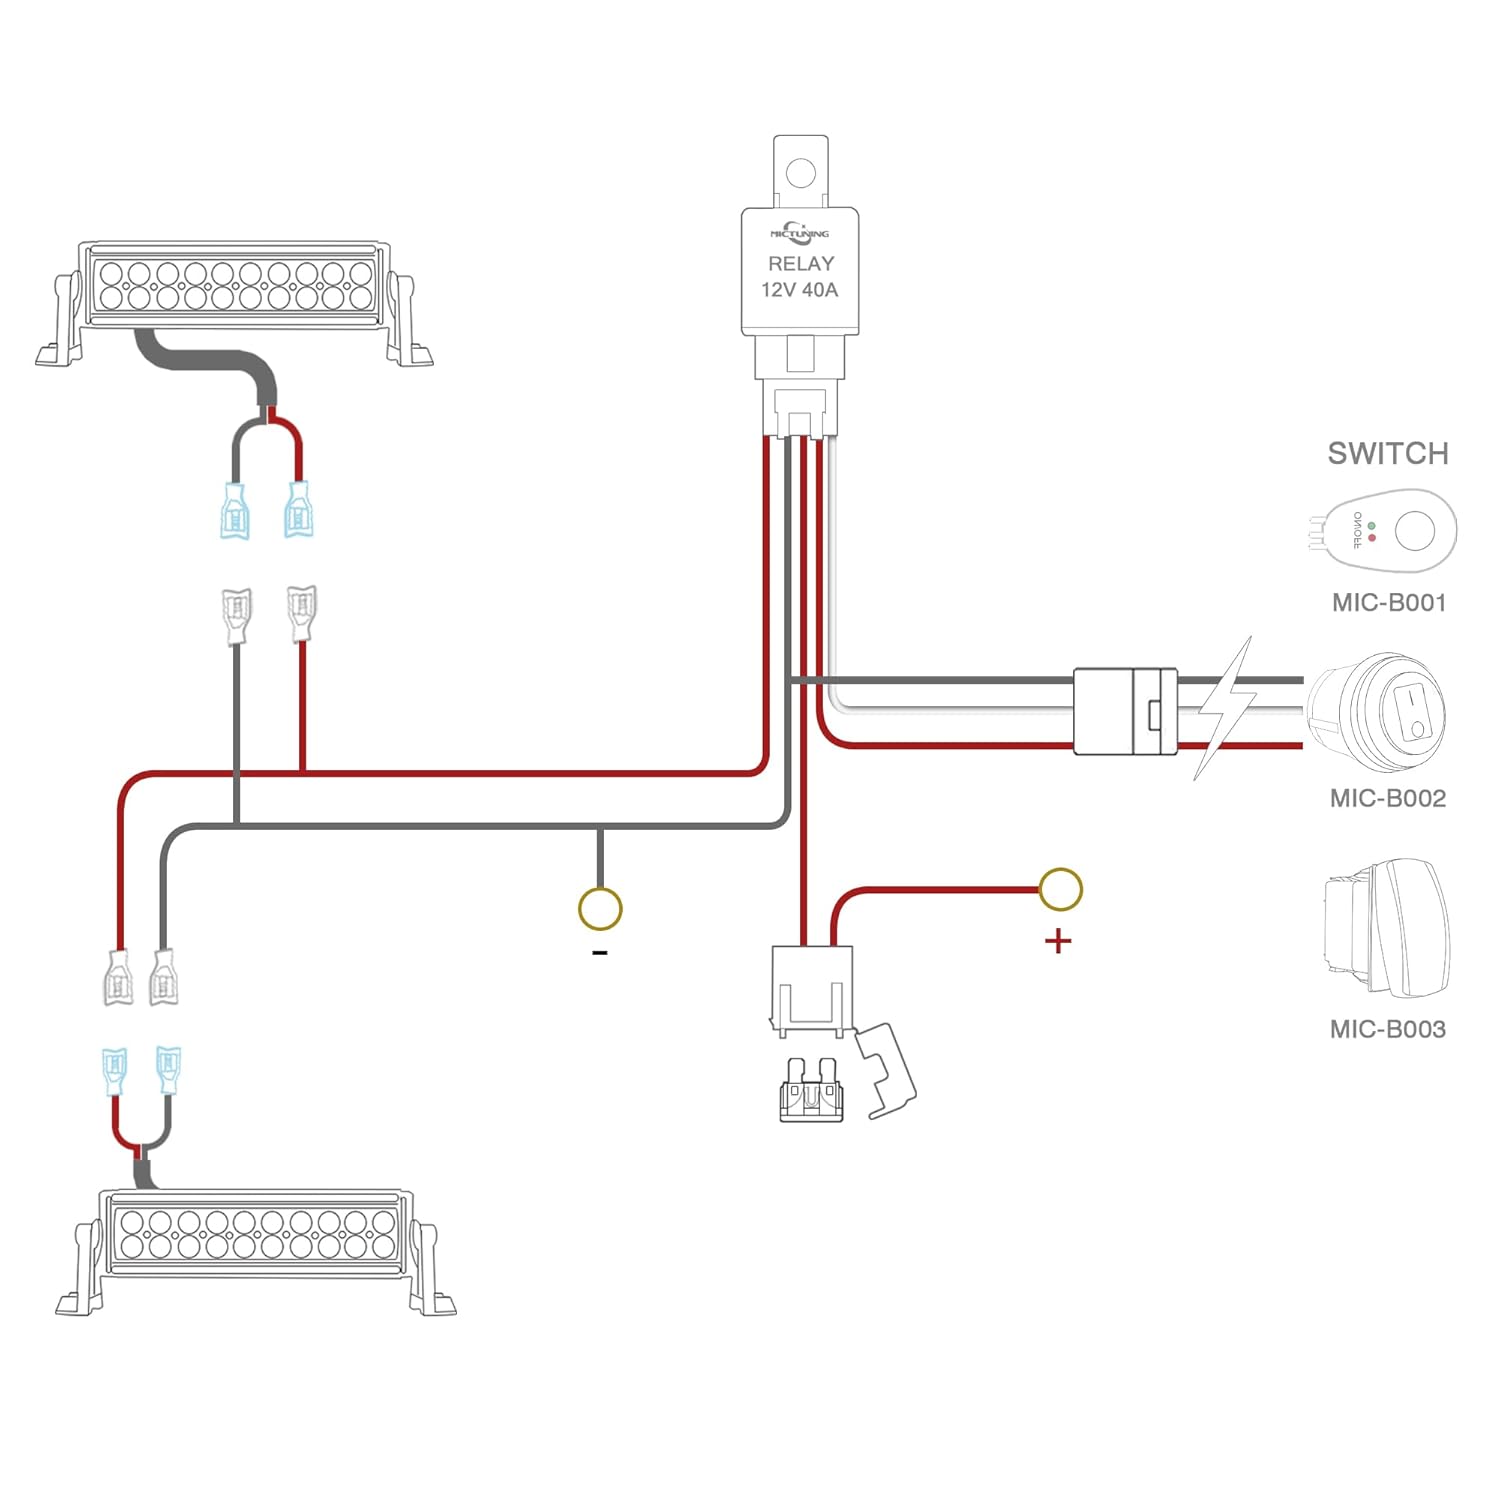
Image: Detailed wiring diagram illustrating connections from the battery to the relay, switch, and two LED light bars, showing positive and negative terminals.
Video: An official MICTUNING video demonstrating the wiring harness components and basic connection steps for installation.
Operating Instructions
Once installed, operate the connected LED light bars using the ON-Off button switch.
- Turn ON: Press the button to turn the lights ON. The switch will illuminate with a green indicator light.
- Turn OFF: Press the button again to turn the lights OFF. The switch will show a red indicator light.

Image: Close-up of the ON-Off button switch, showing the red (off) and green (on) indicator lights for clear power status.
Maintenance
To ensure longevity and safe operation of your wiring harness, follow these maintenance guidelines:
- Regular Inspection: Periodically inspect all electrical connections for tightness and signs of corrosion. Tighten any loose connections and clean any corrosion.
- Wire Insulation: Ensure all exposed wiring is properly insulated with electrical tape or heat shrink tubing to prevent short circuits and protect against moisture and abrasion.
- Cleanliness: Keep the relay and fuse box free from excessive dirt, dust, and moisture.
- Fuse Replacement: If a fuse blows, replace it only with a new fuse of the exact same amperage rating (e.g., 7.5A or 10A, as originally supplied). Using a fuse with a higher rating can lead to electrical damage or fire.
Troubleshooting
Lights Not Turning On
- Check Power Connections: Ensure the red and black wires from the harness are securely connected to the positive and negative terminals of the battery, respectively.
- Inspect Fuse: Check the inline blade fuse. If the filament is broken, replace it with a new fuse of the same amperage.
- Verify Light Bar Connections: Confirm that the light bar's positive and negative wires are correctly connected to the harness output.
- Test Switch Functionality: Ensure the ON-Off switch is functioning correctly and receiving power. The indicator lights should respond.
Lights Flickering or Dim
- Check for Loose Connections: Tighten any loose connections throughout the harness, especially at the battery and light bar terminals.
- Inspect for Corrosion: Clean any corrosion on battery terminals or wire connectors, as this can impede current flow.
- Verify Power Draw: Ensure the total wattage of your connected lights does not exceed the harness's 180W capacity. Overloading can cause dimming or damage.
Harness Overheating
- Reduce Load: Immediately disconnect some lights if the harness is overheating. The total wattage must not exceed 180W.
- Check for Short Circuits: Inspect all wiring for any exposed sections or damaged insulation that could be causing a short circuit. Insulate any damaged areas immediately.
Specifications
| Feature | Detail |
|---|---|
| Brand | MICTUNING |
| Model | MIC-B1001 |
| Harness Length | 10 feet (approx. 3 meters) |
| Max Wattage Load | 180W |
| Max Amperage | 16 Amp |
| Relay | 40A Power Relay |
| Fuse | Inline Blade Fuse (e.g., 7.5A, 10A) |
| Output Connections | 2 Leads for LED lights |
| Wire Material | Flexible Strand Copper Wire |
| Insulation | Thermoplastic Insulation (VW-1 Rated Cord, Insulates Up to 105°C) |
| Item Dimensions (L x W x H) | 12 x 2 x 2 inches |
| Item Weight | 7.2 ounces |

Image: A table comparing specifications of different MICTUNING harness models, highlighting the 01-03 Series (MIC-B1001) with its 10ft length, 180W max wattage, and 16 amp max current.
Warranty Information
MICTUNING provides a 1-year warranty for genuine MICTUNING brand products. This warranty covers replacement of the entire item or its accessories upon proof of a manufacturing defect. Please retain your purchase receipt or proof of purchase for all warranty claims.
Customer Support
For any questions, technical assistance, or warranty claims regarding your MICTUNING LED Light Bar Wiring Harness, please contact MICTUNING customer support. Refer to the official MICTUNING website or your purchase documentation for the most current contact details.