Introduction
This manual provides detailed instructions for the setup, operation, and maintenance of your AcuRite 13020 Intelli-Time Projection Alarm Clock. This device offers a clear, illuminated display with indoor and outdoor temperature readings, an Intelli-Time clock, calendar, moon phase, and programmable alarm settings. It also includes a USB charging port for compatible devices.

Image: The AcuRite 13020 Intelli-Time Projection Alarm Clock, showing its main unit with a projected time on the wall and a smartphone connected via USB for charging.
Key Features
- Projects time or temperature (indoor or outdoor) onto your ceiling or wall.
- Intelli-Time Clock automatically adjusts for Daylight Saving Time.
- Programmable alarm with snooze function for daily, weekday, or weekend use.
- Integrated USB power port for charging compatible mobile devices (maximum output 1000mA / 1A).
- AC adapter-powered with optional battery backup for power loss protection.
- Illuminated color display showing indoor temperature, outdoor temperature, time, date, and moon phase.
- Wireless outdoor sensor with a range of up to 330 feet (100 meters).
Package Contents
- AcuRite 13020 Projection Alarm Clock Unit
- Wireless Temperature Sensor
- Power Adapter
- Instruction Manual (this document)
Setup Instructions
1. Powering the Main Unit
- Connect the included 5V power adapter to the main alarm clock unit and then plug it into a standard electrical outlet. The display will illuminate.
- For optional battery backup, open the battery compartment on the back of the unit and insert 3 AA alkaline batteries (not included). This ensures time and settings are retained during a power outage.
2. Installing Batteries in the Wireless Sensor
- Remove the battery compartment cover from the wireless temperature sensor.
- Insert 2 AA alkaline or lithium batteries (not included) into the sensor, observing the correct polarity (+/-). Lithium batteries are recommended for temperatures below -4°F (-20°C).
- Replace the battery compartment cover.

Image: The wireless outdoor temperature sensor, designed to be weather-resistant and easily mounted.
3. Placing the Wireless Sensor
For accurate temperature readings, place the wireless sensor outdoors in a location that is:
- Out of direct sunlight to avoid artificially high temperature readings.
- Protected from direct precipitation.
- Within 330 feet (100 meters) of the main alarm clock unit.
- Away from large metallic objects or thick walls that could interfere with the wireless signal.
The sensor has an integrated hanger for easy mounting.
4. Intelli-Time Technology
The AcuRite 13020 features Intelli-Time technology, which automatically sets the time and date upon initial power-up. It also automatically adjusts for Daylight Saving Time. Ensure your time zone is correctly set if needed (refer to Operating Instructions for time zone adjustment).
Operating Instructions
Display Functions
The illuminated color display shows the following information:
- Indoor Temperature: Displayed in the upper left.
- Outdoor Temperature: Displayed in the upper right, received from the wireless sensor.
- Current Time: Large digits in the center.
- Date and Day of Week: Below the current time.
- Moon Phase: Icon displayed in the lower left.
- Alarm Status: Indicates if the alarm is ON/OFF and the set alarm time.
Setting Time and Date Manually (if needed)
While Intelli-Time sets the clock automatically, you can manually adjust settings:
- Press and hold the SET button (often represented by a gear icon) to enter setup mode.
- Use the UP and DOWN arrows to adjust the flashing value.
- Press SET again to confirm and move to the next setting (e.g., Time Zone, Daylight Saving Time ON/OFF, Hour, Minute, Year, Month, Day).
- Exit setup mode by pressing SET repeatedly until the display returns to normal, or wait for 10 seconds of inactivity.
Projection Feature
The clock can project the time or temperature onto a wall or ceiling.

Image: The AcuRite 13020 alarm clock positioned on a bedside table, projecting the current time in red digits onto the ceiling of a bedroom.
- Activating Projection: Press the PROJECTION button (often labeled with a light icon or "180°").
- Changing Projected Information: Repeatedly press the PROJECTION button to cycle between Time, Indoor Temperature, Outdoor Temperature, or OFF.
- Rotating Projection: Use the 180° ROTATION button or dial (if present) to adjust the orientation of the projected image.
Alarm Settings
- Setting Alarm Time: Press and hold the ALARM SET button (often a bell icon). Use the UP and DOWN arrows to adjust the hour and minute. Press ALARM SET to confirm each step.
- Alarm Mode: Some models allow setting the alarm for Daily, Weekdays Only, or Weekends Only. Use the ALARM MODE button to cycle through options.
- Activating/Deactivating Alarm: Press the ALARM ON/OFF button to toggle the alarm. An alarm icon will appear on the display when active.
- Snooze Function: When the alarm sounds, press the large SNOOZE button (usually on top) to temporarily silence it. The alarm will sound again after approximately 9 minutes.
- Stopping Alarm: To stop the alarm for the day, press any button other than SNOOZE when it is sounding.
USB Charging Port
The integrated USB port on the back of the unit provides convenient charging for compatible smartphones and other USB-powered devices. Connect your device's USB charging cable to the port. The output is 1000mA (1A).
Display Brightness
Adjust the display brightness using the DIMMER button (often a sun icon) to cycle through different brightness levels.
Maintenance
- Cleaning: Clean the unit and sensor with a soft, damp cloth. Do not use abrasive cleaners or solvents.
- Battery Replacement: Replace batteries in the wireless sensor annually or when the low battery indicator appears on the main unit. Replace backup batteries in the main unit every 1-2 years.
- Storage: If storing the unit for an extended period, remove all batteries.
Troubleshooting
| Problem | Possible Solution |
|---|---|
| No display on main unit. | Ensure the power adapter is securely plugged into both the unit and a working electrical outlet. Check if backup batteries are installed correctly. |
| Outdoor temperature not displayed or showing dashes. |
|
| Projection is dim or unclear. | Ensure the room is sufficiently dark. Adjust the focus of the projector lens (if available) and the distance to the projection surface. |
| Projected image is upside down or sideways. | Use the 180° ROTATION button or dial to adjust the orientation of the projected image. You may also need to physically rotate the clock unit. |
| Alarm does not sound. | Verify that the alarm is set to ON (alarm icon visible on display) and the alarm time is correct. |
| USB charging not working. | Ensure the main unit is powered by the AC adapter. Check the USB cable and device compatibility. The port provides 1A output. |
Specifications
| Feature | Detail |
|---|---|
| Model Number | 13020 |
| Display Type | Digital, Color LCD |
| Power Source (Main Unit) | 5V AC Adapter (included), 3 x AA Alkaline Batteries (optional backup, not included) |
| Power Source (Wireless Sensor) | 2 x AA Alkaline or Lithium Batteries (not included) |
| Wireless Range | Up to 330 feet (100 meters) |
| USB Charging Output | 1000mA (1A) |
| Product Dimensions | 5"W x 5.4"H (Main Unit) |
| Item Weight | 16 ounces (Main Unit) |
| Material | Plastic |
| Special Features | Alarm, Snooze, Temperature Display (Indoor/Outdoor), Projection, USB Charging |
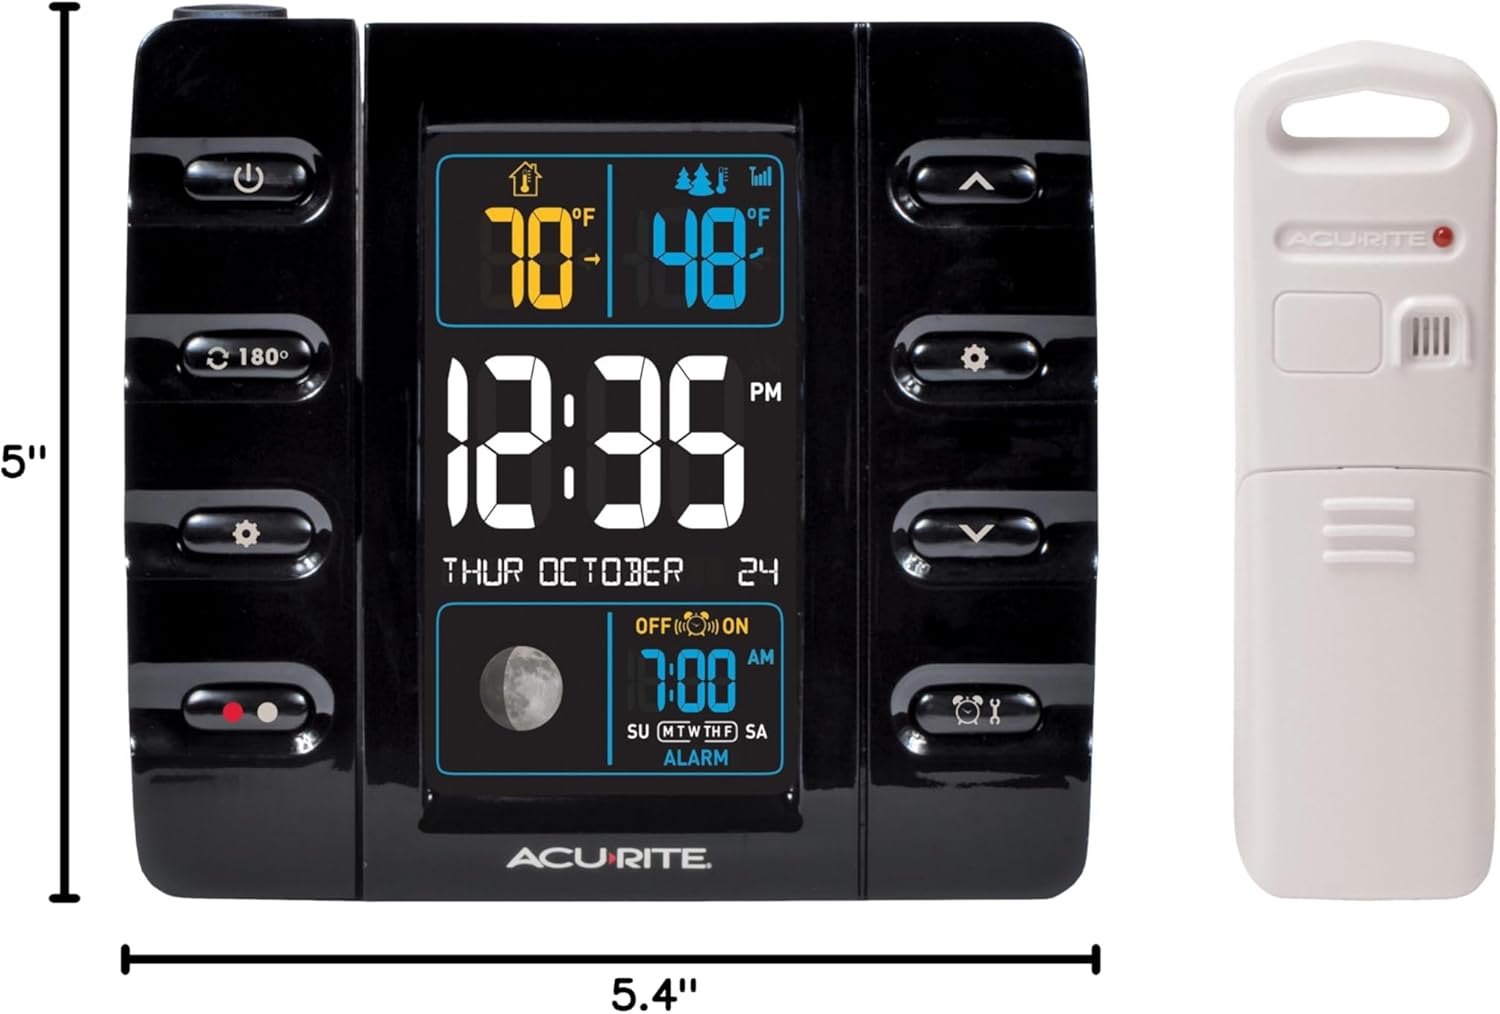
Image: Diagram showing the dimensions of the AcuRite 13020 main unit (5"W x 5.4"H) and its accompanying wireless sensor.
Warranty & Support
Limited Warranty
The AcuRite 13020 Intelli-Time Projection Alarm Clock is covered by a one-year limited warranty from the date of purchase. This warranty covers defects in material and workmanship. For full warranty details and to register your product, please visit the official AcuRite website or contact customer support.
Customer Support
For technical assistance, troubleshooting, or warranty claims, please contact AcuRite Customer Support. Contact information can typically be found on the AcuRite website or on the product packaging.
Product Videos
AcuRite 13020 Display Overview
Video: A brief overview demonstrating the dynamic display of the AcuRite 13020 alarm clock, showing changes in indoor and outdoor temperature readings and time.


