
Introduction
This manual provides detailed instructions for the setup, operation, and maintenance of your Tecsun PL-600 AM/FM/LW SSB Shortwave Radio. The PL-600 is a PLL Synthesized world band receiver featuring dual conversion technology, designed for optimal reception across various frequency bands. Please read this manual thoroughly to ensure proper use and to maximize your listening experience.

Figure 1: Front view of the Tecsun PL-600 radio with its telescopic antenna extended.
Package Contents
Upon unpacking, please verify that all items listed below are included:
- Tecsun PL-600 Radio Unit
- AC Adapter (110V)
- User Manual
- Rechargeable Batteries (4 x AA, 1000 mAh Ni-MH)
- Battery Charger (DC-06D specific automatic charger)
- Stereo Headphones
- External Wire Antenna (AN03 type)
- Protective Pouch

Figure 2: The Tecsun PL-600 radio being placed into its protective pouch.
Setup
1. Battery Installation
The Tecsun PL-600 operates on 4 AA batteries. For rechargeable battery use, Ni-MH batteries are recommended.
- Locate the battery compartment on the back of the radio.
- Slide the battery compartment cover downwards and lift it off.
- Insert 4 AA batteries, ensuring correct polarity (+/-) as indicated inside the compartment.
- Replace the battery compartment cover, sliding it upwards until it clicks into place.

Figure 3: Rear view of the radio with the battery compartment open for battery insertion.
Caution: Do not mix new and old batteries. Do not mix alkaline and rechargeable batteries.
2. Powering the Radio
- Battery Power: Ensure batteries are correctly installed. Press the POWER button to turn the radio on/off.
- AC Power: Connect the included 110V AC adapter to the DC 6V input jack on the side of the radio. Plug the adapter into a wall outlet. The radio can operate directly from AC power and also charge rechargeable batteries when connected.
3. Connecting External Antenna
For improved Shortwave (SW) reception, connect the AN03 external wire antenna to the FM & SW ANTENNA jack on the side of the radio. Extend the wire antenna fully and position it for best reception.

Figure 4: Side panel of the radio with various input/output jacks and switches.
Operating Instructions
1. Basic Controls
- POWER / SLEEP: Turns the radio on/off. Also activates the sleep timer function.
- VOLUME +/-: Adjusts the audio output level.
- TUNING Knob: Used for manual frequency adjustment.
- LIGHT / SNOOZE: Illuminates the LCD display. Also functions as a snooze button for alarms.
- LOCK: Locks all buttons to prevent accidental operation.
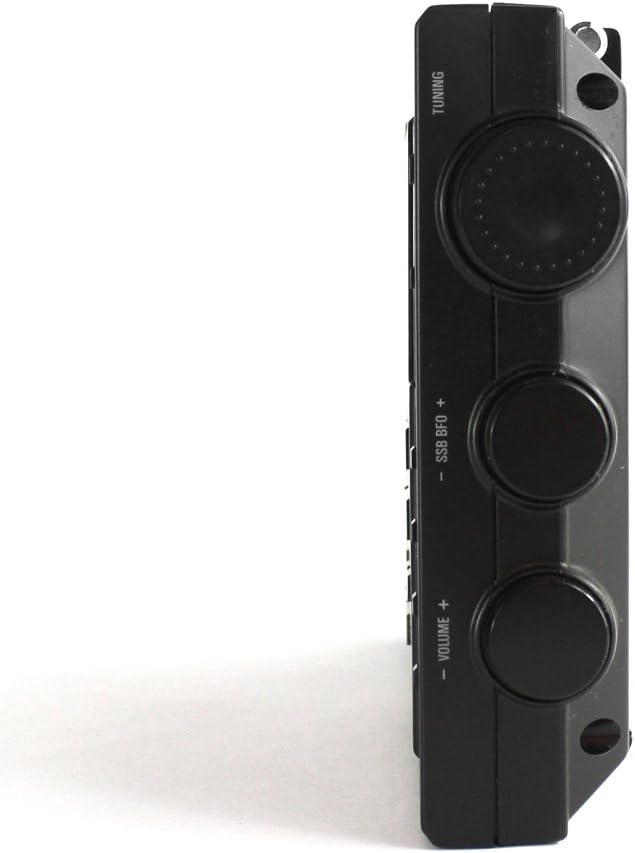
Figure 5: Top panel of the radio with tuning and volume controls.
2. Tuning Methods
The PL-600 offers several ways to find your desired radio stations:
- Direct Tuning: Enter the frequency directly using the numeric keypad. Press DIRECT KEY IN, then the frequency digits, and finally ENTER.
- Manual Tuning: Use the TUNING knob on the side of the radio to incrementally change the frequency.
- Scan Tuning (ATS - Auto Tuning Storage): Press the SCAN button to automatically scan and store all listenable stations within the current band.
- Preset Tuning: Recall a stored station by navigating through memory pages and addresses.
3. Band Selection
Press the FM/MW/LW/SW button repeatedly to cycle through the available frequency bands:
- FM: Frequency Modulation (87-108 MHz)
- AM (MW): Amplitude Modulation / Medium Wave (522-1620 KHz)
- LW: Long Wave (100-519 KHz)
- SW: Shortwave (1711-29999 KHz)
4. Single Side Band (SSB) Reception
The PL-600 supports SSB reception, allowing you to listen to amateur radio and utility transmissions.
- Select a Shortwave (SW) frequency.
- Press the SSB button to activate SSB mode.
- Use the SSB BFO +/- knob (Beat Frequency Oscillator) to fine-tune the audio for clear voice reception.
5. Memory Functions
The radio can store up to 600 stations.
- Storing a Station: Tune to the desired frequency. Press MEMORY, then select a memory page/address using the numeric keypad or tuning knob, and press ENTER to save.
- Recalling a Station: Press MEMORY, then enter the memory page/address, and press ENTER.
6. Alarm Clock and Sleep Timer
- Setting Alarm: Press the TIME button, then TIMER A or TIMER B. Use the numeric keypad to set the alarm time and frequency.
- Sleep Timer: When the radio is on, press POWER / SLEEP repeatedly to cycle through sleep timer durations (e.g., 120, 90, 60, 30, 15, 5 minutes). The radio will automatically turn off after the selected time.
7. Antenna Gain and Tone Control
On the side panel (refer to Figure 4), you will find switches for:
- ANT. GAIN: Adjusts antenna sensitivity. Use DX for distant stations, NORMAL for standard reception, and LOCAL for strong local signals to prevent overload.
- TONE: Switches between TREBLE and BASS to adjust audio output to your preference.
Maintenance
1. Battery Charging
The PL-600 features a built-in automatic battery charger for Ni-MH rechargeable batteries.
- Ensure rechargeable batteries are installed.
- Connect the AC adapter to the radio and a power outlet.
- Press the CHARGE button (if available, or refer to the LCD indicator for charging status). The LCD will display charging status.
- The charger has dual protection and automatic width control of constant current charging circuit. It detects peak voltage and sets charging time based on battery capacity.
Note: For optimal battery life and faster charging, an external dedicated Ni-MH battery charger is often recommended.
2. Cleaning
Wipe the radio with a soft, dry cloth. Do not use abrasive cleaners or solvents, as they may damage the finish.
3. Storage
If storing the radio for an extended period, remove the batteries to prevent leakage. Store in a cool, dry place away from direct sunlight and extreme temperatures.
Troubleshooting
If you encounter issues with your Tecsun PL-600, please refer to the following common solutions:
- No Power:
- Check battery installation and ensure correct polarity.
- Replace depleted batteries with fresh ones.
- If using AC adapter, ensure it is securely plugged into both the radio and the wall outlet.
- Poor Reception (AM/SW):
- Extend the telescopic antenna fully.
- Connect the external wire antenna (AN03) for improved Shortwave reception.
- Adjust the ANT. GAIN switch (DX/NORMAL/LOCAL) on the side of the radio.
- Relocate the radio to an open area, away from electronic devices that may cause interference.
- For Shortwave, reception quality varies significantly with time of day and atmospheric conditions. Try listening at different times.
- Poor Reception (FM):
- Extend and rotate the telescopic antenna for best signal.
- Distorted Sound:
- Adjust the VOLUME.
- Adjust the TONE switch (TREBLE/BASS) to your preference.
- If using SSB, fine-tune with the SSB BFO +/- knob.
- Difficulty with Controls:
- Ensure the LOCK switch is not engaged.
- Refer to the "Operating Instructions" section for specific button functions.
Specifications
| Feature | Detail |
|---|---|
| Model Number | PL-600 |
| Product Dimensions | 7.5 x 1.25 x 4.75 inches (188 x 31 x 116 mm) |
| Item Weight | 15.7 ounces |
| Radio Bands Supported | AM, FM, SW, LW, SSB |
| FM Frequency Range | 87-108 MHz |
| AM (MW) Frequency Range | 522-1620 KHz |
| LW Frequency Range | 100-519 KHz |
| SW Frequency Range | 1711-29999 KHz |
| Memory Stations | 600 |
| Power Source | 4 x AA batteries (rechargeable Ni-MH included), Corded Electric (AC Adapter) |
| Connectivity Technology | DC Input, External Antenna Jack, Headphone Jack |
| Special Features | PLL Synthesized, Dual Conversion, Orange back-lit LCD, Dual Alarm Clock, 1-120 minutes Sleep Timer, Built-in Automatic Battery Charger, Antenna Gain Control, Tone Control (Treble/Bass) |

Figure 6: Dimensions of the Tecsun PL-600 radio.
Warranty and Support
For warranty information or technical support, please refer to the documentation provided with your purchase or contact Tecsun customer service. Keep your purchase receipt as proof of purchase.
You may also visit the official Tecsun website for further assistance and updated information.


