
1. Introduction
This manual provides essential information for the safe and efficient operation, maintenance, and troubleshooting of your Powermatic PM2800B 18-Inch Floor Drill Press. Please read this manual thoroughly before assembly or operation to ensure proper use and to prevent injury or damage to the machine. The Powermatic PM2800B is designed for precision drilling in various materials, offering variable speed control and robust construction.
2. Safety Information
Always prioritize safety when operating power tools. Failure to follow safety guidelines can result in serious injury.
- Read the Entire Manual: Understand all instructions and warnings before operating the drill press.
- Wear Personal Protective Equipment (PPE): Always wear safety glasses, hearing protection, and appropriate work attire. Avoid loose clothing, gloves, or jewelry that could get caught in moving parts.
- Maintain a Clean Work Area: Keep the work area free of clutter, debris, and obstructions.
- Secure Workpiece: Always clamp the workpiece securely to the drill press table before drilling. Never hold it by hand.
- Adjust Speed Correctly: Select the appropriate speed for the material and drill bit size. Refer to the operating instructions for guidance.
- Unplug Before Adjustments: Disconnect the power supply before making any adjustments, changing accessories, or performing maintenance.
- Avoid Overreaching: Maintain proper footing and balance at all times.
- Use Correct Accessories: Only use accessories designed for and compatible with this drill press.
- Keep Guards in Place: Ensure all safety guards are properly installed and functioning before operation.
3. Components Overview
Familiarize yourself with the main components of your Powermatic PM2800B drill press.
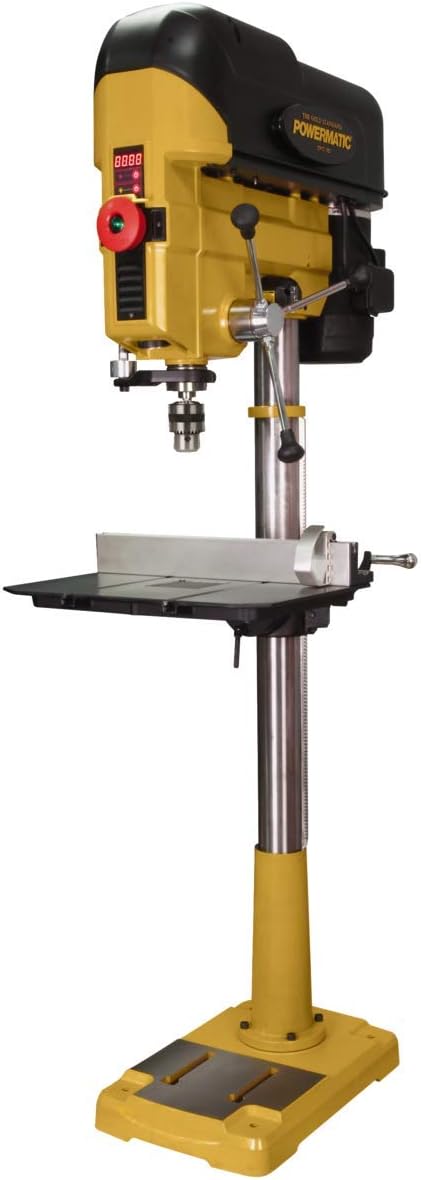
Figure 3.1: Overall view of the Powermatic PM2800B 18-Inch Floor Drill Press. This image displays the complete assembly of the drill press, including the head, column, table, and base, highlighting its robust construction.

Figure 3.2: Labeled diagram illustrating key features such as the variable-speed 1-HP motor, digital RPM readout, two adjustable LED work lights, 6-inch quill travel, table rotation, and the 13.5" x 20.5" cast iron base.
- Head Assembly: Contains the motor, variable speed control, digital RPM readout, and chuck.
- Column: The main support structure for the head and table.
- Drill Press Table: A cast iron work surface that can be tilted up to 90 degrees and features an adjustable fence system.
- Base: An oversized cast iron base providing stability.
- Quill Travel: Offers 6 inches of quill travel with one turn of the handle for deep drilling.
- Laser Guides: Provides accurate indication for the tool point.
- LED Work Lights: Two independently-adjustable LED lights illuminate the work area.
- Reversible Handles: Can be mounted on either side of the machine for user convenience.
4. Setup
Proper assembly and setup are crucial for the performance and safety of your drill press. Due to the weight of the components, particularly the head assembly, it is recommended to have at least two people for assembly.
- Unpacking: Carefully unpack all components and verify against the packing list. Report any damage or missing parts immediately.
- Base Installation: Place the oversized cast iron base on a stable, level surface.
- Column Assembly: Securely attach the column to the base according to the provided hardware.
- Head Assembly Installation: With assistance, carefully lift and slide the head assembly onto the top of the column. Ensure it is properly seated and secured.
- Table Assembly: Mount the cast iron work table to the column. Ensure the table can move freely up and down and tilt as intended.
- Handle Installation: Attach the reversible handles to the quill feed mechanism.
- Chuck Installation: Install the 5/8" chuck onto the spindle. Ensure it is firmly seated.
- Fence System: Install the adjustable fence system onto the table. This fence provides a perfect 90-degree relationship to the table for accurate work.
- Electrical Connection: Connect the drill press to a grounded 115V or 230V 1Ph power supply as specified for your model.
5. Operating Instructions
Follow these steps for safe and effective operation of your Powermatic PM2800B drill press.
Video 5.1: Official product video demonstrating the Powermatic PM2800B Drill Press in operation. This video highlights key features and operational aspects of the machine, including speed changes and drilling actions.
- Power On: Ensure the drill press is properly connected to power. Turn on the main power switch.
- Install Drill Bit: Open the chuck jaws using the chuck key (if applicable) or by hand for keyless chucks. Insert the drill bit into the chuck, ensuring it is centered and tightened securely.
- Adjust Speed: The PM2800B features infinitely-variable speeds from 250 to 3,000 RPM without belt changes. Use the speed adjustment control (typically a dial or lever) to set the desired RPM, which will be displayed on the digital readout. Refer to a speed chart for recommended speeds based on material and bit size.
- Position Workpiece: Place your workpiece on the drill press table. Use clamps to secure it firmly.
- Adjust Table and Fence: Adjust the table height and angle as needed. The table can tilt up to 90 degrees. Position the adjustable fence to support the workpiece and ensure accurate drilling.
- Activate Laser Guides and LED Lights: Turn on the laser guides to pinpoint the drilling location. Activate the two independently-adjustable LED work lights for optimal visibility.
- Start Drilling: With the workpiece secured and speed set, slowly lower the quill using the feed handles. Apply steady, even pressure. Allow the drill bit to cut through the material cleanly.
- Retract Quill: Once the hole is complete, retract the quill smoothly.
- Power Off: Turn off the drill press and unplug it when finished or before making any adjustments.

Figure 5.1: A user operating the Powermatic PM2800B drill press, demonstrating the use of the feed handles and the secure positioning of the workpiece with the fence.

Figure 5.2: Close-up view of the variable speed control and digital RPM readout, illustrating the ease of adjusting speeds from 250 to 3,000 RPM without manual belt changes.

Figure 5.3: Detail of the 20" x 2 3/4" rapid-adjust fence system, designed for quick and accurate alignment of stock, ensuring a perfect 90-degree relationship to the table.
6. Maintenance
Regular maintenance ensures the longevity and optimal performance of your drill press.
- Cleaning: After each use, clean wood chips and dust from the table, column, and head assembly. Use a brush or vacuum; never use compressed air directly on electrical components.
- Lubrication: Periodically apply a light coat of machine oil to the column and quill to ensure smooth movement. Consult the full product manual for specific lubrication points and frequency.
- Check Fasteners: Regularly inspect all nuts, bolts, and screws for tightness. Tighten any loose fasteners.
- Inspect Power Cord: Check the power cord for any signs of damage, fraying, or cuts. Replace immediately if damaged.
- Chuck Maintenance: Keep the chuck jaws clean and free of debris to ensure proper gripping of drill bits.
7. Troubleshooting
This section addresses common issues you might encounter with your drill press.
| Problem | Possible Cause | Solution |
|---|---|---|
| Drill press does not start | No power, tripped circuit breaker, faulty switch | Check power connection, reset breaker, inspect switch |
| Excessive vibration | Loose components, unbalanced drill bit, worn bearings | Tighten fasteners, replace/balance drill bit, contact service |
| Drill bit not cutting efficiently | Dull drill bit, incorrect speed, insufficient pressure | Sharpen/replace bit, adjust speed, apply steady pressure |
| Chuck not holding bit securely | Dirty jaws, worn chuck, improper tightening | Clean jaws, ensure proper tightening, replace chuck if worn |
| Laser guide not visible/accurate | Laser off, battery low (if applicable), misaligned | Turn on laser, replace batteries, refer to manual for calibration |
8. Specifications
Technical specifications for the Powermatic PM2800B 18-Inch Floor Drill Press.
| Specification | Value |
|---|---|
| Model Number | PM2800B |
| Brand | Powermatic |
| Power Source | Corded Electric |
| Motor Horsepower | 1 HP |
| Voltage | 115/230 Volts |
| Amperage | 20 Amps |
| Maximum Rotational Speed | 3000 RPM |
| Variable Speed Range | 250 to 3,000 RPM |
| Maximum Chuck Size | 0.63 Inches (5/8") |
| Quill Travel | 6 Inches |
| Product Dimensions (L x W x H) | 20.25" x 18" x 71" |
| Item Weight | 246 Pounds |
| Material | Aluminum, Cast Iron, Steel |
| Table Tilt | Up to 90 degrees |
| Special Features | Adjustable Handle, Built-In LED Working Light, Laser Guide, Variable Speed |
| UPC | 731325224276 |
9. Warranty and Support
Your Powermatic PM2800B 18-Inch Floor Drill Press comes with a 5-year limited warranty. This warranty covers defects in materials and workmanship under normal use. For detailed warranty terms, conditions, and exclusions, please refer to the official warranty document included with your product or visit the Powermatic website.
For technical assistance, parts, or service inquiries, please contact Powermatic customer support. Have your model number (PM2800B) and serial number ready when contacting support to expedite assistance.
Powermatic Customer Support: Refer to your product packaging or the official Powermatic website for the most current contact information.