1. Product Overview
The Blodgett 20348 Spark Box Assembly is a genuine Original Equipment Manufacturer (OEM) replacement part designed for use with Blodgett commercial ovens that utilize liquid propane. This assembly is an essential component of the oven's ignition system, responsible for generating the spark required to ignite the gas, thereby ensuring reliable and safe operation.
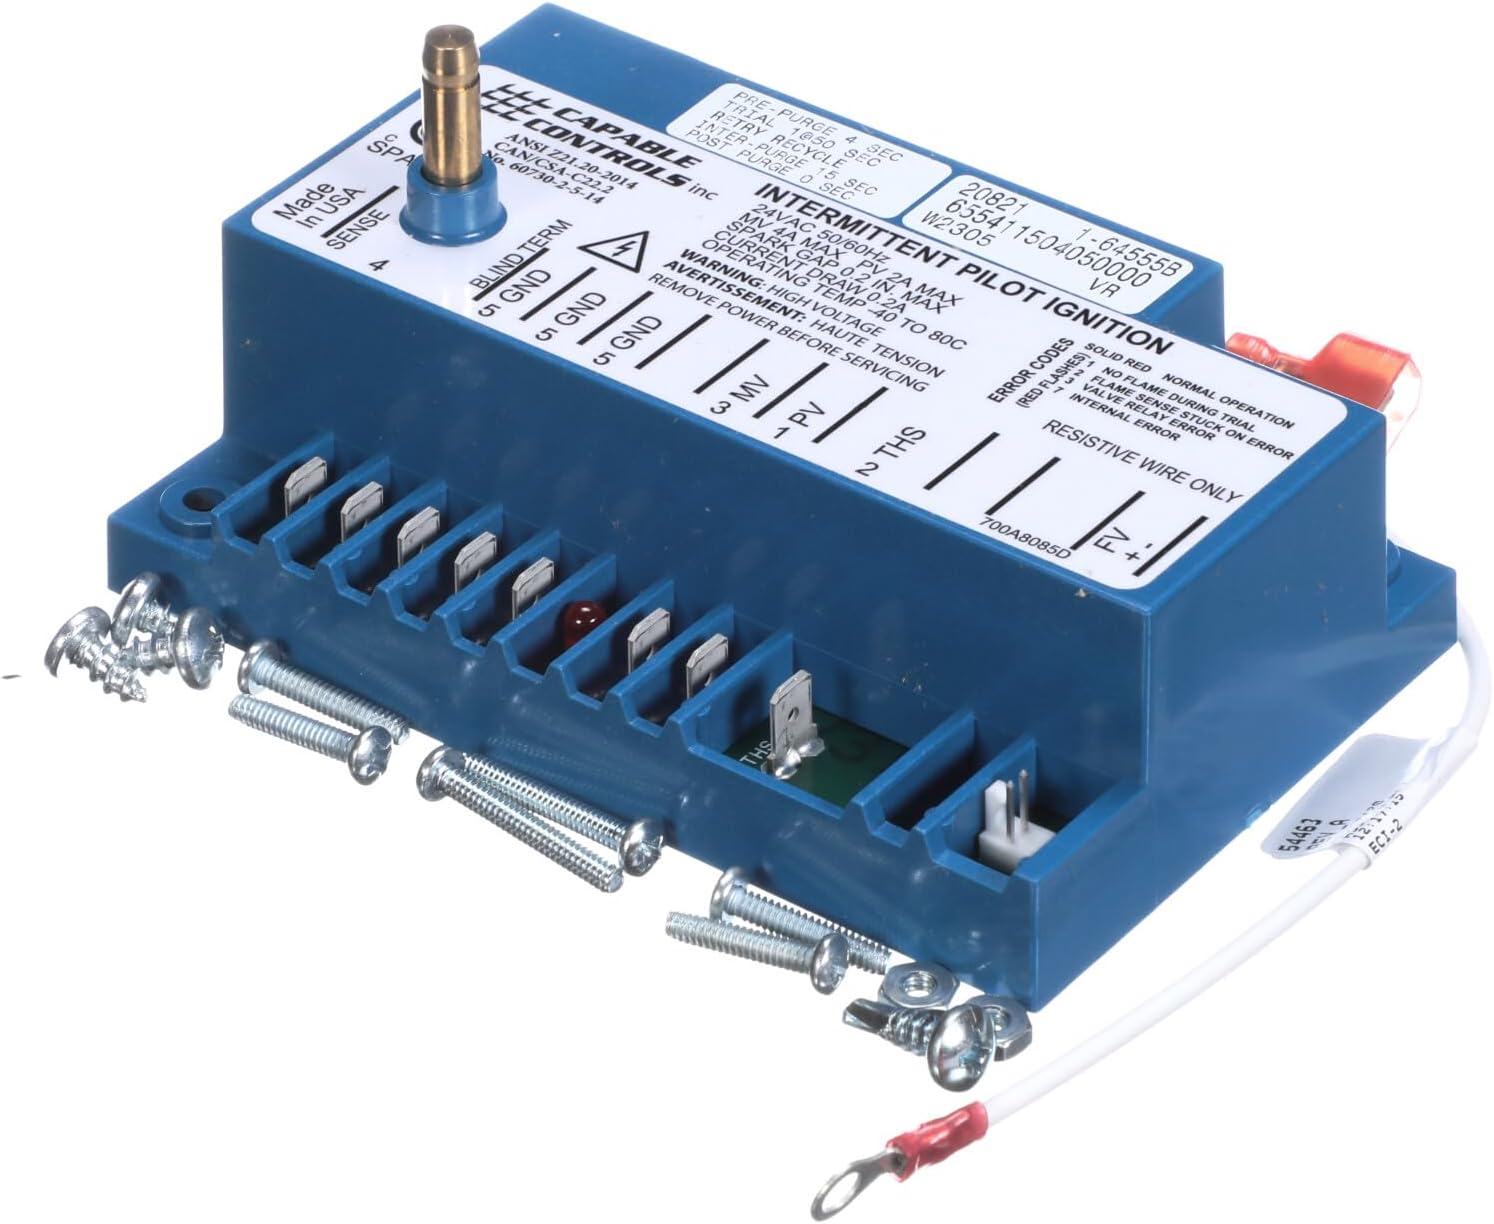
Image 1.1: Top-down view of the Blodgett 20348 Spark Box Assembly, showing the main unit and included mounting screws.
2. Safety Information
WARNING: High voltage is present. Always disconnect power and gas supply to the appliance before installation, servicing, or maintenance to prevent electric shock and gas leaks.
- Installation and servicing of this component should only be performed by a qualified service technician.
- Ensure all gas connections are properly sealed and tested for leaks after installation.
- Do not operate the oven if you smell gas. Immediately shut off the gas supply and ventilate the area.
- Refer to the oven's main instruction manual for additional safety guidelines.
3. Package Contents
Verify that all items are present in the package:
- 1 x Blodgett 20348 Spark Box Assembly
- Mounting Screws (approximately 6-8, as pictured)

Image 3.1: The Blodgett 20348 Spark Box Assembly shown with the accompanying mounting screws.
4. Setup and Installation
This section provides general steps for replacing the spark box assembly. Always consult your specific oven's service manual for detailed, model-specific instructions.
- Prepare the Oven: Disconnect all electrical power and shut off the liquid propane gas supply to the oven.
- Locate Old Assembly: Identify and locate the existing spark box assembly within the oven's control compartment.
- Disconnect: Carefully disconnect all electrical wiring and any associated gas lines from the old assembly. Note the position and connection points of each wire for correct reinstallation.
- Remove Old Assembly: Unscrew and remove the old spark box assembly from its mounting location.
- Mount New Assembly: Position the new Blodgett 20348 Spark Box Assembly in the same location and secure it using the provided mounting screws.
- Reconnect Wiring: Reconnect all electrical wiring to the new assembly, ensuring each wire is attached to its correct terminal. Refer to the labels on the unit for guidance (e.g., GND, PV, THS, MV, SPARK).
- Reconnect Gas Lines: If applicable, reconnect any gas lines, ensuring all connections are tight and secure.
- Leak Test: After reconnecting gas lines, perform a leak test using an approved method (e.g., soap solution) to ensure there are no gas leaks.
- Restore Power and Gas: Once all connections are verified and secure, restore the gas supply and electrical power to the oven.

Image 4.1: Side view of the spark box assembly, highlighting the various wiring terminals and their labels for correct connection.
5. Operation
The Blodgett 20348 Spark Box Assembly operates automatically as part of your oven's control system. When the oven thermostat calls for heat, the assembly receives a signal to initiate the ignition sequence. It then generates a high-voltage spark at the igniter electrode, which ignites the liquid propane gas flowing to the burner. A flame sensor confirms successful ignition, allowing the burner to continue operation. If ignition fails, the assembly will attempt to reignite or enter a lockout state, depending on the oven's control logic.
6. Maintenance
The Blodgett 20348 Spark Box Assembly is designed for durability and typically requires minimal maintenance. However, periodic inspection is recommended:
- Visual Inspection: Annually, or as recommended by your oven's service schedule, visually inspect the assembly and its wiring for any signs of wear, corrosion, or damage.
- Cleanliness: Ensure the area around the spark box is kept clean and free from dust, grease, or other debris that could interfere with its operation or cause overheating.
- Component Replacement: Do not attempt to repair the spark box assembly. If it is found to be faulty or damaged, replace it with a genuine Blodgett 20348 part to ensure continued safety and performance.
7. Troubleshooting
The spark box assembly may indicate operational status or errors via an LED light. Refer to the labels on the unit for specific error codes:
- SOLID RED LED: Indicates normal operation.
- NO FLAME DURING TRIAL FOR IGNITION: If the burner fails to ignite, check the gas supply to the oven, verify the igniter electrode is clean and properly gapped, and ensure the flame sensor is functioning correctly.
- INTERNAL ERROR: If the LED indicates an internal error, the spark box assembly is likely faulty and requires replacement.
If the oven fails to ignite or experiences intermittent ignition issues, consider the following:
- Confirm the gas supply valve is open.
- Check all electrical connections to the spark box assembly for tightness and correct wiring.
- Inspect the igniter and flame sensor for damage or carbon buildup.
- If troubleshooting steps do not resolve the issue, consult a qualified service technician.

Image 7.1: Detailed view of the spark box assembly, showing the error code descriptions printed on the label.
8. Specifications
| Brand | Blodgett |
| Model Number | 20348 |
| Product Dimensions (L x W x H) | 5 x 5 x 9 inches |
| Item Weight | 8 ounces |
| Installation Type | Screw-In |
| Connector Gender | Male |
| Country of Origin | United States |
| Voltage | 24 VAC, 50/60Hz |
| Current | 0.2A MAX |
| Operating Temperature | -40 to 80℃ (-40 to 176℉) |
9. Warranty and Support
For specific warranty information regarding your Blodgett 20348 Spark Box Assembly, please refer to the documentation provided with your original Blodgett oven or contact Blodgett customer service directly. Using genuine OEM replacement parts is recommended to ensure compatibility, optimal performance, and to maintain the validity of any existing warranties.
For technical support or further assistance, please visit the official Blodgett website or contact their authorized service providers.


