
1. Introduction
This manual provides detailed instructions for the installation, operation, and maintenance of your ASUS H81M-C Micro-ATX motherboard. The ASUS H81M-C is designed to support Intel LGA 1150 processors and DDR3 memory, offering a reliable foundation for your personal computer system.

Figure 1.1: ASUS H81M-C Motherboard and Packaging. This image displays the ASUS H81M-C motherboard alongside its retail packaging, highlighting the product's design and branding.
2. Setup and Installation
Before beginning installation, ensure your workspace is static-free and you have all necessary components and tools. Refer to your PC case manual for specific mounting instructions.
2.1. Motherboard Installation
- Prepare the Case: Install the I/O shield into the rear opening of your computer case.
- Mount the Motherboard: Carefully align the motherboard with the standoffs in your case. Secure it with screws, ensuring not to overtighten.
- Connect Power: Connect the 24-pin ATX power connector and the 4-pin ATX 12V power connector from your power supply to the motherboard.
2.2. CPU Installation (LGA 1150)
- Open the Socket: Gently push down the load lever and move it sideways to open the CPU socket cover.
- Insert CPU: Align the triangular mark on the CPU with the mark on the socket. Carefully place the CPU into the socket without forcing it.
- Secure CPU: Close the load plate and push the load lever back into place until it clicks.
- Install CPU Cooler: Apply thermal paste (if not pre-applied) and install the CPU cooler according to its manufacturer's instructions. Connect the CPU fan cable to the CPU_FAN header on the motherboard.
2.3. Memory (RAM) Installation
The ASUS H81M-C supports up to 16GB of DDR3 memory across two DIMM slots (1600/1333/1066 MHz).
- Open DIMM Clips: Open the retention clips at both ends of the DIMM slot.
- Insert Memory Module: Align the notch on the DDR3 memory module with the key in the DIMM slot. Insert the module firmly until the clips snap into place.
2.4. Storage Device Connection
The motherboard provides 2 x SATA 6Gb/s ports and 2 x SATA 3Gb/s ports.
- Connect SATA Cables: Connect one end of the SATA data cable to a SATA port on the motherboard and the other end to your storage device (HDD/SSD).
- Connect Power: Connect the SATA power cable from your power supply to the storage device.
2.5. Expansion Card Installation
The motherboard features 1 x PCIe x16 slot, 2 x PCIe 2.0 x1 slots, and 1 x PCI slot.
- Select Slot: Choose an appropriate expansion slot for your card (e.g., graphics card in PCIe x16).
- Insert Card: Align the card with the slot and press down firmly until it is seated correctly. Secure the card with a screw to the case.
- Connect Power (if required): For graphics cards, connect auxiliary PCIe power cables from your power supply if needed.
2.6. Front Panel and Rear I/O Connections
Connect your case's front panel connectors (power button, reset button, USB ports, audio jacks) to the corresponding headers on the motherboard. Connect peripherals to the rear I/O panel.
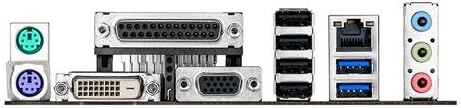
Figure 2.1: ASUS H81M-C Rear I/O Panel. This image illustrates the various ports available on the rear input/output panel of the motherboard, including USB, video, and audio connections.

Figure 2.2: ASUS H81M-C Motherboard Layout. This image provides an overhead view of the motherboard, showing the placement of the CPU socket, RAM slots, PCIe slots, and other components.
3. Operating Instructions
3.1. Initial Power On and BIOS/UEFI Setup
After assembling your system, connect a monitor, keyboard, and mouse. Power on the system. Press the DEL key during startup to enter the BIOS/UEFI setup utility. Here you can configure boot order, system time, and other hardware settings.
- Boot Order: Ensure your primary storage device (where the OS will be installed) is set as the first boot option.
- System Time: Set the correct date and time.
- Save and Exit: After making changes, save your settings and exit the BIOS/UEFI.
3.2. Operating System Installation
Insert your operating system installation media (USB drive or DVD) and restart the computer. Follow the on-screen prompts to install your preferred operating system (e.g., Windows 8, Linux).
3.3. Driver Installation
After OS installation, install the necessary drivers for your motherboard components. These typically include chipset drivers, audio drivers, LAN drivers, and any specific utility drivers. Drivers can be found on the ASUS support website for the H81M-C model.
4. Maintenance
Regular maintenance helps ensure the longevity and stable performance of your motherboard.
- Dust Removal: Periodically clean dust from the motherboard and components using compressed air. Ensure the system is powered off and unplugged before cleaning.
- BIOS Updates: Check the ASUS support website for BIOS/UEFI updates. Updates can improve compatibility, stability, and performance. Follow ASUS's specific instructions for BIOS flashing carefully to avoid system damage.
- Component Checks: Ensure all cables are securely connected and no components are loose.
5. Troubleshooting
This section addresses common issues you might encounter.
- No Power/No Boot:
- Verify all power cables (24-pin ATX, 4-pin ATX 12V, CPU fan) are securely connected.
- Ensure the power supply is switched on and functioning.
- Check front panel power switch connection to the motherboard.
- No Display:
- Ensure the monitor is connected to the correct video output (motherboard or graphics card).
- Reseat the graphics card and memory modules.
- Test with a different monitor or cable if possible.
- System Instability/Crashes:
- Check CPU and GPU temperatures. Ensure coolers are properly installed.
- Run memory diagnostic tools to check for RAM errors.
- Ensure all drivers are up to date.
- Peripheral Not Detected:
- Try connecting the peripheral to a different port.
- Install or update relevant drivers.
- Check BIOS/UEFI settings to ensure the port is enabled.
For more advanced troubleshooting, consult the comprehensive manual available on the ASUS support website or contact ASUS technical support.
6. Specifications
| Feature | Detail |
|---|---|
| Model | ASUS H81M-C |
| CPU Socket | LGA 1150 |
| Compatible Processors | Intel Core i7/i5/i3/Pentium/Celeron (LGA1150) |
| Chipset | Intel H81 |
| Memory Slots | 2 x DIMM, Max. 16GB, DDR3 1600/1333/1066 MHz, Non-ECC, Un-buffered Memory |
| Expansion Slots | 1 x PCIe 2.0 x16, 2 x PCIe 2.0 x1, 1 x PCI |
| Storage | 2 x SATA 6Gb/s ports, 2 x SATA 3Gb/s ports |
| LAN | Realtek 8111G Gigabit LAN Controller |
| Audio | Realtek ALC887 8-Channel High Definition Audio CODEC |
| USB Ports | 4 x USB 3.0/2.0 ports (2 at back panel, 2 at mid-board), 8 x USB 2.0/1.1 ports (4 at back panel, 4 at mid-board) |
| Video Output | DVI-D, D-Sub (VGA) |
| Form Factor | Micro-ATX (22.6 cm x 17.5 cm) |
| Operating System Support | Windows 8, Windows 7 |
7. Warranty Information
ASUS products are manufactured to the highest quality standards. This product is covered by a limited warranty provided by ASUS. The specific terms and conditions of your warranty may vary by region and purchase date. Please refer to the warranty card included with your product or visit the official ASUS website for detailed warranty information.
Note: Physical damage, improper installation, or unauthorized modifications may void your warranty.
8. Technical Support
For technical assistance, driver downloads, BIOS updates, or further product information, please visit the official ASUS support website:
You may also contact ASUS customer service directly through their website for personalized support.