
1. Introduction
This manual provides essential information for the safe and effective operation of your Quick Products 861DW 1000W Digital Hot Air Rework Station. The 861DW is a 1000-watt hot air station designed for precision soldering and desoldering tasks. It features three user-programmable channels, allowing for custom settings of airflow and temperature. The unit incorporates a magnetic switch in the handpiece stand, which automatically activates sleep mode when the handle is placed in it. An automatic cooling system is integrated to extend the lifespan of the heating element and protect the handle from overheating.
2. Safety Information
Please read and understand all safety instructions before operating the device. Failure to follow these instructions may result in electric shock, fire, or serious injury.
- High Temperature Hazard: The hot air output can reach very high temperatures. Avoid direct contact with the nozzle and heated components. Allow components to cool before handling.
- Ventilation: Use the rework station in a well-ventilated area to prevent inhalation of fumes generated during soldering and desoldering.
- ESD Precautions: This unit is ESD safe. However, always follow proper electrostatic discharge (ESD) precautions when working with sensitive electronic components.
- Flammable Materials: Keep the work area clear of flammable liquids, gases, and materials.
- Power Disconnection: Always unplug the unit from the power outlet when not in use, before cleaning, or when changing accessories.
- Children and Unauthorized Personnel: Keep the device out of reach of children and ensure only trained personnel operate the equipment.
- Proper Grounding: Ensure the unit is properly grounded to prevent electrical hazards.
3. Package Contents
Verify that all items are present in the package:
- Quick 861DW Digital Hot Air Rework Station Main Unit
- Hot Air Gun Handle
- Hot Air Gun Stand
- Assorted Nozzles (typically 3-4 different sizes)
- Power Cord

Image 3.1: Quick 861DW Rework Station with main unit, hot air gun handle, stand, and three nozzles.
4. Product Overview
4.1. Key Features
- 1000 Watts of power for rapid heating.
- Three programmable channels for temperature and airflow settings.
- Automatic sleep mode when the handle is placed in its stand.
- Automatic cooling system to protect the heating element and handle.
- LCD display for clear temperature and airflow readings.
4.2. Front Panel Controls
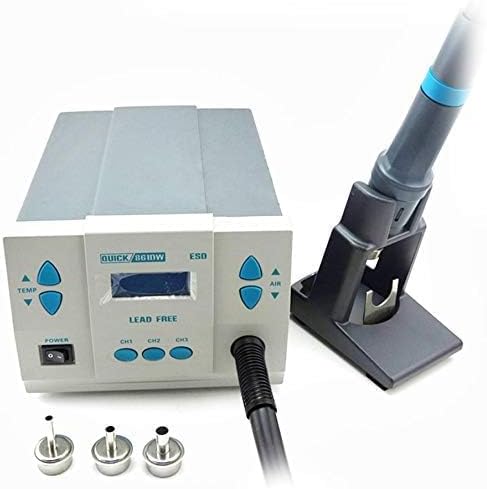
Image 4.1: Front panel of the Quick 861DW, displaying the LCD screen, temperature and air adjustment buttons, and channel selection buttons (CH1, CH2, CH3).
- POWER Switch: Main power on/off switch located on the lower left.
- TEMP Buttons (Up/Down): Adjust the hot air temperature.
- AIR Buttons (Up/Down): Adjust the hot air airflow level.
- CH1, CH2, CH3 Buttons: Select and save programmable channels for quick access to preferred temperature and airflow settings.
- LCD Display: Shows current temperature and airflow settings.
4.3. Rear Panel Connections

Image 4.2: Rear panel of the Quick 861DW, showing the power input, fuse holder, and ground terminal.
- Power Input: Connects the power cord to the main unit.
- Fuse Holder: Contains the main fuse for circuit protection.
- Ground Terminal: Provides an additional grounding point for safety.
5. Setup
- Unpack the Unit: Carefully remove all components from the packaging. Inspect for any damage during transit.
- Place the Unit: Position the main unit on a stable, heat-resistant, and well-ventilated workbench.
- Connect the Hot Air Gun Handle: Insert the hot air gun handle's connector securely into the designated port on the front panel of the main unit. Ensure it is fully seated.
- Attach Nozzle: Select the appropriate nozzle for your task and securely attach it to the hot air gun handle.
- Position the Stand: Place the hot air gun stand in a convenient location on your workbench.
- Connect Power: Plug the power cord into the power input on the rear of the unit, then plug the other end into a grounded electrical outlet.

Image 5.1: The Quick 861DW Rework Station with the hot air gun handle correctly placed in its stand, ready for operation.
6. Operating Instructions
6.1. Powering On/Off
- To power on, flip the POWER switch to the 'ON' position. The LCD will illuminate.
- To power off, flip the POWER switch to the 'OFF' position. The unit will initiate its automatic cooling process before shutting down completely.
6.2. Setting Temperature and Airflow
- With the unit powered on, use the TEMP Up/Down buttons to adjust the desired temperature. The temperature range is typically from 100°C to 500°C (212°F to 932°F).
- Use the AIR Up/Down buttons to adjust the desired airflow level. The display will show the current airflow setting.
6.3. Using Programmable Channels (CH1, CH2, CH3)
The 861DW allows you to save and recall three different sets of temperature and airflow settings.
- To Set a Channel: Adjust the temperature and airflow to your desired values. Press and hold one of the channel buttons (CH1, CH2, or CH3) for a few seconds until the unit beeps or the display indicates the setting has been saved.
- To Recall a Channel: Briefly press the desired channel button (CH1, CH2, or CH3). The unit will automatically adjust to the saved temperature and airflow settings for that channel.
6.4. Sleep Mode and Automatic Cooling
- When the hot air gun handle is placed into its stand, the magnetic switch activates sleep mode. The unit will automatically reduce the temperature and airflow to a safe level, conserving energy and prolonging heating element life.
- When the handle is removed from the stand, the unit will quickly return to the previously set operating parameters.
- Upon powering off, the automatic cooling system will activate, blowing cool air through the handle until the heating element reaches a safe temperature, protecting both the element and the handle.

Image 6.1: The hot air gun handle being used to rework components on a circuit board, demonstrating typical operation.
7. Maintenance
Regular maintenance ensures optimal performance and extends the lifespan of your rework station.
- Cleaning: Regularly clean the main unit and hot air gun handle with a soft, dry cloth. Do not use abrasive cleaners or solvents. Ensure the unit is unplugged and cool before cleaning.
- Nozzle Replacement: Nozzles can be changed when the unit is cool. Ensure the new nozzle is securely attached before operation.
- Air Filter: Periodically check the air intake vents for dust accumulation. Clean as necessary to ensure proper airflow and cooling.
- Fuse Replacement: If the unit does not power on, check the fuse located on the rear panel. Replace with a fuse of the same type and rating (e.g., 10A).

Image 7.1: Close-up view of the hot air gun handle, illustrating the nozzle attachment point.
8. Troubleshooting
Refer to this section for common issues and their solutions.
| Problem | Possible Cause | Solution |
|---|---|---|
| Unit does not power on. | No power from outlet; Power cord loose; Blown fuse. | Check power outlet; Ensure power cord is securely connected; Replace fuse (refer to Section 7). |
| No hot air or insufficient heat. | Heating element failure; Incorrect temperature setting; Hot air gun not connected properly. | Verify temperature setting; Ensure hot air gun is fully connected; Contact support if heating element is suspected. |
| No airflow or weak airflow. | Air pump failure; Airflow setting too low; Blocked air intake. | Verify airflow setting; Clean air intake vents; Contact support if air pump is suspected. |
| Unit does not enter sleep mode. | Hot air gun not placed correctly in stand; Magnetic sensor fault. | Ensure hot air gun is fully seated in the stand; Contact support if sensor is suspected. |
9. Specifications
| Specification | Value |
|---|---|
| Model Number | 861DW |
| Brand | Quick Products |
| Wattage | 1000W |
| Voltage | 120 Volts |
| Display Type | LCD |
| Temperature Stability | 100 degrees_celsius (Note: This value might refer to a range or specific test condition, typical stability is much tighter) |
| Upper Temperature Rating | 500 Degrees Celsius (932°F) |
| Number of Channels | 3 |
| Item Weight | 8.7 Pounds |
| Included Components | Handle |
10. Warranty and Support
For warranty information and technical support, please refer to the documentation provided with your purchase or contact Quick Products customer service directly. Keep your purchase receipt as proof of purchase for any warranty claims.
Manufacturer: Quick