
1. Introduction
Product Overview
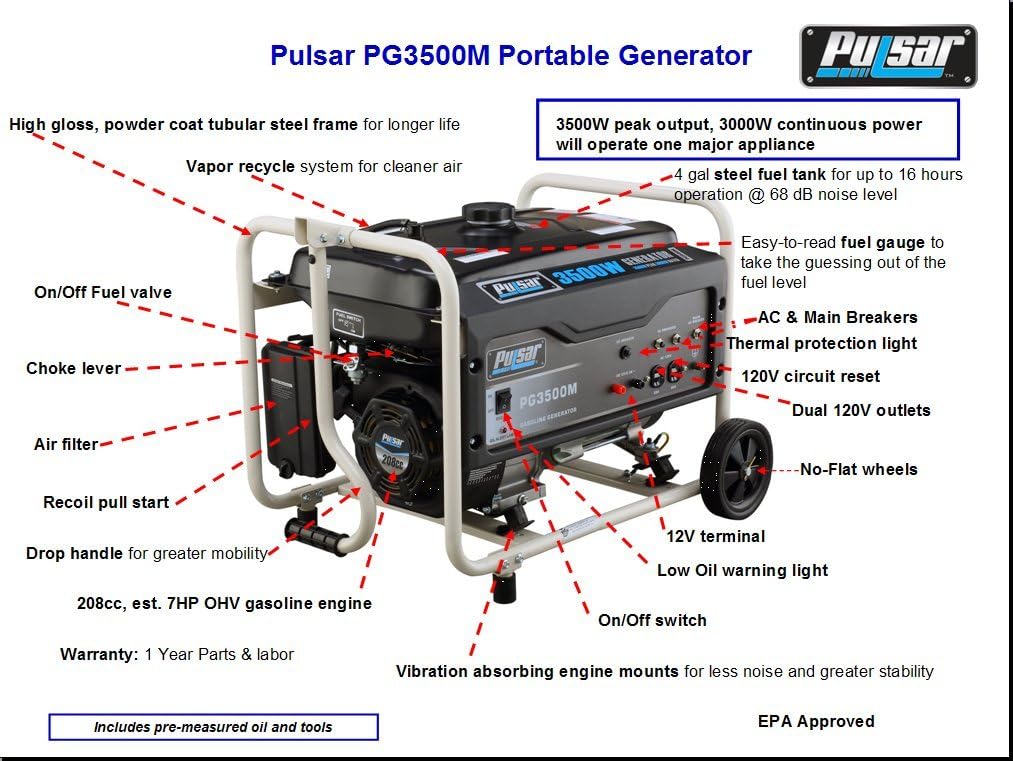
The Pulsar PG3500M portable gas-powered generator is designed to provide reliable power for various applications, from powering major appliances to supporting contractors, camping, cottages, and boats. It features a 7 HP dura-life engine, offering up to 3500 peak watts and 3000 running watts. Its efficient design allows for quieter operation, extended life, and improved fuel economy, providing up to 15 hours of operation on a single 4-gallon tank of gasoline. The unit includes a mobility kit for easy transport and offers dual 120V and 12V outlets for versatile power options.
Key Features
- 3,500 Peak Watts / 3,000 Running Watts of power.
- Single Cylinder, 4-Stroke, OHV, Air Cooled Engine protected by a heavy-duty powder-coated frame for durability.
- 4 Gallon Fuel Tank provides up to 12 hours of continuous operation at half load.
- (2) 120V Outlets and (1) 12V DC Output for powering various tools and devices.
- Equipped with Low Oil Shutdown and Automatic Voltage Regulation for enhanced safety and convenience.
2. Safety Information
Read and understand this entire manual before operating the generator. Failure to follow instructions can result in serious injury or death.
General Safety Rules
- Carbon Monoxide Hazard: Never operate the generator indoors or in poorly ventilated areas. Exhaust contains carbon monoxide, a colorless, odorless, poisonous gas that can kill you.
- Fire Hazard: Gasoline is highly flammable. Refuel in a well-ventilated area with the engine off and cool. Do not smoke or allow open flames near the generator.
- Electrical Shock Hazard: Do not operate the generator in wet conditions. Ensure the generator is properly grounded. Never connect the generator to a building's electrical system unless an approved transfer switch has been installed by a qualified electrician.
- Keep children and pets away from the generator during operation.
- Always wear appropriate personal protective equipment (PPE) when operating or maintaining the generator.
Important Safety Symbols
| Symbol | Meaning |
|---|---|
| DANGER | Indicates an imminently hazardous situation which, if not avoided, will result in death or serious injury. |
| WARNING | Indicates a potentially hazardous situation which, if not avoided, could result in death or serious injury. |
| CAUTION | Indicates a potentially hazardous situation which, if not avoided, may result in minor or moderate injury. |
| NOTICE | Indicates information considered important, but not hazard-related. |
3. Setup
Unpacking and Assembly
Carefully remove the generator and all components from the packaging. Inspect for any damage. Assemble the mobility kit by attaching the wheels and handles as per the included instructions. Ensure all bolts are securely tightened.
Adding Engine Oil
The generator is shipped without engine oil. Before first use, add the recommended amount and type of oil. Locate the oil fill cap/dipstick. Place the generator on a level surface. Slowly pour the oil into the crankcase until it reaches the upper mark on the dipstick. Do not overfill.
Adding Fuel
Use only fresh, unleaded gasoline with an octane rating of 87 or higher. Ensure the engine is off and cool before refueling. Open the fuel tank cap and slowly add gasoline, leaving a small air gap at the top to allow for expansion. Do not overfill. Securely close the fuel cap.
Grounding the Generator
For safe operation, the generator must be properly grounded. Connect a heavy-gauge copper wire from the generator's grounding terminal to a suitable ground source, such as a ground rod driven into the earth. Consult local electrical codes for specific grounding requirements.
4. Operating Instructions
Starting the Engine
- Ensure the generator is on a level surface and all electrical loads are disconnected.
- Turn the fuel valve to the 'ON' position.
- Move the choke lever to the 'FULL CHOKE' position (if the engine is cold).
- Flip the engine switch to the 'ON' position.
- Firmly grasp the recoil starter handle and pull it quickly until the engine starts.
- Once the engine starts, slowly move the choke lever to the 'RUN' position.
Connecting Electrical Loads
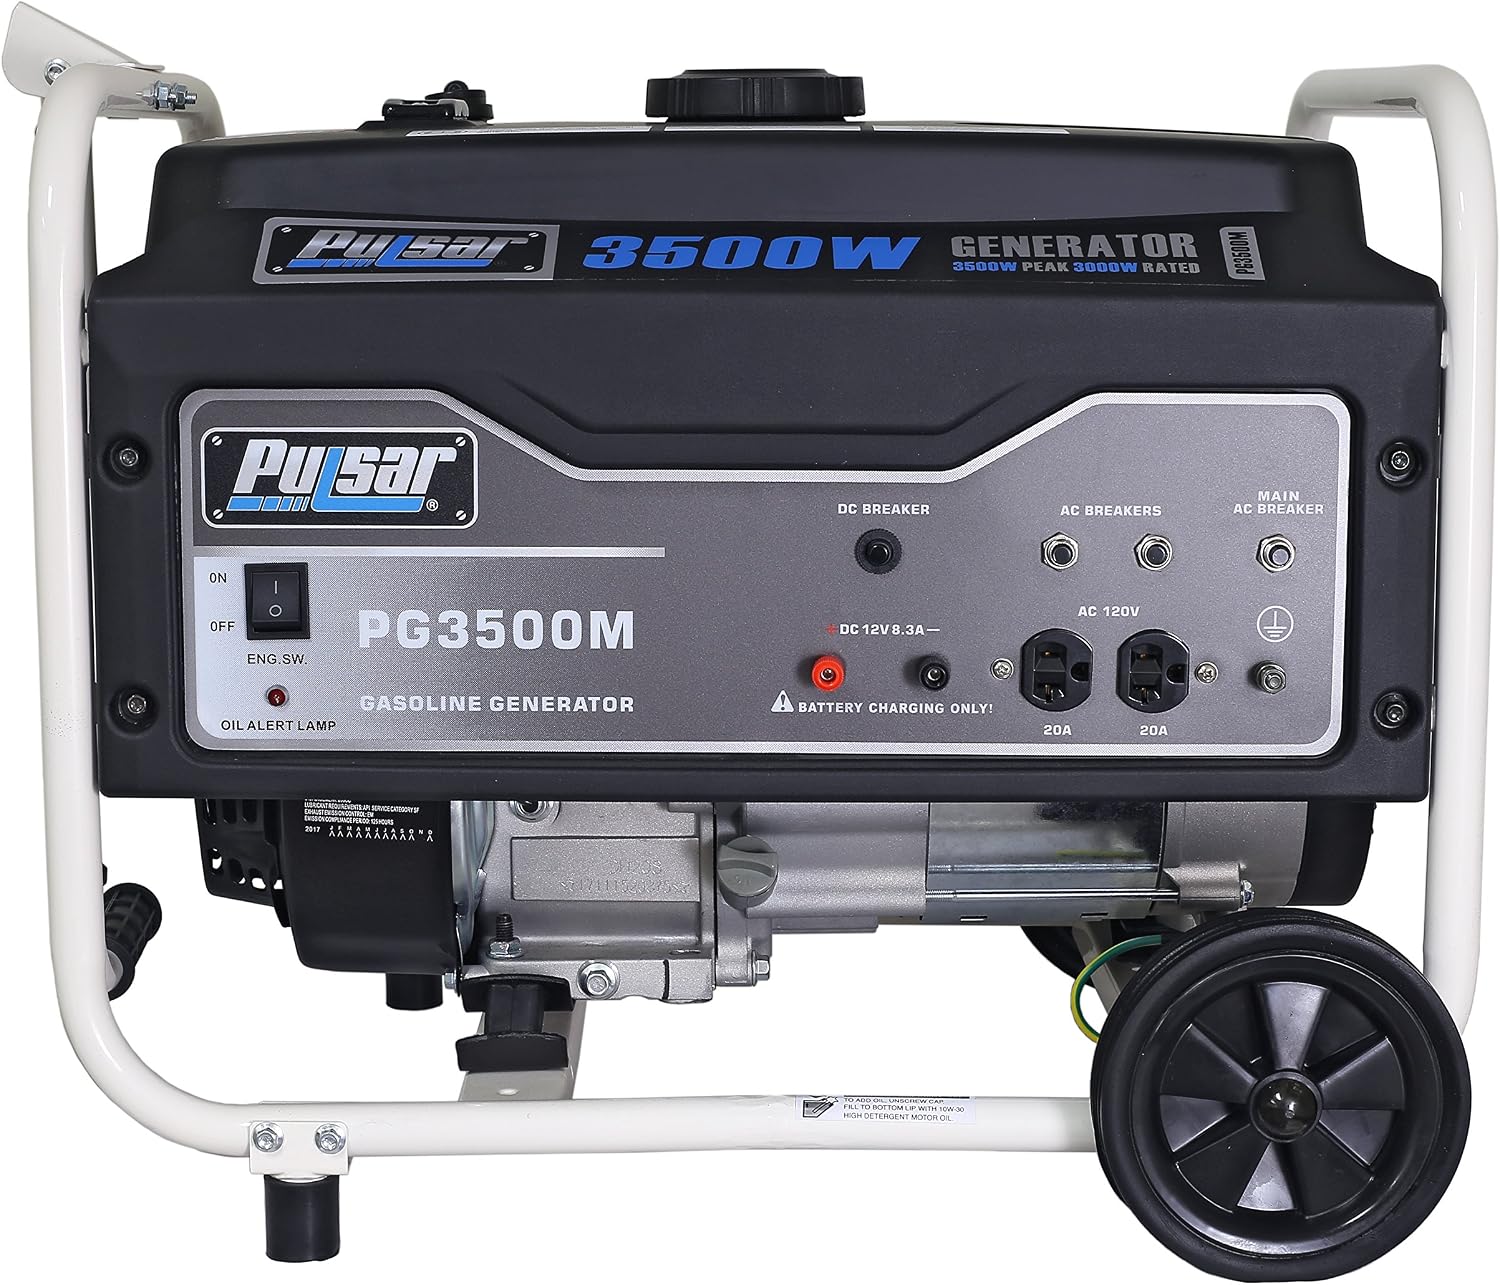
After the engine has warmed up for a few minutes, you can connect your electrical devices. Plug your appliances into the appropriate 120V or 12V DC outlets. Do not exceed the generator's rated running wattage (3000W) to prevent overload. If an overload occurs, the circuit breakers will trip. Reset them after reducing the load.
Stopping the Engine
- Disconnect all electrical loads from the generator.
- Flip the engine switch to the 'OFF' position.
- Turn the fuel valve to the 'OFF' position to prevent fuel flow.
5. Maintenance
Regular maintenance is crucial for the longevity and optimal performance of your generator. Always ensure the engine is off and cool before performing any maintenance.
Maintenance Schedule
| Service Item | Before Each Use | Every 25 Hours or Monthly | Every 100 Hours or Annually |
|---|---|---|---|
| Check Engine Oil Level | ✓ | ||
| Clean Air Filter | ✓ | ||
| Change Engine Oil | ✓ | ||
| Inspect Spark Plug | ✓ | ||
| Check Fuel Filter | ✓ |
Engine Oil Change
Drain the old oil while the engine is warm. Remove the drain plug and oil fill cap. Allow all oil to drain completely. Replace the drain plug and refill with the recommended type and amount of new engine oil. Check the level with the dipstick.
Air Filter Cleaning
Remove the air filter cover and take out the foam filter element. Wash the element in warm, soapy water, rinse thoroughly, and allow it to air dry completely. Lightly oil the foam element with engine oil, then squeeze out any excess. Reinstall the filter and cover.
Spark Plug Inspection
Remove the spark plug cap and use a spark plug wrench to remove the plug. Inspect the electrode for wear and carbon buildup. Clean or replace the spark plug as needed. Ensure the gap is set correctly according to the engine specifications in your manual.
Storage
For long-term storage (over 30 days), drain the fuel tank and carburetor, or add a fuel stabilizer. Run the engine until it stops from lack of fuel. Change the engine oil. Remove the spark plug and pour a small amount of engine oil into the cylinder, then slowly pull the recoil starter a few times to distribute the oil. Reinstall the spark plug. Store the generator in a clean, dry place.
6. Troubleshooting
| Problem | Possible Cause | Solution |
|---|---|---|
| Engine will not start | No fuel Engine switch OFF Low oil level Choke not set correctly Spark plug issue | Add fresh fuel Turn engine switch ON Add oil to correct level Adjust choke (full for cold, off for warm) Inspect/clean/replace spark plug |
| No power output | Circuit breaker tripped Overload Faulty cord/appliance | Reset circuit breaker Reduce connected load Test cord/appliance with another source |
| Engine runs rough | Stale fuel Dirty air filter Spark plug issue | Drain and refill with fresh fuel Clean/replace air filter Inspect/clean/replace spark plug |
| Low oil alert lamp on | Low oil level | Add oil to correct level |
7. Specifications
| Specification | Value |
|---|---|
| Brand | Pulsar |
| Model Name | Pulsar 3,500W Portable Gas-Powered Generator with Mobility Kit, PG3500M |
| Peak Wattage | 3500 Watts |
| Running Wattage | 3000 Watts |
| Fuel Type | Gasoline |
| Power Source | Gas-Powered |
| Engine Type | 4 Stroke, Single Cylinder, OHV, Air Cooled |
| Engine Displacement | 208 Cubic Centimeters |
| Engine Power Maximum | 7 Horsepower |
| Tank Volume | 4 Gallons |
| Runtime | Up to 15 hours (at half load) |
| Voltage | 120 Volts |
| Frequency | 50 Hz |
| Item Weight | 100 Pounds |
| Product Dimensions (L x W x H) | 24.5" x 18.5" x 19.5" |
| Included Components | Generator, Mobility Kit |
| Special Feature | Durability, Low Oil Shutdown, Automatic Voltage Regulation |
8. Warranty and Support
Warranty Information
This Pulsar PG3500M Portable Gas-Powered Generator comes with a 1 Year Parts & Labor warranty. Please retain your proof of purchase for warranty claims. The warranty covers defects in materials and workmanship under normal use.
Customer Support
For technical assistance, parts, or warranty inquiries, please contact Pulsar Products Inc. customer support. You can also visit the official Pulsar Store for more information and resources:


