Introduction
The PlayMonster OK to Wake! Alarm Clock & Night-Light is designed to help children understand when it's an appropriate time to get out of bed. This device features a visual indicator that glows green when it's OK to wake up, along with a night-light function, nap timer, and alarm clock capabilities. It includes interchangeable faceplates for a personalized touch.
What's in the Box
- OK to Wake! Alarm Clock & Night-Light Unit
- Two (2) Interchangeable Faceplates (Pink Flower and Green Bug)
- Micro USB Cable (for power)
Note: 4 AA batteries (not included) are required for battery backup. A wall adapter is not included.
Product Overview

Figure 1: The OK to Wake! Alarm Clock & Night-Light with the green bug faceplate, glowing green to indicate it's time to wake up.
The OK to Wake! Alarm Clock & Night-Light combines several useful features into one compact device:
- OK to Wake! Light: A green light illuminates to visually signal when it's acceptable for children to get out of bed.
- Night-Light: Provides a soft glow for comfort during the night.
- Alarm Clock: Standard alarm function with snooze.
- Nap Timer: A dedicated feature for managing nap durations.
- Interactive Animations: Tapping the 'toe' buttons activates fun animations on the display.
- Changeable Faceplates: Customize the clock's appearance with included pink flower and green bug designs.

Figure 2: Two OK to Wake! Alarm Clocks demonstrating interchangeable faceplates (green bug and pink flower) and the green 'OK to Wake!' glow.
Setup
Powering the Device
- Connect USB Cable: Plug the micro USB cable into the port on the back of the clock.
- Connect to Power: Plug the other end of the USB cable into a USB wall adapter (not included) or a powered USB port.
- Battery Backup (Optional): For uninterrupted operation during power outages, install 4 AA batteries (not included) into the battery compartment on the underside of the clock.
Installing Faceplates
The clock comes with two interchangeable faceplates. To change them:
- Gently remove the currently attached faceplate by pulling it away from the clock's front.
- Align the desired new faceplate with the grooves on the clock's front and press firmly until it clicks into place.

Figure 3: The alarm clock featuring the pink flower faceplate, demonstrating customization options.
Operating Instructions
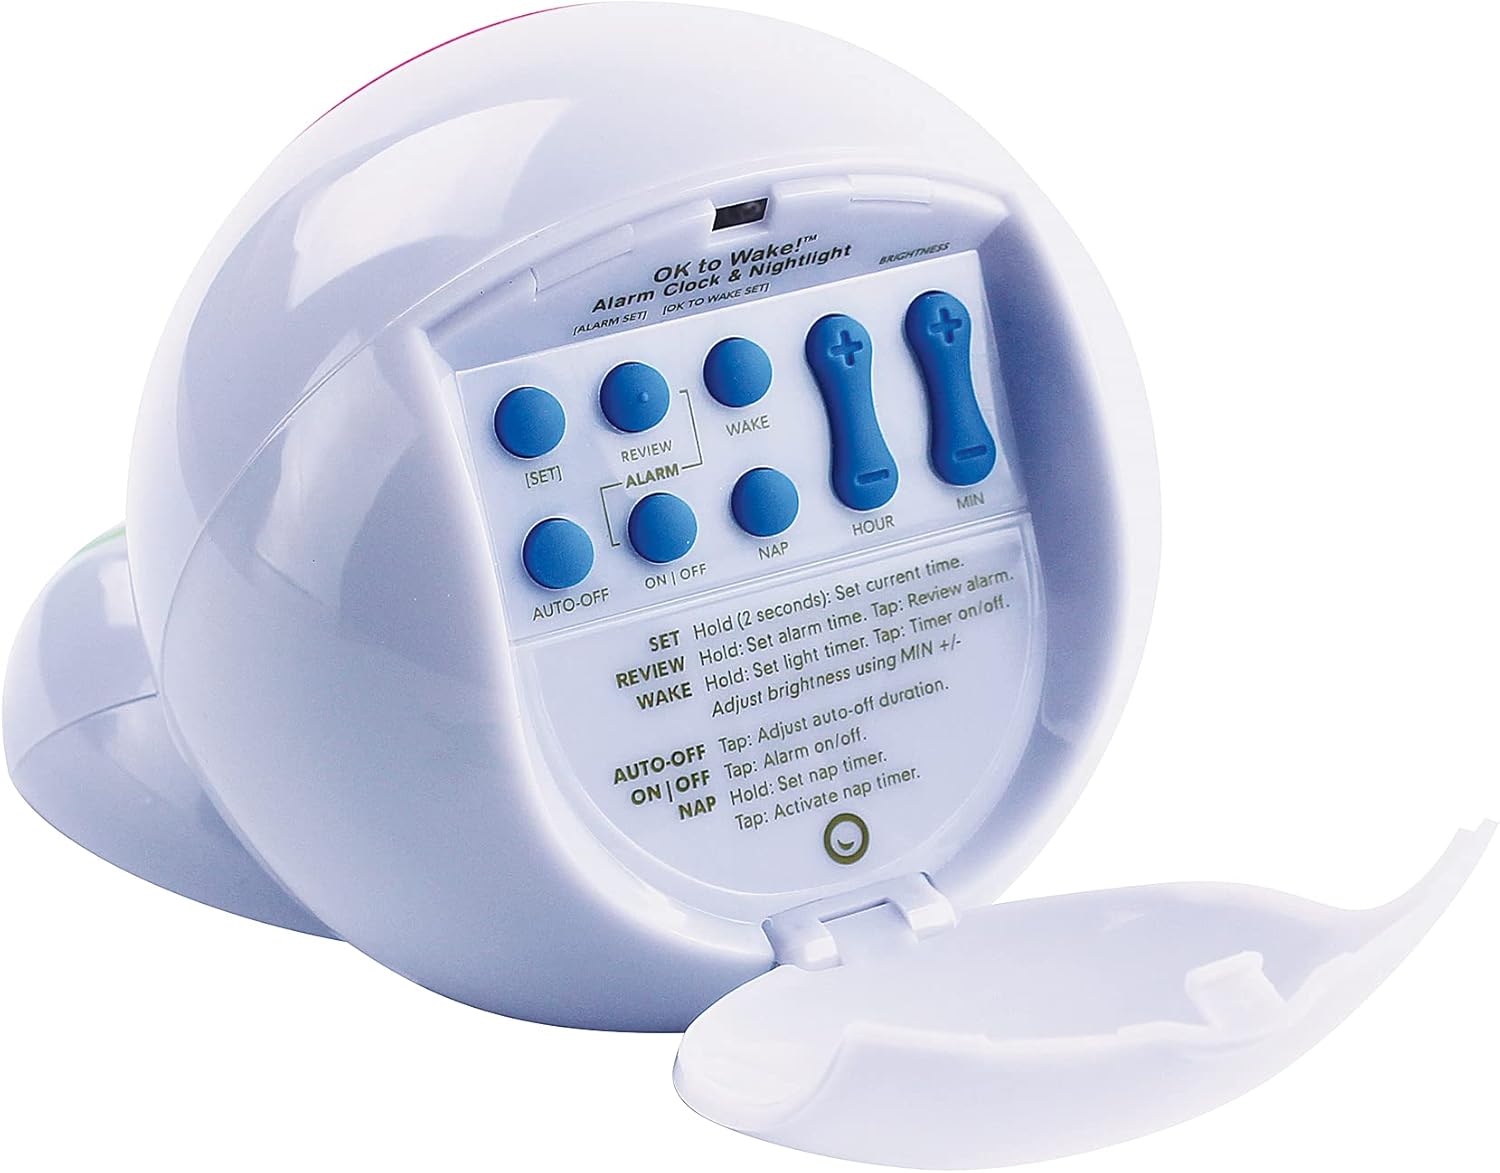
Figure 4: Rear view of the OK to Wake! Alarm Clock, highlighting the control buttons for various settings.
Setting Current Time
- Press and hold the SET button for 2 seconds until the hour digits flash.
- Use the HOUR and MIN buttons to adjust the current hour and minute.
- Press SET again to confirm and exit.
Setting OK to Wake! Time (Green Light)
This feature uses a green light to indicate when it's time for your child to get out of bed.
- Press and hold the WAKE button for 2 seconds until the hour digits flash.
- Use the HOUR and MIN buttons to set the desired wake-up hour and minute.
- Press WAKE again to confirm. The clock will glow green at the set time.

Figure 5: The OK to Wake! Alarm Clock displaying a green glow, signifying 'Green means GO!' for children.
Setting Bedtime (Red Light - Visual Cue)
While the product primarily highlights the green 'OK to Wake' light, some models or settings may offer a visual cue for bedtime, such as a red light or closed eyes on the display, to indicate it's time to sleep.
- Consult your specific model's manual for detailed instructions on setting a visual bedtime cue.
- Typically, this involves setting a 'Sleep' time using a dedicated SLEEP button or a combination of SET and time buttons.
Using the Nap Timer
The nap timer allows you to set a specific duration for naps.
- Press the NAP button to activate the nap timer.
- Use the HOUR and MIN buttons to set the desired nap duration.
- Press NAP again to start the timer. The clock will display a countdown.
Setting the Alarm
The clock also functions as a traditional alarm clock.
- Press and hold the ALARM button for 2 seconds until the hour digits flash.
- Use the HOUR and MIN buttons to set the desired alarm time.
- Press ALARM again to confirm.
- To snooze the alarm, tap one of the 'toe' buttons. To turn it off, tap the other 'toe' button.
Adjusting Night-Light and Brightness
The night-light can be customized for color and brightness.
- To cycle through different night-light colors, tap the right 'toe' button.
- To adjust the brightness of the night-light, tap the left 'toe' button.
- To adjust the display brightness, use the MIN +/- buttons when in time display mode.
Activating Fun Animations
The clock features entertaining animations to give it personality.
- Simply tap the 'toe' buttons on the front of the clock to see various animations on the display.
Child Lock Feature
To prevent children from accidentally changing settings, the clock may feature a child lock. Refer to the manual or product videos for specific instructions on activating and deactivating this feature.
Official Product Videos
How to Use
Video 1: A comprehensive guide from Play Monster LLC demonstrating the various functions and settings of the OK to Wake! Alarm Clock & Night-Light.
Steps to Set and Review the Green Light
Video 2: A detailed demonstration by Merchant Video on how to set and review the green 'OK to Wake!' light feature on the alarm clock.
Maintenance
- Cleaning: Wipe the clock with a soft, dry cloth. Do not use abrasive cleaners or immerse in water.
- Battery Replacement: If using battery backup, replace 4 AA batteries when the display dims or functions become unreliable. Ensure correct polarity.
Troubleshooting
- Clock not turning on: Ensure the USB cable is securely plugged into both the clock and a working power source. If using battery backup, check battery installation and charge level.
- Settings not saving: Verify that the child lock feature is not engaged. Ensure you are pressing the correct confirmation button (e.g., SET, ALARM, WAKE) after making adjustments.
- Light not changing color: Check that the OK to Wake! or night-light functions are properly set and activated.
Specifications
| Feature | Detail |
|---|---|
| Brand | PlayMonster |
| Model Number | DP8091Z |
| Color | Multicolor |
| Display Type | Digital |
| Product Dimensions | 5"W x 4.3"H |
| Power Source | Battery Powered, Corded Electric |
| Batteries Required | 4 AA batteries (not included) |
| Material | Plastic |
| Special Feature | Interchangeable faceplates |
Warranty and Support
For warranty information or customer support, please refer to the contact details provided with your product packaging or visit the official PlayMonster website.


