1. Introduction
This manual provides essential information for the safe and effective installation, operation, and maintenance of your Robertshaw Furnace Hot Surface Ignitor, Model CECOMINOD002711. This ignitor is designed as a direct replacement for specific Carrier, Bryant, and Payne furnace models, replacing OEM part numbers LH33ZS001, LH33ZS002, LH33ZS003, and LH33ZS004.
Please read these instructions thoroughly before proceeding with any installation or service to ensure proper function and safety.
2. Product Overview and Components
The Robertshaw Hot Surface Ignitor is a critical component in gas furnaces, responsible for igniting the gas burner. It features a durable ceramic block and a heating element designed for reliable performance.
- Ceramic Block: Measures approximately 2 inches wide, 7/8 inch deep, and 5/8 inch thick. It includes locating ridges on all four corners.
- Heating Element: The ignitor's heating element portion is 2-1/4 inches long.
- Lead Wires: The ignitor is equipped with 5-1/4 inch long lead wires.
- Connector Plug: The wires terminate in a plug with two male pins, housed within a connector that has one square end and one pointed end. This design ensures compatibility with many Carrier, Bryant, Payne, and Day & Night furnace models.
- Included Accessories: Two high-temperature ceramic wire nuts are provided for alternative connection methods, should the existing plug be damaged or the lead wires require extension.
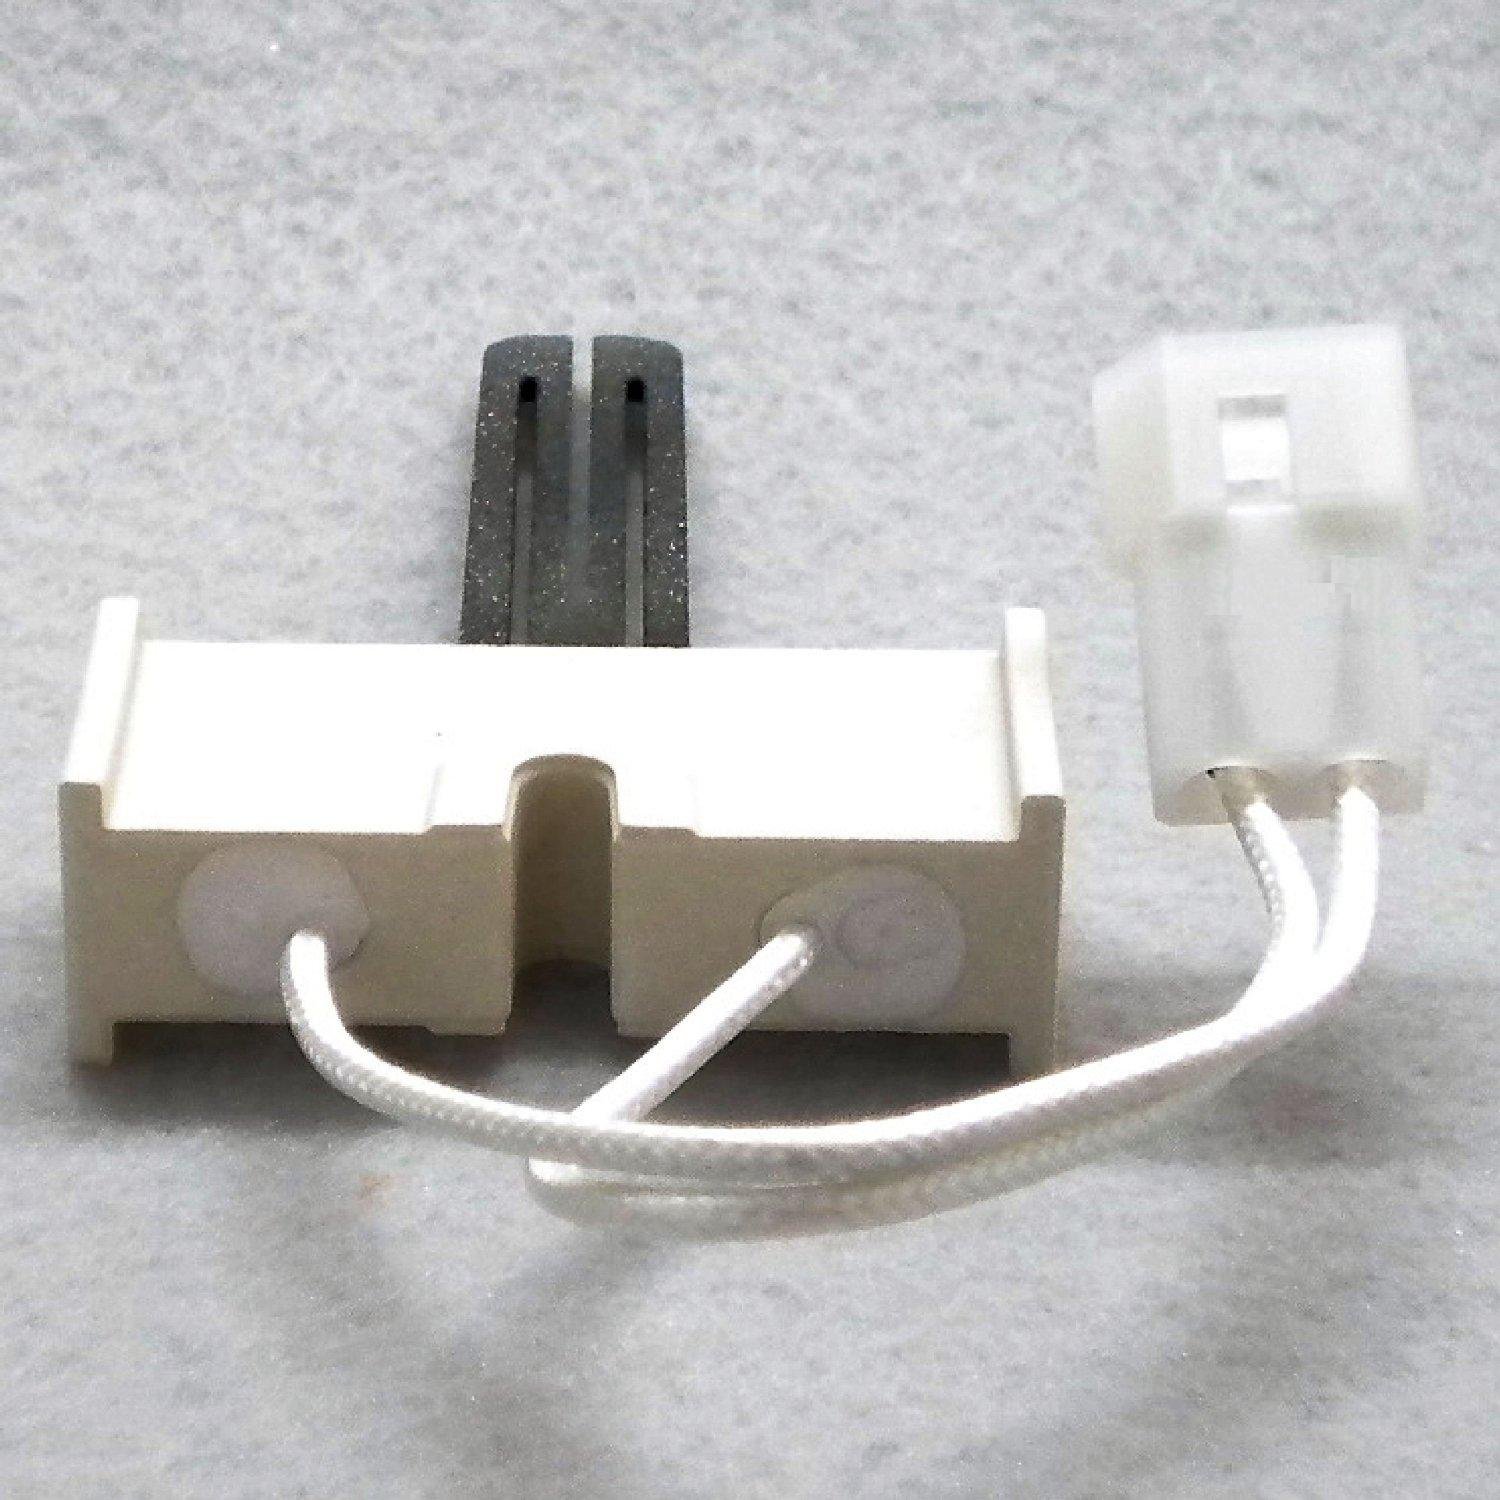
Figure 2.1: Front view of the Robertshaw Furnace Hot Surface Ignitor, showing the ceramic block, heating element, and lead wires with connector.
3. Compatibility
This Robertshaw ignitor (Model CECOMINOD002711) is a direct replacement for the following OEM part numbers:
- Carrier LH33ZS001
- Carrier LH33ZS002
- Carrier LH33ZS003
- Carrier LH33ZS004
- Bryant LH33ZS001
- Bryant LH33ZS002
- Bryant LH33ZS003
- Bryant LH33ZS004
- Payne LH33ZS001
- Payne LH33ZS002
- Payne LH33ZS003
- Payne LH33ZS004
- Day & Night (various models using the above part numbers)
Always verify the original part number in your furnace before purchasing and installing a replacement ignitor.
4. Safety Information
WARNING: Improper installation, adjustment, alteration, service, or maintenance can cause property damage, personal injury, or loss of life. Read and understand these instructions completely before proceeding. Installation and service must be performed by a qualified installer, service agency, or the gas supplier.
- Disconnect Power: Always turn off the electrical power to the furnace at the main service panel before attempting any installation, maintenance, or service.
- Gas Supply: Ensure the gas supply to the furnace is turned off before working on the ignitor or burner assembly.
- Handle with Care: The ignitor's heating element is fragile. Avoid touching the black silicon carbide element with bare hands, as oils from your skin can shorten its lifespan. Handle the ignitor by its ceramic base.
- Personal Protective Equipment: Wear appropriate personal protective equipment, such as gloves and safety glasses, during installation.
- Verify Connections: Double-check all electrical and gas connections before restoring power and gas supply.
- Qualified Personnel: If you are not comfortable performing this repair, contact a qualified HVAC technician.
5. Setup and Installation
Follow these general steps for replacing your furnace's hot surface ignitor. Specific furnace models may have slight variations.
- Prepare for Installation:
- Turn off all electrical power to the furnace at the main circuit breaker or fuse box.
- Turn off the gas supply to the furnace.
- Access the furnace's burner compartment. This usually involves removing an access panel.
- Locate the Old Ignitor: The ignitor is typically located near the gas burners, often secured by one or two screws.
- Disconnect the Old Ignitor:
- Carefully disconnect the electrical plug from the old ignitor.
- Remove the screws holding the old ignitor in place.
- Gently pull the old ignitor out of its mounting bracket.
- Install the New Ignitor:
- Handle the new ignitor by its ceramic base only. Do not touch the black heating element.
- Insert the new ignitor into the mounting bracket, ensuring it is correctly oriented.
- Secure the ignitor with the screws removed earlier. A 1/4" socket and driver are often sufficient.
- Connect Wiring:
- Connect the new ignitor's plug to the furnace's wiring harness. Ensure a secure connection.
- If the original plug is damaged or the wires are too short, use the provided high-temperature ceramic wire nuts to make a secure, insulated connection.
- Final Checks:
- Ensure all connections are tight and secure.
- Verify the ignitor is properly positioned and not touching any other components.
- Replace any access panels removed earlier.
- Restore Power and Gas:
- Turn on the gas supply to the furnace.
- Restore electrical power to the furnace at the main service panel.
- Initiate a heating cycle to test the new ignitor. Observe for proper ignition.

Figure 5.1: Side view of the ignitor, showing the heating element.

Figure 5.2: Connector plug diagram showing male pin terminals.
6. Operation
When the thermostat calls for heat, the furnace control board sends voltage to the hot surface ignitor. The ignitor heats up rapidly to a very high temperature, glowing bright orange. Once the ignitor reaches its optimal temperature, the gas valve opens, allowing gas to flow over the hot ignitor. The gas ignites, and the ignitor then typically de-energizes after a short period, allowing the flame sensor to take over monitoring the flame.
7. Maintenance
Hot surface ignitors are generally maintenance-free components. However, regular furnace maintenance can help prolong their life:
- Annual Furnace Inspection: Have your furnace inspected annually by a qualified HVAC technician. They can check the ignitor's condition and overall furnace health.
- Cleanliness: Ensure the area around the ignitor and burners is free from dust, debris, and obstructions.
- Avoid Contamination: As mentioned, avoid touching the ignitor element with bare hands. If the element becomes contaminated with oil or dirt, it can lead to premature failure.
8. Troubleshooting
If your furnace is not igniting, the hot surface ignitor is a common point of failure. Here are some troubleshooting steps:
- No Glow: If the ignitor does not glow when the thermostat calls for heat, it may be faulty or not receiving power.
- Check for power to the furnace.
- Inspect wiring connections to the ignitor.
- A qualified technician can test the ignitor's resistance (ohms) to confirm if it's open or shorted. A typical working ignitor will have a resistance between 40 to 75 ohms.
- Glows but No Ignition: If the ignitor glows but the gas does not ignite, there might be an issue with the gas supply, gas valve, or flame sensor.
- Ensure the gas supply valve to the furnace is open.
- Check if other gas appliances in your home are working.
- The flame sensor might be dirty or faulty, preventing the gas valve from staying open.
- Intermittent Ignition: This could indicate a weak ignitor, a dirty flame sensor, or other control board issues.
Note: Many furnaces have diagnostic LED codes visible through a small window. Consult your furnace's specific manual for these codes.
9. Specifications
| Model Number | CECOMINOD002711 |
| Manufacturer | Robertshaw |
| Product Dimensions (Packaging) | Approximately 6 x 6 x 6 inches |
| Item Weight | 2.89 ounces |
| Ignitor Ceramic Block Dimensions | 2" wide x 7/8" deep x 5/8" thick |
| Heating Element Length | 2-1/4" |
| Lead Wire Length | 5-1/4" |
| Connector Type | Plug with two male pins (one square, one pointed end) |
| Replaces OEM Part Numbers | LH33ZS001, LH33ZS002, LH33ZS003, LH33ZS004 |
10. Warranty and Support
Specific warranty information for this product may vary. Please refer to the packaging or contact Robertshaw directly for details regarding warranty coverage and terms.
For technical support or further assistance, please visit the official Robertshaw website or contact their customer service department. You can also refer to the Robertshaw Store on Amazon for additional product information.


