
JVC GY-HM70U
JVC GY-HM70U HD Shoulder Mount Camcorder User Manual
Model: GY-HM70U | Brand: JVC
1. Introduction
This manual provides detailed instructions for the safe and effective use of your JVC GY-HM70U HD Shoulder Mount Camcorder. Please read this manual thoroughly before operating the camcorder and retain it for future reference. The GY-HM70U is designed for high-quality video capture, featuring a 29.5mm wide-angle GT lens, 1080/60P AVCHD Progressive recording, and a dual SDHC/SDXC memory card system.
2. Safety Information
- Power Source: Use only the specified AC adapter (AP-V20) or compatible battery pack (BN-VF823).
- Moisture: Do not expose the camcorder to rain, moisture, or high humidity to prevent electric shock or damage.
- Temperature: Operate the camcorder within the specified temperature range of 0°C to 40°C (32°F to 104°F).
- Cleaning: Disconnect the power before cleaning. Use a soft, dry cloth. Avoid liquid cleaners.
- Disassembly: Do not attempt to disassemble or modify the camcorder. Refer all servicing to qualified personnel.
- Lens Care: Avoid touching the lens surface directly. Use a lens cleaning cloth if necessary.
3. Package Contents
Verify that all the following items are included in your package:
- AC adapter (AP-V20)
- Battery pack (BN-VF823)
- Composite/audio cable (RCA x 3)
- USB cable
- Operation manual (CD-ROM)
4. Product Overview
Familiarize yourself with the main components and controls of your JVC GY-HM70U camcorder.

Figure 4.1: Front-Side View of the JVC GY-HM70U Camcorder. This image displays the camcorder from a front-side angle, highlighting the main lens, the integrated microphone, and the attached external microphone with a wind muff. The shoulder mount design is also visible.
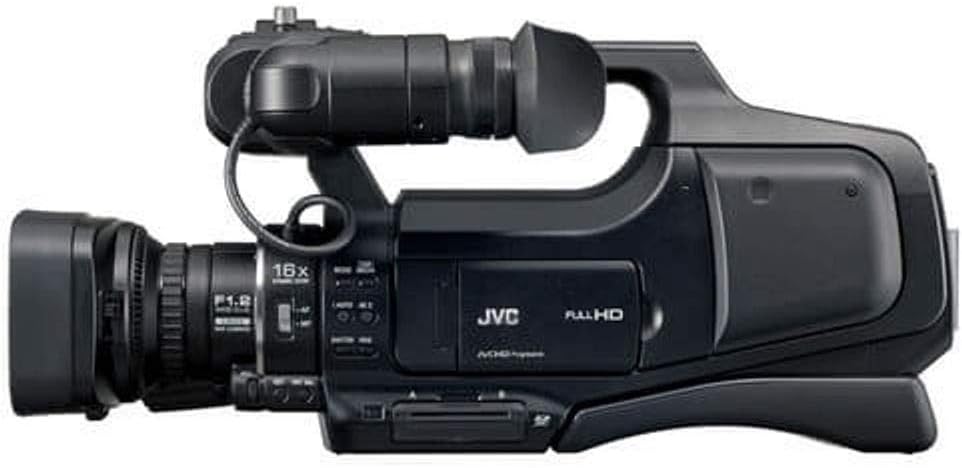
Figure 4.2: Side View of the JVC GY-HM70U Camcorder. This view shows the camcorder's left side, detailing the lens barrel, zoom controls, and various function buttons. The handle and part of the shoulder pad are also visible.

Figure 4.3: Rear View of the JVC GY-HM70U Camcorder. This image focuses on the rear of the camcorder, clearly showing the dual battery compartments with two batteries inserted, the viewfinder, and various input/output ports on the right side.
5. Setup
5.1. Battery Installation and Charging
- Ensure the camcorder is powered off.
- Locate the battery compartments at the rear of the camcorder (refer to Figure 4.3).
- Insert the BN-VF823 battery pack(s) into the compartments, ensuring correct orientation until they click into place.
- Connect the AC adapter (AP-V20) to the camcorder's DC input and then to a power outlet to charge the battery. The charging indicator will illuminate.
- The GY-HM70U features a unique dual snap-on battery system allowing for hot-swapping during recording for extended operation.
5.2. SD Card Installation
- Ensure the camcorder is powered off.
- Locate the dual SDHC/SDXC memory card slots, typically on the side or bottom of the camcorder body.
- Insert a compatible SDHC or SDXC card (Class 4/6/10 recommended) into a slot with the label facing the correct direction until it clicks.
- To remove, gently push the card in until it springs out.
6. Operating the Camcorder
6.1. Power On/Off
Locate the power switch, usually near the handle or rear panel. Slide it to the 'ON' position to power on the camcorder. Slide to 'OFF' to power down.
6.2. Basic Recording
- Power on the camcorder.
- Open the LCD monitor or use the viewfinder to frame your shot.
- Press the RECORD START/STOP button (typically located on the handle or rear) to begin recording. The recording indicator will illuminate.
- Press the RECORD START/STOP button again to stop recording.
6.3. Zoom Operation
The camcorder features a 10x optical zoom, 16x dynamic zoom, and up to 200x digital zoom.
- Zoom Lever: Use the zoom lever on the handle to smoothly adjust the focal length. Push forward for telephoto (zoom in) and pull back for wide-angle (zoom out).
- Dynamic Zoom: The 16x dynamic zoom utilizes the 12MP imager to achieve extended zoom without pixel enlargement, unlike digital zoom.
- Digital Zoom: Digital zoom (up to 200x) can be enabled via the menu, but it will result in a loss of resolution.
6.4. Focus Adjustment
The camcorder supports both autofocus and manual focus.
- Autofocus: In auto mode, the camcorder automatically adjusts focus. Touch priority AE/AF is available via the LCD screen.
- Manual Focus: Switch to manual focus mode using the dedicated switch or menu option. Rotate the focus ring on the lens barrel to adjust focus. Use the Focus Assist function for precise manual focusing.
6.5. Exposure Control (Iris, Shutter, White Balance)
Manual control over exposure settings is available for advanced users.
- Iris: Adjust the aperture (F1.2-5.6) manually using the iris control. Auto iris is also available.
- Shutter Speed: Manually set the shutter speed from 1/2 to 1/4000 seconds.
- White Balance: Select from Auto, MWB (Manual White Balance), 5200K, 6000K, or 3200K presets.
- Gain: Adjust gain (OFF, ON, AUTO SLOW-SHUTTER) to control image brightness in low light conditions.
- Zebra Indication: Enable zebra patterns (Over 100%/70-80%/OFF) to identify overexposed areas.
6.6. LCD Monitor and Viewfinder
- 3-inch Touch Screen LCD: The flip-out LCD provides a clear view for framing, playback, and menu navigation via touch input.
- 0.24-inch LCOS Color Viewfinder: Use the viewfinder for stable shooting, especially in bright conditions or when shoulder-mounted.
6.7. Special Recording Functions
- High-Speed Video Recording: Capture slow-motion footage at 300 fps (720x480 resolution).
- Time Lapse Recording: Set intervals from 1 to 80 seconds for time-lapse sequences.
- Still Image Capture: Capture 12MP digital still images (JPEG format) or 2MP stills during video recording.

Figure 6.1: User Operating the JVC GY-HM70U Camcorder. This image demonstrates the camcorder in use, showing a person operating the shoulder-mounted unit, highlighting its ergonomic design for stable handheld shooting.
7. Connectivity
7.1. Video Output
- HDMI Mini Connector: Connect to an external monitor or TV for high-definition video output.
- RCA Video Output: For standard definition video output to compatible displays.
7.2. Audio Input/Output
- 3.5mm Microphone Input: Connect an external stereo microphone (plug-in power supported).
- 3.5mm Headphone Output: Monitor audio during recording or playback.
- RCA Audio Output: For stereo audio output to compatible audio systems.
7.3. USB Connection
Use the Mini USB Type AB port (USB 2.0 compliant) to connect the camcorder to a computer for file transfer.
7.4. Remote Control
A 3.5mm mini jack is provided for connecting a remote control unit, such as the HZ-M150VZR remote lens control unit (sold separately).
8. Maintenance
- Cleaning the Body: Wipe the camcorder body with a soft, dry cloth. For stubborn dirt, use a cloth lightly dampened with water and then wipe dry. Avoid abrasive cleaners.
- Cleaning the Lens: Use a lens brush to remove dust, then gently wipe with a lens cleaning cloth. Do not use paper towels or harsh chemicals.
- Battery Care: Store batteries in a cool, dry place. Fully charge batteries before extended storage and recharge every 6 months to maintain battery health.
- Storage: When not in use for extended periods, store the camcorder in a dry, dust-free environment, preferably in a protective case. Remove batteries before long-term storage.
9. Troubleshooting
This section provides solutions to common issues. If the problem persists, contact JVC customer support.
- Camcorder does not power on: Ensure the battery is charged and correctly inserted, or the AC adapter is properly connected.
- Cannot record: Check if an SD card is inserted and has sufficient free space. Ensure the card is not write-protected.
- No image on LCD/Viewfinder: Check if the LCD is open and the viewfinder is properly engaged. Adjust brightness settings if necessary.
- Poor image quality: Verify lens is clean. Check focus settings (auto/manual). Adjust exposure settings (iris, shutter, white balance) for current lighting conditions.
- No audio: Ensure the microphone is properly connected and enabled. Check audio input levels and headphone connection.
10. Specifications
| Category | Specification |
|---|---|
| General | |
| Power | DC 11V (AC adaptor), DC 7.2V (Battery) |
| Power Consumption | Approx. 3.6W (LCD monitor backlight set to [Level 3], 1920 x 1080i mode) |
| Dimensions (W x H x D) | 227 x 232 x 476mm (8-15/16" x 9-1/8" x 18-3/4") (without battery) |
| Mass | Approx. 3.0kg (6.7lbs) (Including one BN-VF823 battery, SDHC card) |
| Operating Temperature | 0°C to 40°C (32°F to 104°F) |
| Storage Temperature | -20°C to 50°C (14°F to 122°F) |
| Operating Humidity | 35% to 80% |
| Storage Humidity | Under 85% |
| Camera | |
| Synchronizing System | Internal synchronization |
| Stabilizer | Optical Image Stabilization with Enhanced Advanced Image Stabilizer |
| Lens | JVC HD GT LENS F1.2-2.8, f=3.76-37.6mm (35mm conversion: 29.5mm to 476mm) |
| Zoom Ratios | Optical 10x, Dynamic 16x, Digital (max.) 200x |
| Focus | Auto/Manual |
| Filter Diameter | 46mm (screw pitch 0.75mm) |
| Image Sensor | 1/2.3" 12M pixels progressive scan 1CMOS |
| Recording Area Video | 5.4M to 2.07M pixels |
| Recording Area Still Image (16:9) | 5.4M to 2.07M pixels |
| Recording Area Still Image (4:3) | 6.04M to 4.5M pixels |
| Gain | OFF, ON, AUTO SLOW-SHUTTER |
| Minimum Illumination | 1 lx: GAIN UP AUTO SLOW-SHUTTER mode, Shutter Speed 1/30 |
| Shutter Speed | 1/2 to 1/4000 |
| Iris | F1.2-5.6 |
| White Balance | Auto, MWB, 5200K, 6000K, 3200K |
| High-Speed Video Recording | 300 fps (fixed) (Resolution: 720x480) |
| Continuous Still Shooting Speed | High: Approx. 12.5 images/sec, Medium: Approx. 6.25 images/sec, Low: Approx. 2 images/sec |
| LCD Display | 3.0" LCD 230K pixels, 16:9 |
| Viewfinder | 0.24" LCOS 260K pixels, 16:9 |
| Internal Microphone | 2ch Stereo (with Zoom Microphone Function) |
| Video/Audio Recording | |
| Recording Media | SDHC/SDXC (Class 4/6/10) Card, 2 Memory Card Slots |
| Recording Format Video | HD: AVCHD/AVCHD Progressive, MPEG-4 AVC/H.264 |
| Recording Format Audio | Dolby Digital 2ch (AC3) 48kHz/16-bit, 256kbps |
| Recording Modes (HD Progressive) | 1920 x 1080/60p: Approx. 28Mbps (max) |
| Recording Modes (HD Interlaced) | UXP: 1920 x 1080/60i: Approx. 24Mbps XP: 1920 x 1080/60i: Approx. 17Mbps SP: 1920 x 1080/60i: Approx. 12Mbps EP: 1920 x 1080/60i: Approx. 5Mbps |
| Recording Modes (SD) | SSW (16:9): 720x480/60i: Approx. 6Mbps SEW (16:9): 720x480/60i: Approx. 3Mbps |
| Still Image Recording | |
| Recording Media | SD/SDHC/SDXC Card |
| Recording Format | JPEG |
| Interface | |
| Video Output | RCA x1, HDMI Mini Connector x1 |
| Audio Output | RCA x2 |
| Mic Input | 3.5mm mini jack (stereo) x1 (Plug in power) |
| Headphone | 3.5mm mini jack (stereo) x1 |
| USB | Mini USB Type AB, USB 2.0 compliant |
| Remote | 3.5mm mini jack x1 |
11. Warranty and Support
For warranty information, please refer to the warranty card included with your product or visit the official JVC website. For technical support, service, or inquiries, please contact JVC customer service through their official channels. Keep your proof of purchase for warranty claims.
Related documentsGY-HM70U


Ask a question about this manual
Ask about setup, troubleshooting, compatibility, parts, safety, or missing instructions. Manuals+ will review the question and use this page’s manual context to help answer it.