
1. Introduction
The Cooler Master Elite 130 (RC-130-KKN1) is a compact Mini-ITX computer case designed for high-performance systems. It features a mesh front panel for optimal airflow and supports water cooling solutions, full-size ATX power supplies, and long graphics cards. This manual provides detailed instructions for setting up, operating, and maintaining your Elite 130 case.
2. Setup and Installation
Before beginning installation, ensure you have a Phillips head screwdriver and refer to your motherboard and component manuals for specific instructions.
2.1. Prepare the Case
Remove the side panels by unscrewing the thumbscrews at the rear of the case. The top panel can also be removed for easier access.

Image: Angled view of the Cooler Master Elite 130 case with the side panel removed, showing the internal structure.
2.2. Motherboard Installation
- Install your CPU and RAM onto the Mini-ITX motherboard according to your motherboard's instructions.
- Install the I/O shield into the rear opening of the case.
- Install the motherboard standoffs into the appropriate holes on the motherboard tray.
- Carefully place the motherboard onto the standoffs, aligning the screw holes. Secure the motherboard with screws.

Image: Empty interior of the Cooler Master Elite 130 case, showing the motherboard tray and drive bays.
2.3. Storage Device Installation
The Elite 130 supports various drive configurations:
- One 5.25" optical drive bay (external).
- Three 3.5" HDD bays (internal).
- Four 2.5" SSD bays (internal).
Install your hard drives or SSDs into the designated bays using the provided screws or tool-less mechanisms.
2.4. Graphics Card (VGA) Installation
The case supports long graphics cards. Carefully insert your graphics card into the PCIe slot on the motherboard and secure it with the retention clip and a screw at the rear of the case.

Image: Interior view of the Cooler Master Elite 130 case with a large graphics card installed.
2.5. Power Supply Unit (PSU) Installation
The Elite 130 supports standard ATX PS2 power supplies. Install the PSU into its designated mounting area, typically at the front of the case, and secure it with screws.
2.6. Cable Management
Route all power and data cables neatly to ensure optimal airflow and a clean build. Utilize cable tie points within the chassis to secure cables.
2.7. Official Installation Video
For a visual guide on the installation process, please refer to the official Cooler Master Elite 130 installation video:
Video: Detailed installation guide for the Cooler Master Elite 130 Mini-ITX Computer Case, demonstrating component placement and cable management.
3. Operating
Once all components are installed and secured, connect your peripherals and power cable. The mesh front panel ensures good airflow for cooling your components. Ensure the case is placed in a well-ventilated area to maintain optimal operating temperatures.
4. Maintenance
Regular maintenance helps prolong the life of your components and ensures optimal performance.
4.1. Dust Filter Cleaning
The Elite 130 features a mesh front panel that acts as a dust filter. Periodically remove the front panel and clean any accumulated dust using compressed air or a soft brush. This prevents dust buildup inside the case, which can hinder cooling performance.
4.2. General Cleaning
Use a soft, dry cloth to wipe down the exterior of the case. For internal cleaning, use compressed air to remove dust from fans, heatsinks, and other components. Always disconnect the power cable before performing any internal cleaning.
5. Troubleshooting
If you encounter any issues with your Cooler Master Elite 130 case, consider the following common troubleshooting steps:
- No Power: Ensure all power cables (24-pin ATX, 8-pin CPU, GPU power) are securely connected to the motherboard and components. Verify the PSU switch is in the 'ON' position.
- Overheating: Check that all case fans and CPU/GPU coolers are functioning correctly. Ensure dust filters are clean and the case has adequate airflow.
- Component Fit Issues: Double-check component dimensions against the case specifications. Some larger components may require specific installation sequences or removal of drive cages.
For further assistance, please contact Cooler Master customer support.
6. Specifications
| Feature | Specification |
|---|---|
| Case Type | Mini-ITX Tower |
| Color | Midnight Black |
| Motherboard Support | Mini-ITX |
| Expansion Slots | 2 |
| Power Supply Support | Standard ATX PS2 (None included) |
| Dimensions (L x W x H) | 14.9 x 9.4 x 8.1 inches (377.5 x 240 x 205 mm) |
| Item Weight | 6.6 pounds |
| Cooling Method | Air |
| Fan Size | 120 Millimeters (front) |
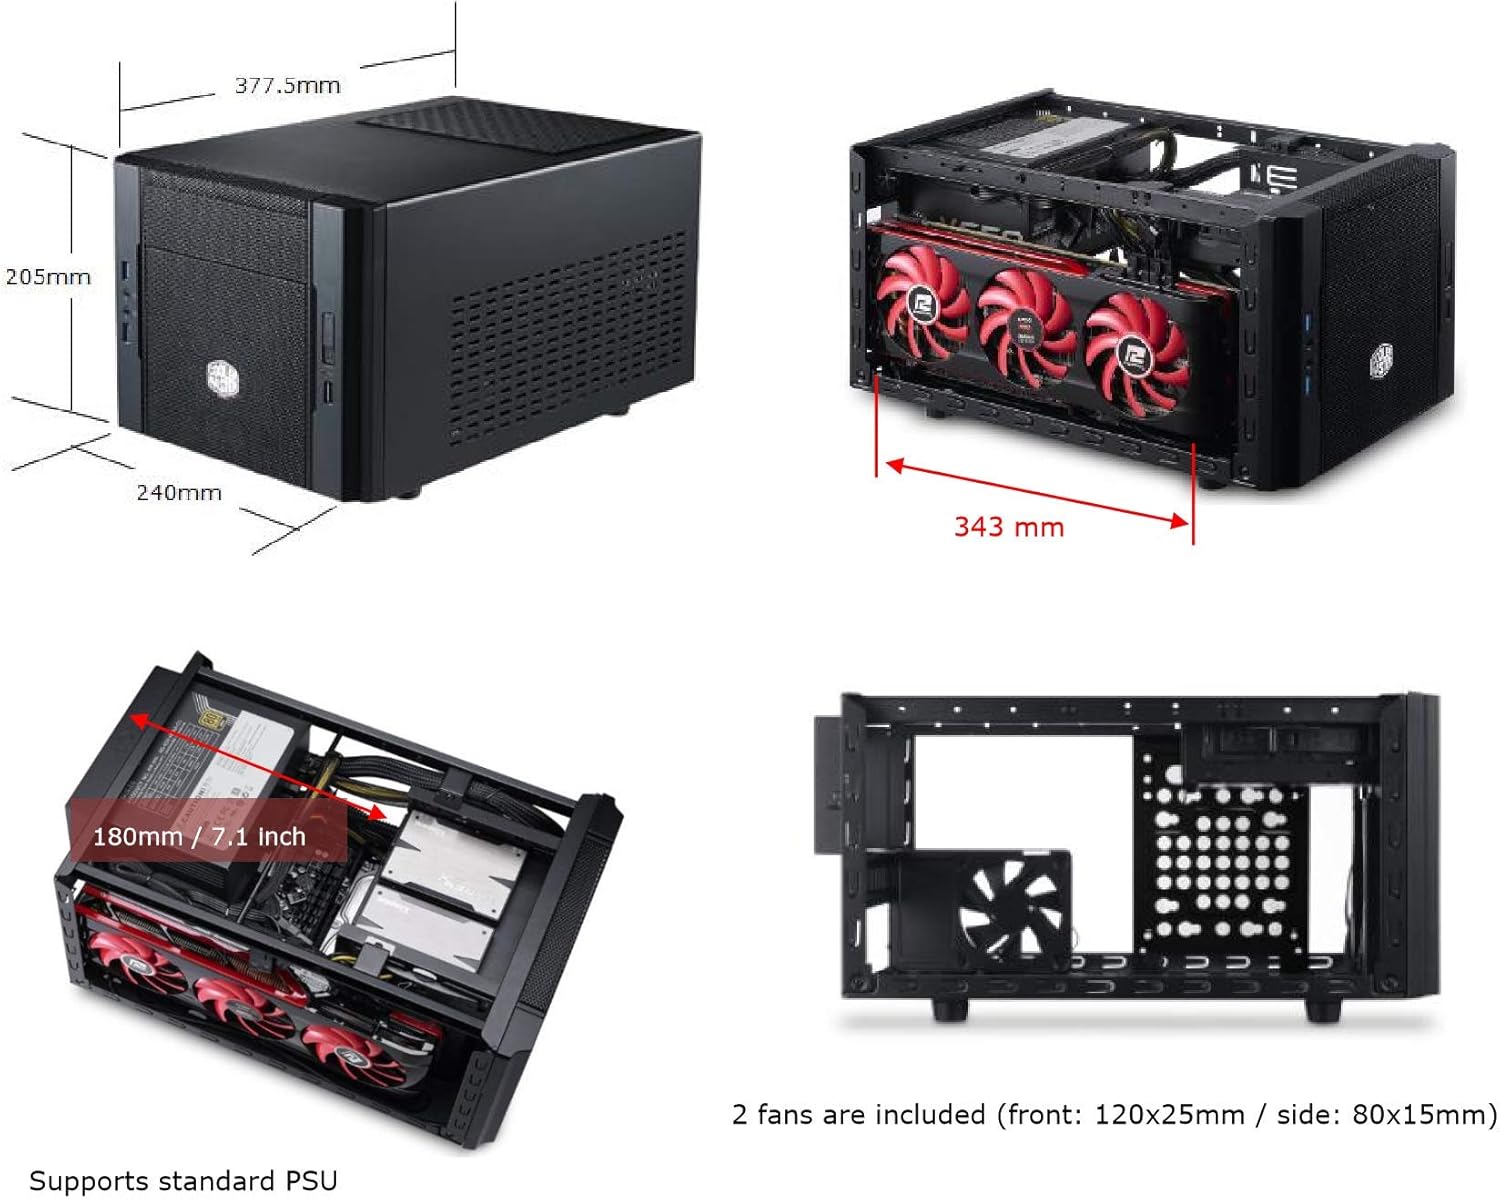
Image: Diagram showing the dimensions and internal layout of the Cooler Master Elite 130 case, highlighting component compatibility.
7. Warranty and Support
For warranty information, technical support, and customer service, please visit the official Cooler Master website or contact their authorized service centers. Keep your proof of purchase for warranty claims.
Official Cooler Master Website: www.coolermaster.com