Introduction
This manual provides essential information for the safe and efficient operation of your Oster Inspire Large Toaster Oven. Please read all instructions carefully before first use and retain for future reference. This appliance is designed to elevate your cooking experience with its versatile functions and spacious capacity.
Important Safety Instructions
When using electrical appliances, basic safety precautions should always be followed to reduce the risk of fire, electric shock, and/or injury to persons, including the following:
- Read all instructions before operating the appliance.
- Do not touch hot surfaces. Use handles or knobs.
- To protect against electrical shock, do not immerse cord, plugs, or appliance in water or other liquid.
- Close supervision is necessary when any appliance is used by or near children.
- Unplug from outlet when not in use and before cleaning. Allow to cool before putting on or taking off parts.
- Do not operate any appliance with a damaged cord or plug or after the appliance malfunctions or has been damaged in any manner.
- The use of accessory attachments not recommended by the appliance manufacturer may cause injuries.
- Do not use outdoors.
- Do not let cord hang over edge of table or counter, or touch hot surfaces.
- Do not place on or near a hot gas or electric burner, or in a heated oven.
- Extreme caution must be used when moving an appliance containing hot oil or other hot liquids.
- Do not use appliance for other than intended use.
- To disconnect, turn any control to 'OFF', then remove plug from wall outlet.
- Oversize foods or metal utensils must not be inserted in a toaster oven as they may create a fire or risk of electric shock.
- A fire may occur if the toaster oven is covered or touching flammable material, including curtains, drapes, walls, and the like, when in operation.
- Do not place any materials other than manufacturer's recommended accessories in this oven.
- Do not place cardboard, plastic, paper, or similar combustible materials in the oven.
- Do not store any materials, other than manufacturer's recommended accessories, in this oven when not in use.
Product Overview and Features
The Oster Inspire Large Toaster Oven offers a range of functionalities designed for diverse cooking needs. Its stainless steel finish complements modern kitchen aesthetics.

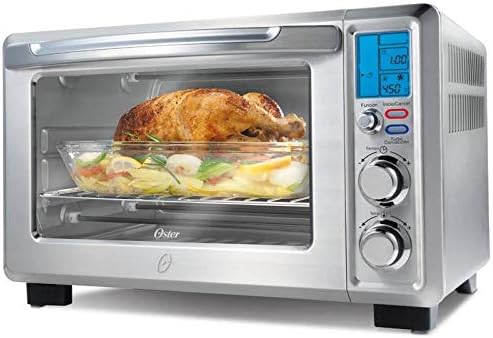
Oster Inspire Toaster Oven with chicken and pizza cooking inside. This image displays the spacious interior accommodating multiple dishes simultaneously.
Key Features:
- Versatile Cooking Functions: Includes Toast, Convection Bake, Bake, Broil, Warm, Pizza, and Bagel settings.
- Large Capacity: Accommodates up to 6 slices of toast or a 12-inch frozen pizza.
- User-Friendly Controls: Features soft grip control knobs and an extra-large LCD back-light display for easy operation.
- Convection Technology: Ensures even and fast baking results.
- Durable Design: Constructed with a contemporary stainless steel finish.
Side view of the Oster Inspire Toaster Oven with a whole roasted chicken. This illustrates the oven's depth and capacity for larger items.
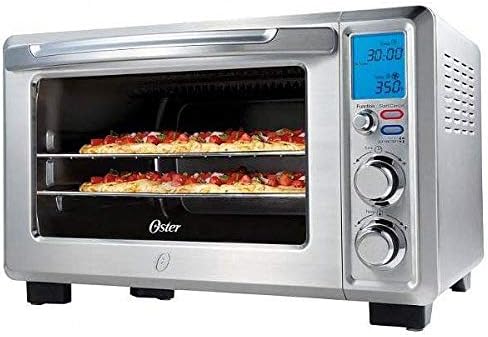
Front view of the Oster Inspire Toaster Oven showing two pizzas on separate racks. This highlights the dual-rack cooking capability.
Setup
Before using your Oster Inspire Toaster Oven for the first time, please follow these steps:
- Unpack: Carefully remove all packaging materials, including any tape or protective film, from the toaster oven and its accessories.
- Clean: Wash the baking pan and broil rack in warm, soapy water. Rinse thoroughly and dry. Wipe the interior and exterior of the oven with a damp cloth.
- Placement: Place the toaster oven on a flat, stable, heat-resistant surface. Ensure there is adequate clearance (at least 4-6 inches) on all sides and above the oven for proper ventilation. Do not place it directly against a wall or under cabinets.
- Power Connection: Plug the power cord into a standard 120V AC electrical outlet.
- First Use Burn-Off: Before cooking food, operate the oven on the 'Bake' function at 450°F (230°C) for approximately 15 minutes. This will burn off any manufacturing oils and eliminate odors. A slight odor and smoke are normal during this initial use. Ensure the area is well-ventilated.
Operating Instructions
Your Oster Inspire Toaster Oven features intuitive controls for various cooking modes. The control panel includes three main knobs and an LCD display.

Side view of the Oster Inspire Toaster Oven on a kitchen counter, showing the control panel.
Control Panel Overview:
- Function Knob: Selects the desired cooking mode (Toast, Convection Bake, Bake, Broil, Warm, Pizza, Bagel).
- Temperature Knob: Adjusts the cooking temperature.
- Time Knob: Sets the cooking duration.
- LCD Display: Shows selected function, temperature, and time.
- Start/Cancel Buttons: Initiates or stops the cooking cycle.
Cooking Functions:
- Toast:
- Place bread slices on the wire rack.
- Turn the Function Knob to 'Toast'.
- Adjust the Time Knob to select desired toast shade (lighter to darker).
- Press 'Start'. The oven will automatically shut off when toasting is complete.
- Bake / Convection Bake:
- Place food in the baking pan or on the rack.
- Turn the Function Knob to 'Bake' or 'Convection Bake'.
- Set the desired temperature using the Temperature Knob.
- Set the cooking time using the Time Knob.
- Press 'Start'. The oven will preheat and then begin cooking.
- Broil:
- Place food on the broil rack within the baking pan to catch drippings.
- Turn the Function Knob to 'Broil'.
- Set the desired temperature using the Temperature Knob (typically high for broiling).
- Set the cooking time using the Time Knob.
- Press 'Start'. Monitor food closely to prevent burning.
- Pizza:
- Place pizza directly on the wire rack or in a pizza pan.
- Turn the Function Knob to 'Pizza'.
- Adjust temperature and time as recommended by the pizza packaging.
- Press 'Start'.
- Warm:
- Place food in the oven.
- Turn the Function Knob to 'Warm'.
- Set desired time.
- Press 'Start'.
- Bagel:
- Place bagel halves cut-side up on the wire rack.
- Turn the Function Knob to 'Bagel'.
- Adjust the Time Knob for desired shade.
- Press 'Start'.
Maintenance and Cleaning
Regular cleaning of your toaster oven will ensure optimal performance and longevity. Always unplug the appliance and allow it to cool completely before cleaning.
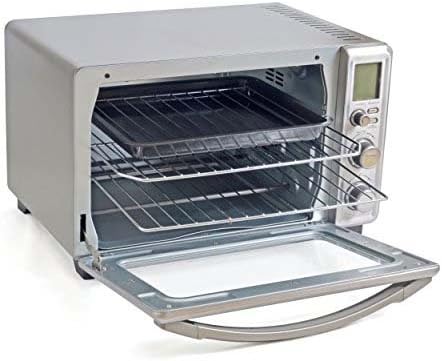
Interior view of the Oster Inspire Toaster Oven with racks and baking pan. Regular cleaning of these components is crucial.
Cleaning Steps:
- Crumb Tray: Pull out the removable crumb tray located at the bottom front of the oven. Discard crumbs and wash the tray in warm, soapy water. Rinse and dry thoroughly before replacing.
- Wire Rack and Baking Pan: These accessories can be washed in warm, soapy water. For stubborn food residue, soak them before scrubbing. They are also dishwasher-safe.
- Interior: Wipe the interior walls with a damp cloth and mild liquid soap. For baked-on grease, use a non-abrasive cleaner designed for oven interiors. Avoid using harsh abrasives or metal scouring pads.
- Exterior: Wipe the exterior surfaces with a soft, damp cloth. Do not use abrasive cleaners or polishes that may scratch the stainless steel finish.
- Glass Door: Clean the glass door with a glass cleaner or a damp cloth. Avoid harsh chemicals that could damage the door seal.
Troubleshooting
If your Oster Inspire Toaster Oven is not functioning as expected, please consult the following common issues and solutions:
| Problem | Possible Cause | Solution |
|---|---|---|
| Oven does not turn on. | Not plugged in; power outage; circuit breaker tripped. | Ensure plug is securely in outlet; check household circuit breaker; try another outlet. |
| Food not cooking evenly. | Incorrect rack position; overcrowding; uneven food placement. | Refer to recipe for recommended rack position; avoid overcrowding; arrange food in a single layer. |
| Excessive smoke during cooking. | Food drippings on heating elements; dirty interior/crumb tray. | Clean crumb tray and interior thoroughly; use baking pan under broil rack to catch drippings. |
| Toast is too light/dark. | Incorrect toast shade setting. | Adjust the Time Knob to a lighter or darker setting as desired. |
Specifications
Detailed technical specifications for the Oster TSSTTVDFL1 Inspire Large Toaster Oven:
| Specification | Detail |
|---|---|
| Brand | Oster |
| Model Number | TSSTTVDFL1 |
| Colour | Stainless Steel |
| Product Dimensions | 53.98 x 43.82 x 37.47 cm |
| Material | Stainless Steel |
| Special Features | Convection, Broiler Option |
| Item Weight | 8.16 kg |
| Control Type | Knob |
| Door Style | Dropdown Door |
| Included Components | Baking Pan |
| Finish Type | Painted, stainless steel |
Warranty and Support
For warranty information or product support, please refer to the documentation included with your purchase or visit the official Oster website. You may also contact Oster customer service directly for assistance with any issues or questions regarding your toaster oven.


