
Introduction
This manual provides essential instructions for the proper setup, operation, and maintenance of your Vivitar VX137-BLK 12.1MP Digital Touch Screen Camera. Please read this manual thoroughly before using your camera to ensure optimal performance and longevity.
Product Overview
The Vivitar VX137-BLK is a compact 12.1-megapixel digital camera featuring a 2.4-inch touchscreen display. It includes a 4x digital zoom and an anti-shake feature to assist in capturing clear images. This camera is designed for ease of use and portability.

Figure 1: Front view of the Vivitar VX137-BLK Digital Camera.
Camera Components
- Lens: Captures images.
- Flash: Provides illumination in low-light conditions.
- Power Button: Turns the camera on or off.
- Shutter Button: Takes photos.
- 2.4-inch Touch Screen Display: For viewing images, navigating menus, and controlling camera functions.
- Home Button: Returns to the main menu or home screen.
- Battery Compartment: Holds 3 AAA batteries.
- Memory Card Slot: For inserting an SD or compatible memory card.
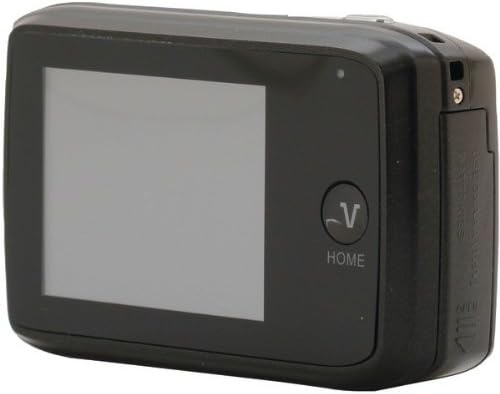
Figure 2: Back view of the Vivitar VX137-BLK Digital Camera, showing the touchscreen and Home button.
Setup
1. Battery Installation
- Locate the battery compartment door on the side or bottom of the camera.
- Slide the latch to open the compartment.
- Insert three (3) AAA batteries, ensuring correct polarity (+/-) as indicated inside the compartment.
- Close the battery compartment door securely until it latches.
Note: Batteries are not included and must be purchased separately.
2. Memory Card Installation
- Locate the memory card slot, typically near the battery compartment.
- Open the memory card slot cover.
- Insert a compatible SD or memory card into the slot with the metal contacts facing the correct direction, usually downwards or towards the front of the camera. Push gently until it clicks into place.
- Close the memory card slot cover.
Note: A memory card is not included and is highly recommended for storing photos and videos.
Operating the Camera
1. Power On/Off
- To power on: Press and hold the Power Button until the screen illuminates.
- To power off: Press and hold the Power Button again until the screen turns off.
2. Taking Photos
- Turn on the camera. The camera will typically start in photo capture mode.
- Frame your shot using the 2.4-inch touchscreen display.
- To zoom in or out, use the digital zoom controls on the touchscreen.
- Press the Shutter Button halfway to focus, then press it fully to capture the image.
- The anti-shake feature will automatically engage to help reduce blur.
3. Video Recording
- From the main screen, tap the video icon on the touchscreen to switch to video recording mode.
- Press the Shutter Button to start recording. A timer or indicator will appear on the screen.
- Press the Shutter Button again to stop recording.
4. Playback Mode
- From the main screen, tap the playback icon (usually an arrow in a rectangle) to enter playback mode.
- Swipe left or right on the touchscreen to browse through your captured photos and videos.
- Tap on a photo or video to view it in full screen.
- To exit playback mode, tap the Home Button or the appropriate icon on the screen.
5. Touch Screen Usage
The 2.4-inch touchscreen allows for intuitive navigation. Tap icons to select functions, swipe to scroll through images, and use pinch-to-zoom gestures if supported for reviewing photos.
Maintenance
Cleaning the Camera
- Camera Body: Use a soft, dry cloth to wipe the camera body. Do not use liquid cleaners or solvents.
- Lens: Gently clean the lens with a lens cleaning cloth or a soft brush designed for camera lenses. Avoid touching the lens surface with your fingers.
- Touch Screen: Use a microfiber cloth specifically designed for screens to gently wipe the display.
Storage
- When not in use for extended periods, remove the AAA batteries to prevent leakage.
- Store the camera in a cool, dry place, away from direct sunlight, extreme temperatures, and high humidity.
- Use a camera case to protect it from dust and scratches.
Troubleshooting
| Problem | Possible Cause | Solution |
|---|---|---|
| Camera does not power on. | Dead or incorrectly inserted batteries. | Replace with fresh AAA batteries, ensuring correct polarity. |
| Cannot take photos. | Memory card full or not inserted. | Insert a memory card or delete existing files to free up space. Ensure the card is properly inserted. |
| Images are blurry. | Insufficient light, camera shake, or dirty lens. | Ensure adequate lighting. Hold the camera steady. Clean the lens. The anti-shake feature is automatic, but extreme movement can still cause blur. |
| Touchscreen is unresponsive. | Temporary software glitch or screen dirt. | Turn the camera off and on again. Gently clean the screen with a microfiber cloth. |
| Camera freezes. | Software error. | Remove and reinsert the batteries to reset the camera. |
Specifications
| Feature | Detail |
|---|---|
| Model Number | VX137-BLK |
| Image Sensor | 12.1 Megapixels |
| Display | 2.4-inch Touch Screen LCD |
| Digital Zoom | 4x |
| Image Stabilization | Optical (Anti-Shake) |
| Power Source | 3 x AAA Batteries (not included) |
| Supported File Format | JPEG |
| Photo Sensor Technology | CMOS |
| Aspect Ratio | 4:3 |
| Item Weight | 4.8 ounces |
| Product Dimensions | 7.09 x 8.94 x 1.69 inches |
Warranty Information
This product is sold AS-IS. Please refer to the original purchase documentation for any specific warranty details provided at the time of sale. For further inquiries regarding product functionality, please consult the support section.
Support
For technical assistance or further questions not covered in this manual, please visit the Vivitar official website or contact their customer support. Keep your purchase receipt and product model number (VX137-BLK) available when seeking support.