1. Introduction
This manual provides detailed instructions for the installation and maintenance of the NBS CF4MA 315501 Exterior Set, designed specifically for the Suzuki Address V125S motorcycle. This aftermarket cowl set is intended for replacing damaged or worn original exterior components, restoring the aesthetic and protective functions of your vehicle.

Figure 1.1: Overview of the NBS CF4MA 315501 Exterior Set components. This image displays the complete set of white painted cowls, including the front cowl, main front panel, and side cowls, designed for the Suzuki Address V125S.
2. Safety Information
Always prioritize safety when working on your motorcycle. Read all instructions thoroughly before beginning installation. If you are unsure about any step, consult a qualified motorcycle mechanic.
- Ensure the motorcycle is stable and securely supported on a level surface before starting any work.
- Turn off the engine and remove the key to prevent accidental starting.
- Wear appropriate personal protective equipment, including gloves and eye protection.
- Keep all fasteners and small parts organized to prevent loss.
- Do not overtighten screws or bolts, as this can damage the new parts or the motorcycle frame.
- Dispose of old parts responsibly.
3. Package Contents
Verify that all components are present and undamaged before proceeding with installation. The NBS CF4MA 315501 Exterior Set typically includes the following:
- Front Cowl (Upper part)
- Main Front Panel (Lower part with headlight openings)
- Side Cowls (Left and Right)
- (Fasteners are typically reused from the original parts or purchased separately if damaged.)
4. Installation Guide
This section outlines the general procedure for replacing the exterior cowl set. Specific fastener locations and types may vary slightly; refer to your Suzuki Address V125S service manual for precise details if needed.
4.1. Preparation
- Park the motorcycle on a stable stand.
- Gather necessary tools: screwdrivers (Phillips, flathead), socket wrench set, plastic trim removal tools (recommended to prevent scratches), clean cloths.
- Inspect the new cowl set for any manufacturing defects or shipping damage.
4.2. Removal of Existing Cowls
- Identify Fasteners: Locate all screws, clips, and bolts securing the existing front cowl, main front panel, and side cowls. These are typically found along seams, under the handlebars, and near the footrests.
- Remove Screws and Clips: Carefully remove all visible fasteners. Use plastic trim removal tools to gently pry open any clips or separate panels without scratching the paint. Store fasteners in an organized manner.
- Disconnect Electrical Connections (if applicable): If any electrical components (e.g., turn signals, headlights) are integrated into the cowls, carefully disconnect their wiring harnesses. Note their positions for reassembly.
- Detach Panels: Once all fasteners and connections are removed, carefully detach the old cowl panels from the motorcycle frame.

Figure 4.1: Various components of the exterior cowl set. This image shows the individual parts of the cowl set, including the front and side panels, which will replace the existing ones on the Suzuki Address V125S.
4.3. Installation of New Cowls
- Clean Mounting Surfaces: Before installing new parts, clean any dirt or debris from the motorcycle's frame and mounting points.
- Install Main Front Panel: Begin by positioning the main front panel (the lower part with headlight openings). Align it with the mounting points on the motorcycle frame.
- Secure Main Front Panel: Loosely attach the main front panel using the appropriate screws and clips. Do not fully tighten yet.
- Install Side Cowls: Attach the left and right side cowls, ensuring they align correctly with the main front panel and other existing motorcycle components.
- Secure Side Cowls: Loosely attach the side cowls with their respective fasteners.
- Install Front Cowl: Position the front cowl (upper part) and align it with the main front panel and handlebar area.
- Secure Front Cowl: Loosely attach the front cowl.
- Reconnect Electrical Connections: If any electrical components were disconnected, reconnect them now, ensuring proper routing of wires.
- Final Tightening: Once all panels are in place and aligned, systematically tighten all screws, clips, and bolts. Ensure a snug fit without overtightening. Check for any gaps or misalignments.

Figure 4.2: Detailed view of the front cowl (upper section). This component fits above the main front panel, typically around the handlebar area, and is secured with screws.
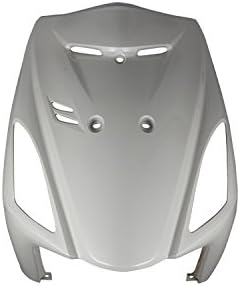
Figure 4.3: Detailed view of the main front panel. This is the central lower front piece, featuring cutouts for the headlights and other front-mounted components.
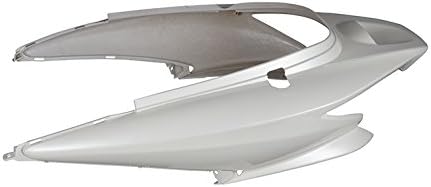
Figure 4.4: Detailed view of a side cowl panel. These panels attach to the sides of the motorcycle, connecting the front and rear sections of the bodywork.
5. Post-Installation Check
After installation, perform the following checks to ensure proper fitment and functionality:
- Visual Inspection: Check all newly installed panels for proper alignment, secure fitment, and absence of gaps.
- Fastener Check: Ensure all screws, clips, and bolts are securely tightened.
- Electrical Functionality: If any electrical components were disconnected, test their functionality (e.g., headlights, turn signals).
- Handlebar Clearance: Turn the handlebars fully left and right to ensure there is no interference with the new front cowl.
- Test Ride: Conduct a short, low-speed test ride in a safe area to listen for any unusual noises or vibrations.
6. Maintenance
Proper maintenance will extend the life and appearance of your NBS exterior set:
- Cleaning: Wash the cowls regularly with mild soap and water, using a soft cloth or sponge. Avoid abrasive cleaners or harsh chemicals that can damage the paint finish.
- Waxing: Apply a quality motorcycle wax periodically to protect the paint and maintain its shine.
- Inspection: Periodically check all mounting points and fasteners for tightness. Vibrations during riding can sometimes loosen components.
- Damage: In case of minor scratches, touch-up paint matching the original white color may be used. For significant damage, replacement of the affected panel is recommended.
7. Troubleshooting
This section addresses common issues that may arise during or after installation.
| Problem | Possible Cause | Solution |
|---|---|---|
| Panels do not align correctly. | Incorrect positioning; fasteners not loosely attached before final alignment. | Loosen all fasteners, reposition panels, and then gradually tighten while ensuring alignment. |
| Gaps between panels. | Panels not fully seated; missing or incorrect clips/fasteners. | Press panels firmly into place. Verify all clips and fasteners are installed correctly and are the right type. |
| Loose or rattling sound after installation. | Fasteners not tightened sufficiently; a component is not fully secured. | Re-check all fasteners for tightness. Ensure all internal components (e.g., wiring) are secured and not vibrating against the panels. |
| Electrical components (e.g., headlights) not working. | Wiring harness not reconnected or improperly connected. | Check all electrical connections for proper seating and continuity. Refer to the motorcycle's electrical diagram if necessary. |
8. Specifications
- Model: NBS 315501
- Compatible Motorcycle: Suzuki Address V125S (CF4MA)
- Type: Exterior Cowl Set
- Color: White (Painted)
- Material: Aftermarket plastic components
- Package Dimensions: Approximately 69 x 46.4 x 43.6 cm
- Item Weight: Approximately 4.16 kg
9. Warranty & Support
For warranty information and customer support regarding the NBS CF4MA 315501 Exterior Set, please refer to the original purchase documentation or contact the retailer/manufacturer directly. Specific warranty terms and conditions may vary.
For technical assistance beyond the scope of this manual, it is recommended to consult a certified motorcycle technician or refer to the official Suzuki Address V125S service manual.


