
Introduction
This manual provides detailed instructions for the installation, operation, and maintenance of your Orbit 94894 Easy-Set Logic Automatic Irrigation System Programmer. This digital programmer is designed for both indoor and outdoor use, featuring a protective cover with a key lock, an LCD display, and large buttons for simplified programming. It supports up to 4 irrigation zones and offers flexible scheduling options to efficiently manage your watering needs.
Safety Information
Please read all safety instructions before installing and operating the irrigation programmer. Failure to follow these instructions may result in property damage or personal injury.
- Ensure the power supply is disconnected before performing any wiring or maintenance.
- Install the unit in a location protected from direct sunlight and extreme weather conditions if possible, even though it is rated for outdoor use.
- Keep batteries away from children. Battery warning: Chemical Burn Hazard.
- Only use the specified power transformer (240V to 24V integrated transformer).
Setup and Installation
The Orbit 94894 programmer can be installed indoors or outdoors. Choose a location that is easily accessible and provides adequate protection for the unit and wiring.
1. Mounting the Programmer
Mount the programmer vertically on a wall using appropriate screws and anchors. Ensure it is at a height that allows for comfortable viewing and operation.

Image: Orbit 94894 programmer mounted indoors, open, showing controls and internal components. This illustrates a typical indoor installation.

Image: Orbit 94894 programmer mounted on an outdoor brick wall, open, displaying the control panel. This shows an outdoor installation with the protective cover open.
2. Wiring the Valves
Connect the common wire from your irrigation valves to the terminal labeled "COM". Connect each zone wire to its corresponding terminal (1, 2, 3, 4). The programmer supports up to 4 zones.

Image: Internal view of the Orbit 94894 programmer showing wiring terminals for common and zones 1-4. This image highlights the connection points for irrigation valves.
3. Power Connection
The unit includes an integrated 240V to 24V transformer. Connect the power cord to a suitable electrical outlet. Ensure the connection is secure.
4. Rain Sensor Connection (Optional)
If using a rain sensor, connect it to the designated sensor terminals. Refer to your rain sensor's manual for specific wiring instructions. The rain sensor will interrupt scheduled watering during rainfall.
5. Battery Installation
A button battery is integrated to retain programming during power outages. Ensure it is properly seated. This battery does not power the irrigation system, only the program memory.
Operating Instructions
The Orbit 94894 features an intuitive interface with an LCD display and control buttons. The main dial allows selection of different programming modes.

Image: Front view of the Orbit 94894 programmer showing the LCD display, control dial, and buttons. This is the primary interface for programming.
1. Setting Current Time and Date
Rotate the dial to the "SET CLOCK" position. Use the "+" and "-" buttons to adjust the time and date. Press the "NEXT" button to move between settings (hour, minute, AM/PM, day, month, year).
2. Programming Irrigation Schedules
The programmer supports 3 independent programs (A, B, C) with up to 4 start times each, allowing for a total of 12 irrigation events per day.
- Select Program: Rotate the dial to "PROGRAM A", "PROGRAM B", or "PROGRAM C".
- Set Start Times: For each program, use the "+" and "-" buttons to set up to 4 start times. Press "NEXT" to cycle through start times.
- Set Run Times (Duration): Rotate the dial to "RUN TIMES". Select the desired zone (1-4) using the "ZONE" button, then use "+" and "-" to set the watering duration from 1 to 99 minutes for that zone. Repeat for all active zones.
- Set Watering Days: Rotate the dial to "WATER DAYS". Select your preferred watering schedule (e.g., specific days of the week, odd/even days, or interval watering). Use "+" and "-" to adjust.
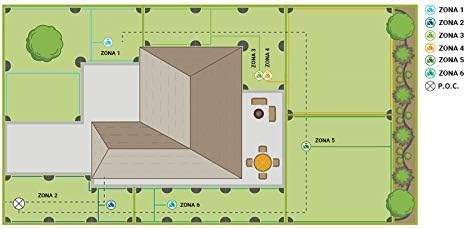
Image: Diagram illustrating different irrigation zones in a garden layout. This visual aid helps in understanding how to assign and manage different watering areas.
3. Rain Delay Function
To temporarily suspend watering due to rain, rotate the dial to "RAIN DELAY". Use the "+" or "-" buttons to select a delay of 24, 48, or 72 hours. The system will automatically resume watering after the selected delay period.
4. Seasonal Adjustment (Percentage Adjustment)
To adjust all programmed watering durations by a percentage without reprogramming each zone, rotate the dial to "SEASONAL ADJUST". Use the "+" or "-" buttons to increase or decrease the watering duration percentage (e.g., 50% for less water, 120% for more water).
5. Manual Watering
To manually water a specific zone or all zones, rotate the dial to "MANUAL". Follow the on-screen prompts to select zones and set durations for immediate watering.
Maintenance
Regular maintenance ensures optimal performance and longevity of your irrigation programmer.
- Cleaning: Wipe the unit with a soft, damp cloth. Avoid abrasive cleaners or solvents.
- Battery Check: Periodically check the integrated button battery to ensure program retention during power interruptions. Replace if necessary, following the instructions for battery type and polarity.
- Winterization: In regions with freezing temperatures, disconnect the programmer and store it indoors during winter months to prevent damage from ice.
- Wiring Inspection: Annually inspect all wiring connections for corrosion or damage. Ensure all connections are secure.
Troubleshooting
If you encounter issues with your Orbit 94894 programmer, refer to the following common problems and solutions:
| Problem | Possible Cause | Solution |
|---|---|---|
| Programmer display is blank. | No power, faulty transformer, or internal issue. | Check power outlet. Ensure transformer is connected. If problem persists, contact support. |
| Valves do not turn on. | No power to valves, faulty wiring, rain sensor active, or valve malfunction. | Verify power to programmer. Check common and zone wiring connections. Ensure rain sensor is not activated. Manually test valves. |
| Valves do not turn off. | Faulty valve, wiring short, or programmer malfunction. | Inspect valve for debris or damage. Check wiring for shorts. If a specific zone continuously runs, disconnect its wire to isolate the issue. |
| Programmer loses settings after power outage. | Integrated button battery is dead or improperly seated. | Check and replace the button battery if necessary. |
| Rain delay not working. | Rain sensor not connected or faulty. | Ensure rain sensor is properly wired and functioning. Check rain sensor settings on the programmer. |
Specifications
- Model: 94894
- Brand: Orbit
- Material: Plastic
- Color: Grey
- Display Type: LCD
- Item Weight: Approximately 3.31 lbs (1.5 kg)
- Power Input: 240V AC (integrated 24V transformer)
- Zones: Up to 4 zones
- Programs: 3 independent programs (A, B, C)
- Start Times: Up to 4 start times per program
- Run Time per Zone: 1 to 99 minutes
- Rain Delay: 24, 48, 72 hours
- Seasonal Adjustment: Percentage-based adjustment for all run times
Warranty and Support
The Orbit 94894 Automatic Irrigation System Programmer typically comes with a 6-year warranty, as indicated on product packaging. For specific warranty details, claims, or technical support, please refer to the official Orbit website or contact their customer service directly. Keep your proof of purchase for warranty purposes.
For further assistance, visit www.orbitonline.com.


