
1. Introduction
This document provides comprehensive instructions for the installation, operation, maintenance, and troubleshooting of your ASUS B85M-G Intel B85 LGA1150 Micro-ATX Motherboard. Please read this manual thoroughly before proceeding with any installation or configuration to ensure proper functionality and system stability.
2. Product Overview
The ASUS B85M-G is a Micro-ATX motherboard designed for Intel LGA 1150 processors, featuring the Intel B85 chipset. It supports DDR3 RAM and offers various connectivity options for building a reliable personal computer system.

Key features include:
- CPU Socket: LGA 1150, compatible with Intel LGA 1150 processors (e.g., Core i5).
- Chipset: Intel B85.
- Memory: DDR3 SDRAM, supporting speeds up to 1333 MHz.
- USB Ports: Multiple USB 2.0 ports for peripheral connectivity.
- Form Factor: Micro-ATX, suitable for compact PC builds.

3. Setup and Installation
Before beginning installation, ensure your system is powered off and unplugged from the wall outlet. Handle the motherboard by its edges to avoid static discharge.
3.1. Package Contents
Verify that all components are present:
- ASUS B85M-G Motherboard
- I/O Shield
- SATA Data Cables
- User Manual (this document)
- Driver CD (if included)

3.2. Installing the CPU
- Locate the LGA 1150 CPU socket on the motherboard.
- Gently lift the load lever and open the CPU socket cover.
- Align the CPU with the socket, ensuring the golden triangle on the CPU matches the triangle on the socket.
- Carefully place the CPU into the socket without forcing it.
- Close the socket cover and push down the load lever until it locks into place.
- Install the CPU cooler according to its manufacturer's instructions.
3.3. Installing Memory (RAM)
- Locate the DDR3 DIMM slots.
- Open the clips at both ends of the DIMM slot.
- Align the notch on the DDR3 memory module with the key in the DIMM slot.
- Insert the memory module firmly into the slot until the clips snap into place.
- Repeat for additional memory modules, following the motherboard's manual for dual-channel configuration if desired.
3.4. Connecting Peripherals and Power
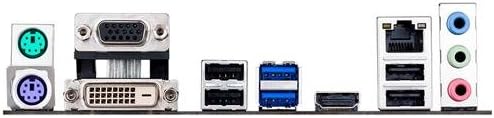
Connect the 24-pin ATX power connector and the 4-pin CPU power connector from your power supply to the corresponding ports on the motherboard. Connect SATA devices (hard drives, SSDs) using the provided SATA cables. Ensure all front panel connectors (power button, reset button, USB, audio) are correctly attached to the motherboard headers.

4. Operating Instructions
After successful hardware installation, connect your monitor, keyboard, and mouse. Power on your system.
4.1. BIOS/UEFI Setup
To enter the BIOS/UEFI setup utility, press the DEL key during the Power-On Self-Test (POST) process. The BIOS/UEFI allows you to configure system settings, boot order, and monitor hardware status.
4.2. Operating System Installation
The ASUS B85M-G motherboard supports operating systems such as Windows 7 and Windows 8. Insert your operating system installation media (USB drive or DVD) and follow the on-screen prompts to install the OS. After installation, install the necessary drivers from the provided driver CD or the ASUS support website for optimal performance.
5. Maintenance
Regular maintenance helps ensure the longevity and stable operation of your motherboard and overall system.
- Dust Removal: Periodically clean dust from inside your PC case, especially around the CPU cooler and motherboard components, using compressed air. Ensure the system is powered off and unplugged before cleaning.
- BIOS Updates: Check the official ASUS website for the latest BIOS/UEFI updates. BIOS updates can improve compatibility, stability, and performance. Follow the instructions provided by ASUS carefully when updating the BIOS.
- Driver Updates: Keep your device drivers updated. Visit the ASUS support website to download the latest drivers for your motherboard's components.
6. Troubleshooting
If you encounter issues, refer to the following common troubleshooting steps:
- No Power/No Boot:
- Verify all power cables (24-pin ATX, 4-pin CPU) are securely connected.
- Ensure the power supply is functional and switched on.
- Check front panel connections (power button).
- No Display:
- Confirm the monitor is connected to the correct video output (VGA, DVI, HDMI) on the motherboard or discrete graphics card.
- Reseat the RAM modules.
- Ensure the CPU is correctly installed.
- Peripheral Not Detected:
- Check the physical connection of the peripheral.
- Install or update the necessary drivers.
- Try a different port or device to isolate the issue.
- System Instability/Crashes:
- Ensure all drivers are up to date.
- Check for proper cooling of the CPU and chipset.
- Run memory diagnostic tools to check RAM integrity.
For more detailed troubleshooting or advanced issues, please visit the official ASUS support website.
7. Specifications
| Feature | Specification |
|---|---|
| Brand | ASUS |
| Model Name | B85M-G |
| CPU Socket | LGA 1150 |
| Compatible Processors | Intel LGA 1150 processors |
| Chipset Type | Intel B85 |
| RAM Memory Technology | DDR3 SDRAM |
| Memory Clock Speed | 1333 MHz |
| Number of USB 2.0 Ports | 4 |
| Platform | Windows 7, Windows 8 |
| Item Weight | 3.17 ounces |
| Product Dimensions (LxWxH) | 11.81 x 11.81 x 2.36 inches |
8. Warranty and Support
Warranty information for the ASUS B85M-G motherboard is typically provided with the product packaging. Please refer to the documentation included with your purchase for specific warranty terms and conditions.
For technical support, driver downloads, FAQs, and additional product information, please visit the official ASUS support website: