
1. Introduction
The Limit Magnetic Holder with Measuring Clock, Model 119081008, is a precision instrument designed for accurate dimensional measurement in various industrial and scientific applications. This manual provides essential information for the proper setup, operation, and maintenance of your device to ensure optimal performance and longevity.
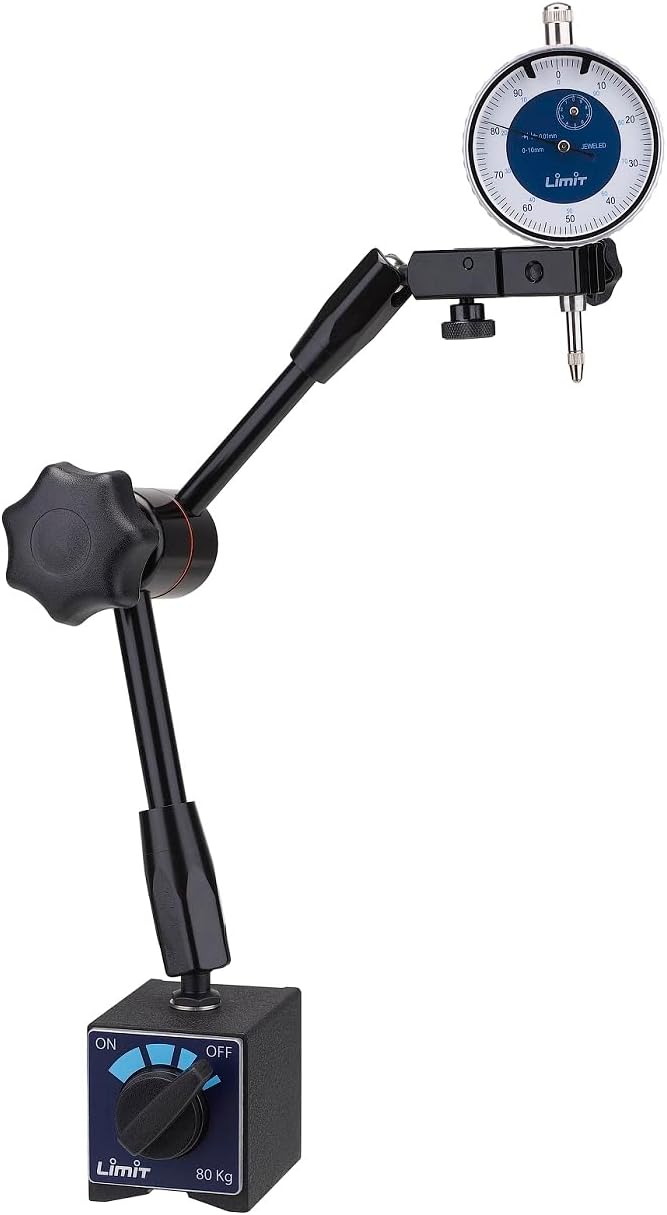
This unit combines a robust magnetic base with an articulated arm and a high-precision dial indicator, making it ideal for tasks requiring stable and precise measurement positioning.
2. Product Overview and Components
The Limit Magnetic Holder with Measuring Clock consists of the following primary components:
- Magnetic Base: A powerful magnetic base (Limit Code 119080208) with an ON/OFF switch for secure attachment to ferrous surfaces. It provides a holding force of approximately 80 kg.
- Articulated Arm: A flexible, multi-jointed arm that allows for precise positioning and locking of the dial indicator at various angles and heights.
- Measuring Clock (Dial Indicator): A precision dial indicator (Limit Code 119110104) with a rotating bezel, typically featuring a measurement range of 0-10mm and a resolution of 0.01mm. It often includes a jeweled movement for enhanced accuracy and durability.
3. Setup Instructions
- Unpacking: Carefully remove all components from the packaging. Inspect for any signs of damage.
- Attaching the Dial Indicator: Securely mount the dial indicator into the clamp at the end of the articulated arm. Ensure it is firmly seated but do not overtighten, which could damage the indicator stem.
- Positioning the Magnetic Base: Place the magnetic base on a clean, flat ferrous surface. Ensure the surface is free of debris or contaminants that could affect magnetic adhesion.
- Activating the Magnet: Turn the ON/OFF switch on the magnetic base to the "ON" position. The base will firmly attach to the surface. To release, turn the switch to "OFF".
- Adjusting the Articulated Arm: Loosen the central locking knob(s) on the articulated arm to adjust the position and angle of the dial indicator. Once the desired position is achieved, tighten the knob(s) to lock the arm securely.
4. Operating Instructions
- Preparation: Ensure the workpiece or surface to be measured is clean and stable.
- Initial Contact: Carefully bring the contact point of the dial indicator into gentle contact with the surface of the workpiece. The indicator's plunger should be slightly depressed.
- Zeroing the Indicator: With the plunger slightly depressed against the reference surface, rotate the outer bezel of the dial indicator until the main needle points to "0". This establishes your reference point.
- Taking Measurements: Move the dial indicator across the surface or to the point of measurement. The needle will move, indicating deviations from the zero reference. Read the measurement directly from the dial. The smaller needle indicates full revolutions of the main needle (e.g., 1mm per revolution).
- Interpreting Readings: Each major division on the dial typically represents 0.01mm. The range of the indicator is 0-10mm.
5. Maintenance
- Cleaning: Keep the magnetic base, articulated arm, and especially the dial indicator clean and free from dust, oil, and debris. Use a soft, dry cloth. For stubborn grime, a slightly dampened cloth with a mild cleaning solution can be used, ensuring no liquid enters the dial indicator mechanism.
- Storage: Store the instrument in its original packaging or a protective case when not in use. Avoid storing in environments with high humidity, extreme temperatures, or corrosive substances.
- Lubrication: The articulated arm joints may benefit from occasional light lubrication with a suitable precision oil to ensure smooth movement, but avoid lubricating the dial indicator's internal mechanism unless performed by a qualified technician.
- Calibration: For critical applications, periodic calibration of the dial indicator by a certified laboratory is recommended to maintain accuracy.
6. Troubleshooting
- Magnetic Base Not Holding:
- Ensure the ON/OFF switch is fully in the "ON" position.
- Check that the contact surface is clean, flat, and made of a ferrous material.
- Verify the magnetic base itself is not damaged.
- Dial Indicator Needle Not Moving Smoothly:
- Check for dirt or debris on the plunger or contact point. Clean thoroughly.
- Ensure the indicator is securely mounted and not binding in its clamp.
- If the issue persists, the internal mechanism may require professional inspection.
- Inaccurate Readings:
- Confirm the dial indicator was properly zeroed against a known reference.
- Ensure the articulated arm is locked securely and not shifting during measurement.
- Verify the contact point is making proper, consistent contact with the workpiece.
- Consider professional calibration if accuracy issues persist.
7. Specifications
| Feature | Specification |
|---|---|
| Brand | Limit |
| Model Number | 119081008 |
| Magnetic Holder Code | 119080208 |
| Measuring Clock Code | 119110104 |
| Magnetic Holding Force | Approx. 80 kg |
| Measuring Range (Dial Indicator) | 0 - 10 mm |
| Resolution (Dial Indicator) | 0.01 mm |
| Movement Type (Dial Indicator) | Jeweled |
| Package Dimensions | 25.8 x 21.3 x 7.3 cm |
| Item Weight | 2.03 kg |
| Included Components | Magnetic holder assembly (base and arm), Dial indicator |
| Batteries Required | No |
| ASIN | B00CYLP7U6 |
| Date First Available | 1 March 2017 |
8. Warranty Information
Specific warranty terms for the Limit Magnetic Holder with Measuring Clock (Model 119081008) may vary by region and retailer. Please refer to your purchase documentation or contact your point of sale for detailed warranty information. Generally, Limit products are manufactured to high standards and are expected to be free from defects in material and workmanship under normal use.
9. Customer Support
For technical assistance, spare parts, or further inquiries regarding your Limit Magnetic Holder with Measuring Clock, please contact the retailer from whom you purchased the product. You may also visit the official Limit website for general product information and support resources.
When contacting support, please have your product model number (119081008) and purchase details readily available.