Introduction
The Behringer Pro Mixer NOX101 is a premium 2-channel DJ mixer designed for demanding turntablists, remixers, and digital DJs. This manual provides comprehensive instructions for setting up, operating, and maintaining your NOX101 mixer to ensure optimal performance and longevity.

Figure 1: Top view of the Behringer Pro Mixer NOX101, showing main controls and layout.
Safety Information
Please read and follow all safety instructions carefully before operating the device. Retain this manual for future reference.
- Power Source: Connect the mixer only to the specified power supply. Ensure the voltage matches the requirements.
- Ventilation: Do not block any ventilation openings. Install in accordance with the manufacturer's instructions.
- Water and Moisture: Do not use this apparatus near water or expose it to dripping or splashing.
- Cleaning: Clean only with a dry cloth.
- Servicing: Refer all servicing to qualified service personnel. Servicing is required when the apparatus has been damaged in any way, such as power-supply cord or plug is damaged, liquid has been spilled or objects have fallen into the apparatus, the apparatus has been exposed to rain or moisture, does not operate normally, or has been dropped.
Setup
Follow these steps to set up your Behringer NOX101 mixer:
- Unpacking: Carefully remove the mixer from its packaging. Verify that all components listed in the "What's in the Box" section are present.
- Placement: Place the mixer on a stable, flat surface. Ensure adequate ventilation around the unit.
- Power Connection: Connect the provided power cord to the mixer's power input and then to a suitable electrical outlet.
- Audio Input Connections:
- Connect your turntables to the PHONO inputs using RCA cables. Ensure the PHONO/LINE switch is set to PHONO.
- Connect CD players, media players, or other line-level devices to the LINE inputs using RCA cables. Ensure the PHONO/LINE switch is set to LINE.
- Connect a microphone to the MIC input (XLR or 1/4" TRS).
- Audio Output Connections:
- Connect the MAIN OUTPUTS (RCA or 1/4" TRS) to your amplifier, powered speakers, or PA system.
- Connect headphones to the HEADPHONE output for monitoring.

Figure 2: Rear view of the Behringer Pro Mixer NOX101, showing the crossfader curve adjustment and headphone jack.

Figure 3: Detailed view of the input and output connections on the Behringer NOX101 mixer, including RCA and TRS options.
Operating Instructions
This section details the functions of the Behringer NOX101 mixer's controls.
Channel Controls (Channels 1 & 2)
- GAIN Knob: Adjusts the input level for the respective channel. Set to an appropriate level to avoid clipping (indicated by the PEAK LED).
- EQ Knobs (HIGH, MID, LOW): These are 3-band EQs with "full-kill" filters, allowing you to completely remove specific frequency ranges.
- HIGH: Adjusts treble frequencies.
- MID: Adjusts mid-range frequencies.
- LOW: Adjusts bass frequencies.
- PHONO/LINE Switch: Selects between PHONO (for turntables) and LINE (for CD players/other line-level devices) input for the channel.
- Channel Fader: Controls the volume level of the individual channel.
- PFL/CUE Button: Sends the channel's audio to the headphone output for pre-fader listening.
- CURVE Knob: Adjusts the curve of the channel fader, from a smooth fade to a sharp cut.
Microphone Section
- MIC GAIN Knob: Adjusts the input level for the microphone.
- MIC LEVEL Knob: Controls the overall volume of the microphone output.
Master Section
- MASTER Knob: Controls the overall output volume of the mixer.
- CUE GAIN Knob: Adjusts the volume of the headphone output.
- CUE MIX Slider: Blends between the PFL (Pre-Fader Listen) signal and the Master output in your headphones.
- VU Meters: Displays the output level of the main mix and PFL signal. Aim for levels that are strong but do not consistently peak into the red.
Crossfader
- Crossfader: Blends between Channel 1 and Channel 2.
- XFADE CURVE Knob: Located on the rear panel, this knob adjusts the curve of the crossfader, from a smooth blend to a sharp cut for scratching.
- REV Button: Reverses the direction of the crossfader.
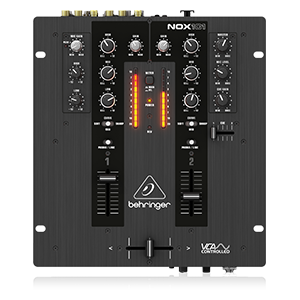
Figure 4: Simplified diagram of the Behringer NOX101 mixer's control layout.
Maintenance
Proper maintenance ensures the longevity and optimal performance of your NOX101 mixer.
- Cleaning: Regularly wipe the mixer's surface with a soft, dry, lint-free cloth. Avoid using abrasive cleaners, solvents, or waxes.
- Dust Protection: When not in use, cover the mixer to protect it from dust and debris.
- Fader Care: While the faders are designed for durability, excessive force or exposure to liquids can cause damage. Keep them clean and free of foreign particles.
- Storage: Store the mixer in a cool, dry place away from direct sunlight and extreme temperatures.
Troubleshooting
If you encounter issues with your Behringer NOX101 mixer, refer to the following common problems and solutions:
| Problem | Possible Cause | Solution |
|---|---|---|
| No sound output |
|
|
| Distorted sound |
|
|
| Crossfader not working smoothly |
|
|
Specifications
| Feature | Detail |
|---|---|
| Model | NOX101 |
| Brand | Behringer |
| Number of Channels | 2 |
| EQ | 3-band EQs with "Full-kill" Filters |
| Crossfader | VCA-controlled Ultraglide Crossfader with adjustable curve |
| Connectivity Technology | XLR, TRS, RCA |
| Power Source | Corded Electric |
| Color | Black |
| Item Weight | 4.63 pounds (2.1 kg) |
| Product Dimensions (L x W x H) | 10.04 x 10.79 x 3.94 inches (25.5 x 27.4 x 10 cm) |
| First Available Date | May 1, 2013 |
Warranty and Support
For warranty information and technical support, please refer to the official Behringer website or contact their customer service directly. Keep your purchase receipt as proof of purchase for warranty claims.
No official product videos from the seller were available for embedding in this manual.


