1. Introduction
This manual provides essential information for the safe and effective installation, operation, and maintenance of the Schneider Electric 8910DPA63V14 Contactor. This device is a 600-Vac, 60-Amp DPA Plus option electrical box designed for industrial electrical control applications. Please read this manual thoroughly before attempting any procedures.
2. Safety Information
WARNING: Electrical shock hazard. Only qualified personnel should install, operate, or service this equipment. Failure to follow these instructions can result in death or serious injury.
- Always disconnect power before working on the contactor or associated circuitry.
- Use appropriate personal protective equipment (PPE), including insulated gloves and eye protection.
- Ensure all wiring complies with local and national electrical codes.
- Verify correct voltage and current ratings before connecting the contactor.
- Do not operate the contactor if it appears damaged.
3. Product Overview
The Schneider Electric 8910DPA63V14 Contactor is a robust electrical switching device designed for controlling electrical loads in various industrial settings. It is rated for 600-Vac and 60-Amp applications, offering reliable performance and control. This contactor is part of the DPA Plus series, known for its durability and integration capabilities within electrical systems.
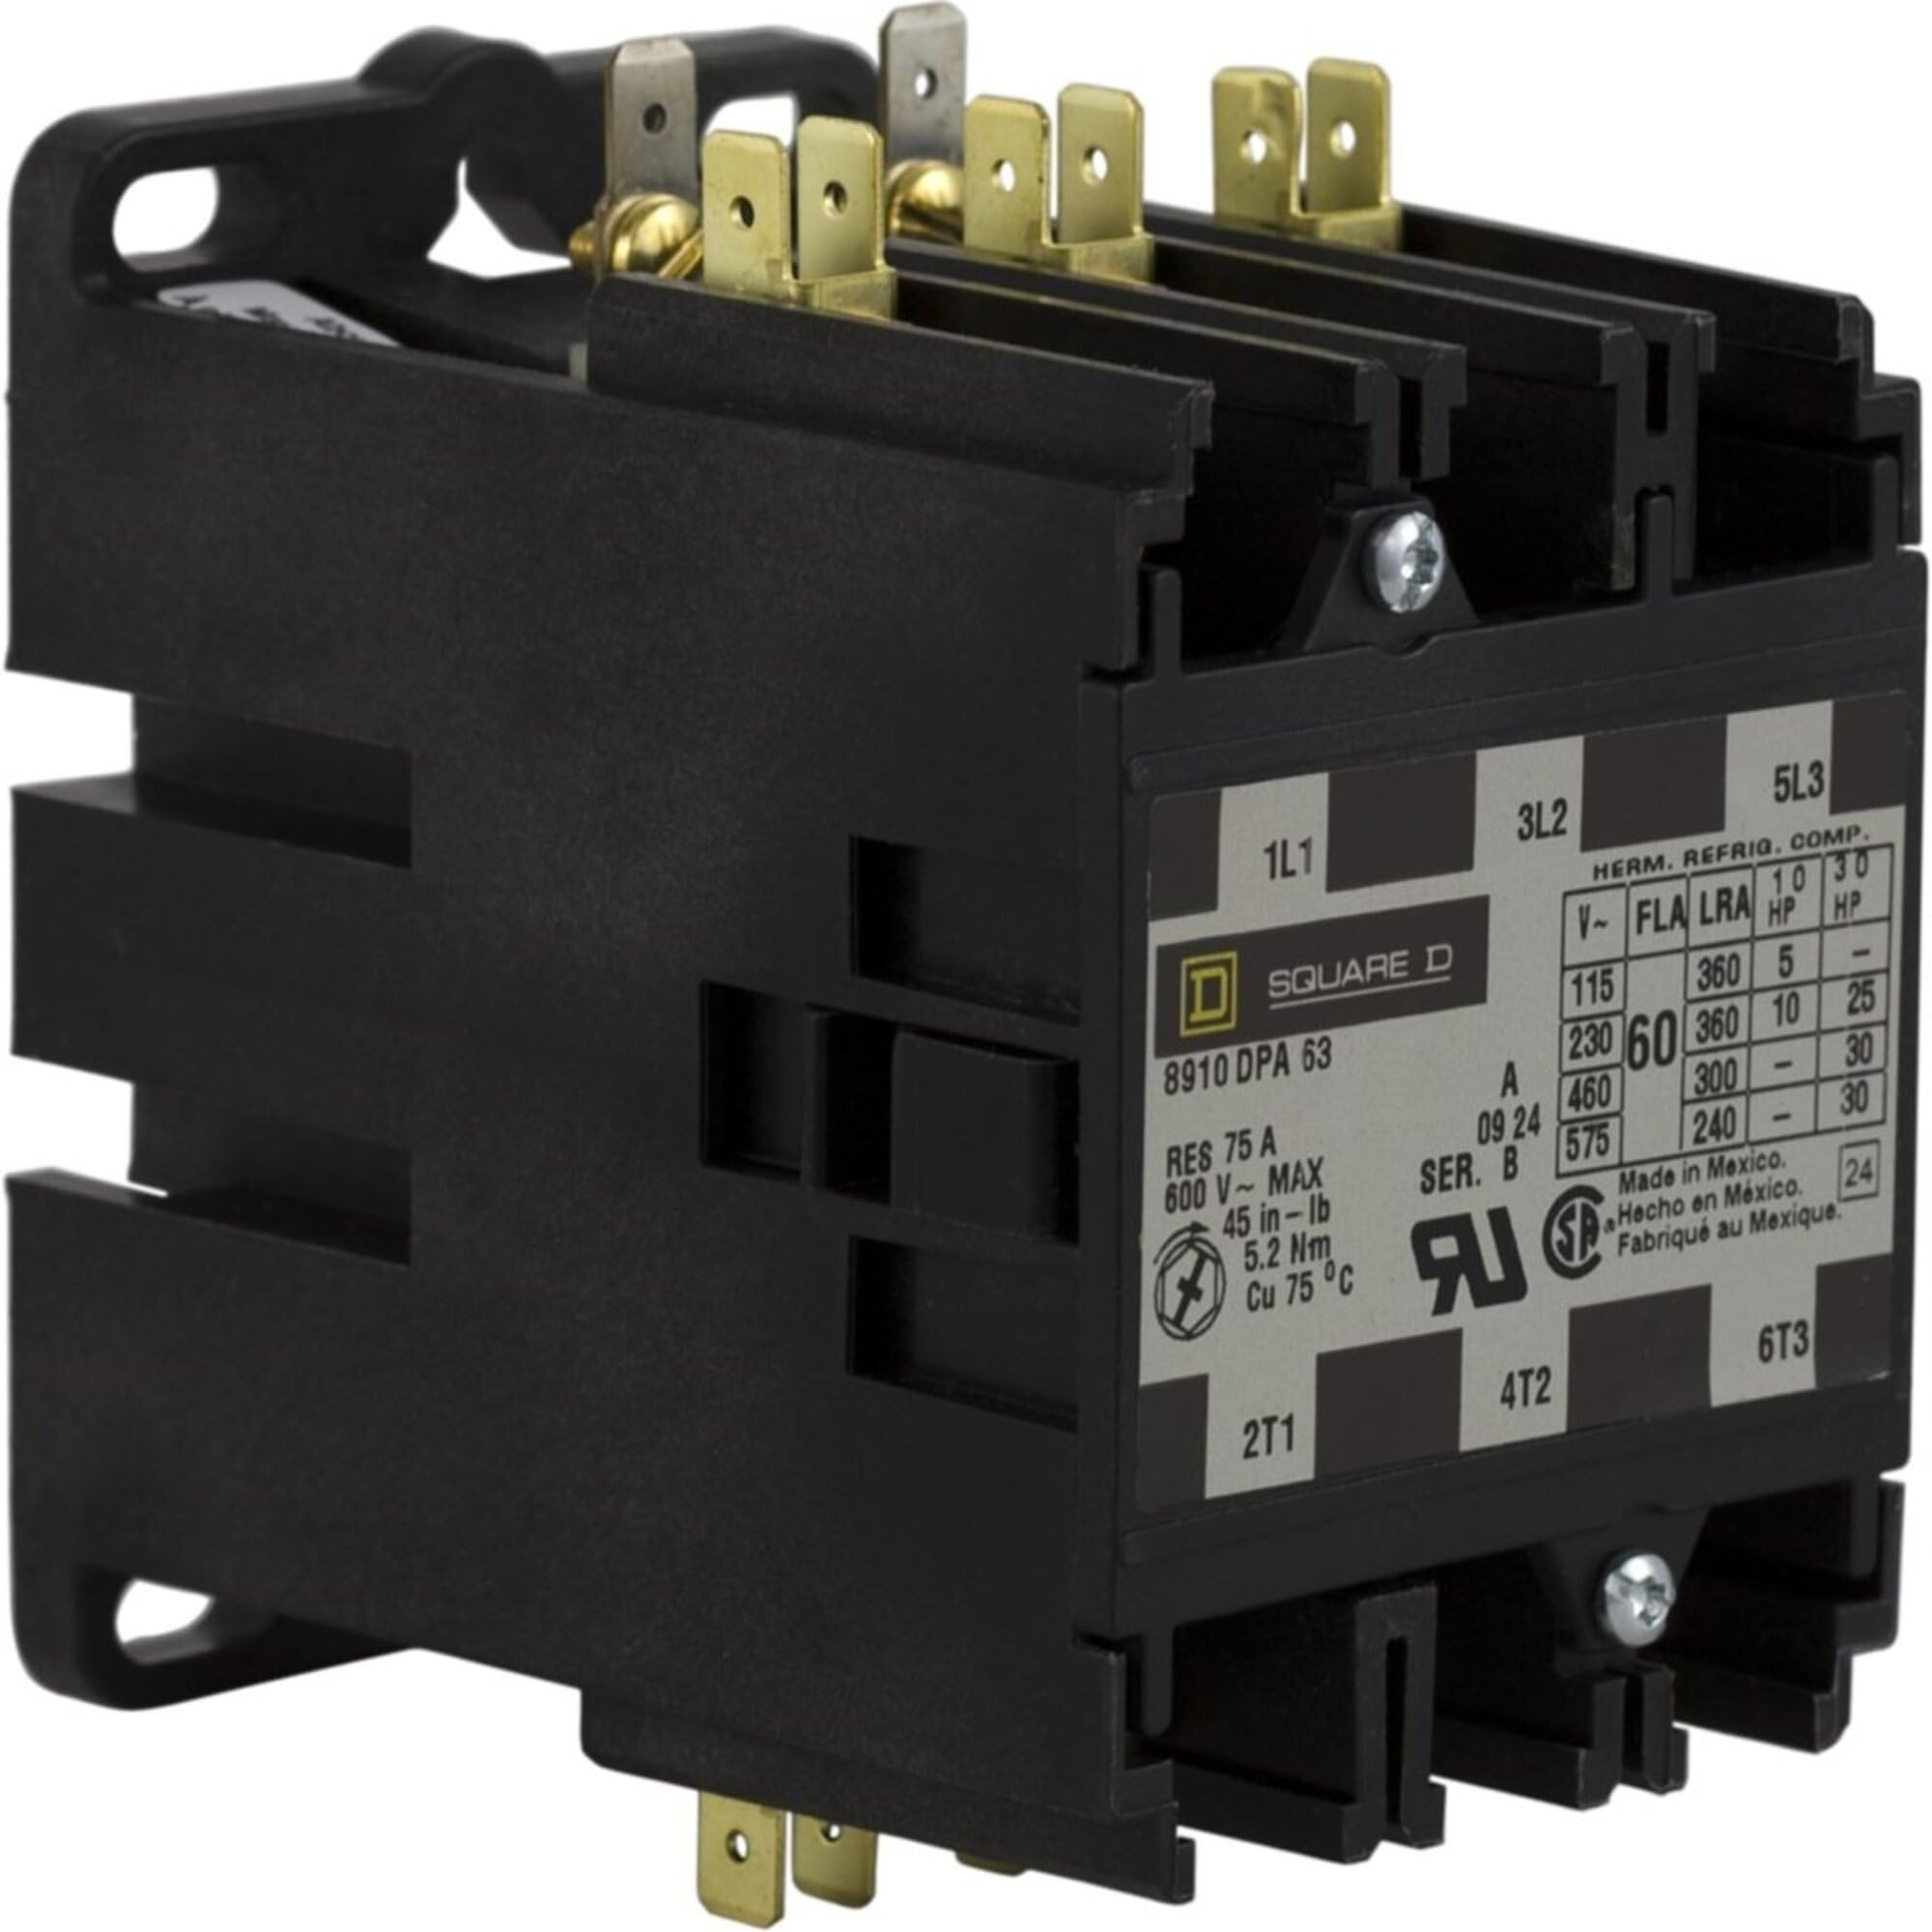
Figure 1: Front view of the Schneider Electric 8910DPA63V14 Contactor, showing terminals and housing.
Key Features:
- Rated for 600-Vac, 60-Amp operation.
- DPA Plus option for enhanced functionality.
- Durable construction for industrial environments.
- Designed for reliable switching of electrical loads.
4. Setup and Installation
Proper installation is crucial for the safe and efficient operation of the contactor. Refer to the wiring diagram provided with the product for specific connection details.
Installation Steps:
- Power Disconnection: Ensure all power to the installation site is disconnected and locked out before beginning any work.
- Mounting: Securely mount the contactor in a suitable electrical enclosure using appropriate fasteners. Ensure adequate ventilation and clearance for wiring.
- Wiring Power Circuits: Connect the main power supply conductors to the line terminals and the load conductors to the load terminals. Ensure all connections are tight and secure. Use appropriately sized wire for the 60-Amp rating.
- Wiring Control Circuits: Connect the control circuit wiring (e.g., from a push-button, PLC, or thermostat) to the coil terminals of the contactor. Verify the coil voltage matches the control circuit voltage.
- Grounding: Ensure the contactor and its enclosure are properly grounded according to electrical codes.
- Verification: Double-check all wiring connections for correctness and tightness. Ensure no loose strands or potential short circuits.
- Enclosure Closure: Close and secure the electrical enclosure cover.
5. Operating Instructions
The 8910DPA63V14 Contactor operates by energizing its coil, which in turn closes the main power contacts, allowing current to flow to the connected load. De-energizing the coil opens the contacts, interrupting the power flow.
Basic Operation:
- Apply Control Voltage: Once installation is complete and verified, apply the specified control voltage to the contactor's coil terminals.
- Contact Closure: Upon coil energization, an audible click indicates that the main power contacts have closed, establishing the circuit to the load.
- Remove Control Voltage: To open the circuit, remove the control voltage from the coil.
- Contact Opening: The main power contacts will open, interrupting the power flow to the load.
The contactor is designed for continuous duty within its specified ratings. Avoid operating it beyond its voltage and current limits.
6. Maintenance
Regular inspection and maintenance can extend the lifespan and ensure the reliable operation of your contactor. Always disconnect power before performing any maintenance.
Maintenance Schedule:
- Periodic Inspection (e.g., annually):
- Check for loose connections at all terminals. Tighten as necessary.
- Inspect contacts for signs of excessive wear, pitting, or discoloration.
- Look for any signs of overheating, such as discolored insulation or melted plastic.
- Ensure the contactor mechanism moves freely without obstruction.
- Cleaning: If necessary, gently clean dust and debris from the contactor using a dry, non-conductive brush or compressed air. Do not use liquids.
- Replacement: If significant wear or damage is observed, replace the contactor with an identical Schneider Electric 8910DPA63V14 unit.
7. Troubleshooting
This section provides solutions to common issues you might encounter with the 8910DPA63V14 Contactor.
| Problem | Possible Cause | Solution |
|---|---|---|
| Contactor does not energize (no click) | No control voltage to coil; Incorrect coil voltage; Open control circuit; Damaged coil. | Check control circuit wiring and voltage; Verify coil voltage rating; Test coil continuity; Replace contactor if coil is faulty. |
| Contactor energizes but contacts do not close | Mechanical obstruction; Worn contacts; Damaged mechanism. | Inspect for foreign objects; Replace contactor if contacts or mechanism are worn/damaged. |
| Contactor hums excessively | Loose laminations; Incorrect voltage; Dirt/debris in magnet assembly. | Check mounting and connections; Verify control voltage; Clean magnet assembly (with power off). |
| Overheating | Overload condition; Loose connections; Inadequate ventilation. | Reduce load; Tighten all connections; Ensure proper airflow around contactor. |
8. Specifications
Detailed technical specifications for the Schneider Electric 8910DPA63V14 Contactor.
- Manufacturer: SCHNEIDER ELECTRIC
- Part Number: 8910DPA63V14
- Item Model Number: 8910DPA63V14
- Voltage Rating: 600-Vac
- Current Rating: 60-Amp
- Item Weight: 1.59 pounds
- Product Dimensions: 2.7 x 4.4 x 3.8 inches
- Color: Black
- Material: Copper
- Item Package Quantity: 1
- Certifications: CE, CSA, NEMA, UL
- Included Components: 8910DPA63V14 Contactor
- Batteries Required?: No
- Country of Origin: China
9. Warranty Information
The Schneider Electric 8910DPA63V14 Contactor comes with a 1-year manufacturer's warranty. For specific terms and conditions, please refer to the warranty documentation included with your purchase or contact Schneider Electric customer support.
10. Support Information
For technical assistance, troubleshooting beyond this manual, or inquiries regarding your Schneider Electric 8910DPA63V14 Contactor, please contact Schneider Electric customer support. You can find contact details on the official Schneider Electric website or through your local distributor.
Visit the official Schneider Electric Store for more product information and resources.