
1. Product Overview
The LiftMaster Passport PPV1 1-Button Remote is designed for convenient access control. This remote control features narrow band transmission on three simultaneous frequencies (310 MHz, 315 MHz, and 390 MHz) to ensure reliable operation.
It is compatible with various LiftMaster receivers, including 850LM, 860LM, PPWR, and STAR1000. The PPV1 remote also works seamlessly with Security+ 2.0 gate operators and residential garage door openers.
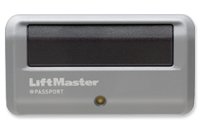
Figure 1: LiftMaster Passport PPV1 1-Button Remote. This image shows the compact, grey remote control with a single black button and the LiftMaster Passport logo.
2. Setup and Programming
Before using your LiftMaster Passport PPV1 remote, it must be programmed to your compatible receiver or garage door opener.
2.1. Battery Installation
The remote comes with a pre-installed battery. If replacement is needed, refer to the Maintenance section.
2.2. Programming Instructions (General Guide)
Programming steps may vary slightly depending on your specific LiftMaster receiver or garage door opener model. Always refer to the manual of your receiver/opener for precise instructions. The general steps are as follows:
- Locate the "Learn" button on your garage door opener or external receiver. This button is typically found on the back or side panel of the motor unit, or on the receiver itself.
- Press and immediately release the "Learn" button. The LED indicator on the opener/receiver will illuminate, indicating it is in programming mode. You usually have about 30 seconds to complete the next step.
- Within 30 seconds, press and hold the button on your PPV1 remote that you wish to program.
- Continue holding the remote button until the opener's light flashes or you hear two clicks. This indicates successful programming.
- Release the button on the remote.
- Test the remote by pressing the programmed button. The garage door or gate should activate.
Note: If the remote does not work after programming, repeat the steps. Ensure you are within range of the receiver during programming.
3. Operating Instructions
Once programmed, operating the LiftMaster Passport PPV1 remote is straightforward.
- To Open/Close: Press and release the single button on the remote control. The garage door or gate will activate.
- Range: For optimal performance, operate the remote within a reasonable range of your receiver. Environmental factors can affect signal range.
4. Maintenance
The LiftMaster Passport PPV1 remote requires minimal maintenance.
4.1. Battery Replacement
When the remote's range decreases significantly or the LED indicator on the remote (if present) does not light up, it may be time to replace the battery.
- Carefully open the remote casing. Refer to the remote's specific design for the battery compartment access.
- Note the type and orientation of the existing battery. Most remotes use a coin cell battery (e.g., CR2032).
- Remove the old battery and insert a new one of the same type, ensuring correct polarity (+/-).
- Close the remote casing securely.
- Test the remote to ensure it functions correctly.
4.2. Cleaning
Wipe the remote with a soft, dry cloth. Avoid using abrasive cleaners or solvents, as these can damage the casing or internal components.
5. Troubleshooting
If your LiftMaster Passport PPV1 remote is not functioning as expected, consider the following common issues and solutions:
- Remote Not Working After Programming:
- Ensure the "Learn" button on your opener/receiver was pressed and released correctly, and that you pressed the remote button within the allowed time frame (usually 30 seconds).
- Verify the battery in the remote is fresh and installed with correct polarity.
- Try reprogramming the remote.
- Reduced Operating Range:
- Replace the remote's battery.
- Check for sources of interference near your garage door opener or receiver (e.g., large metal objects, other radio frequency devices).
- Remote LED Not Lighting Up:
- The battery is likely dead. Replace the battery.
If these steps do not resolve the issue, contact LiftMaster customer support or a qualified technician.
6. Specifications
| Feature | Detail |
|---|---|
| Brand | LiftMaster |
| Model Number | PPV1 |
| Connectivity Technology | Radio Frequency |
| Max Number of Supported Devices | 1 |
| Compatible Devices | LiftMaster 850LM, 860LM, PPWR, STAR1000 |
| Item Weight | 1.3 ounces |
| Package Dimensions | 3.78 x 1.85 x 0.94 inches |
| Special Feature | Ergonomic |
7. Warranty and Support
For specific warranty information regarding your LiftMaster Passport PPV1 remote, please refer to the documentation provided at the time of purchase or visit the official LiftMaster website. Warranty terms and conditions may vary.
If you require technical assistance or have questions not covered in this manual, please contact LiftMaster customer support:
- LiftMaster Official Website: www.liftmaster.com
- Refer to the website for contact numbers or support forms.
Always ensure you have your product model number (PPV1) and any purchase details ready when contacting support.


