Introduction
The Onkyo HT-RC560 is a 7.2-channel network A/V receiver designed to deliver a comprehensive home theater experience. It features built-in Wi-Fi and Bluetooth capabilities, allowing for seamless audio streaming from various sources. This receiver supports 4K pass-through and upscaling, ensuring high-quality video output. With Audyssey MultiEQ calibration, it optimizes sound for your listening environment. This manual provides essential information for setting up, operating, maintaining, and troubleshooting your HT-RC560 receiver.
Setup
1. Unpacking and Placement
Carefully remove the receiver from its packaging. Place the receiver on a stable, level surface with adequate ventilation. Ensure at least 8 inches of clear space above the unit and 4 inches on the sides to prevent overheating. Avoid placing it directly on top of or underneath other heat-generating components.
2. Connecting Speakers
Connect your speakers to the corresponding terminals on the rear panel of the receiver. Ensure correct polarity (+ to + and - to -) for each speaker. The HT-RC560 supports a 7.2 channel configuration, or 5.1 channels with Zone 2 or Dolby Pro Logic IIz for front height/wide speakers.
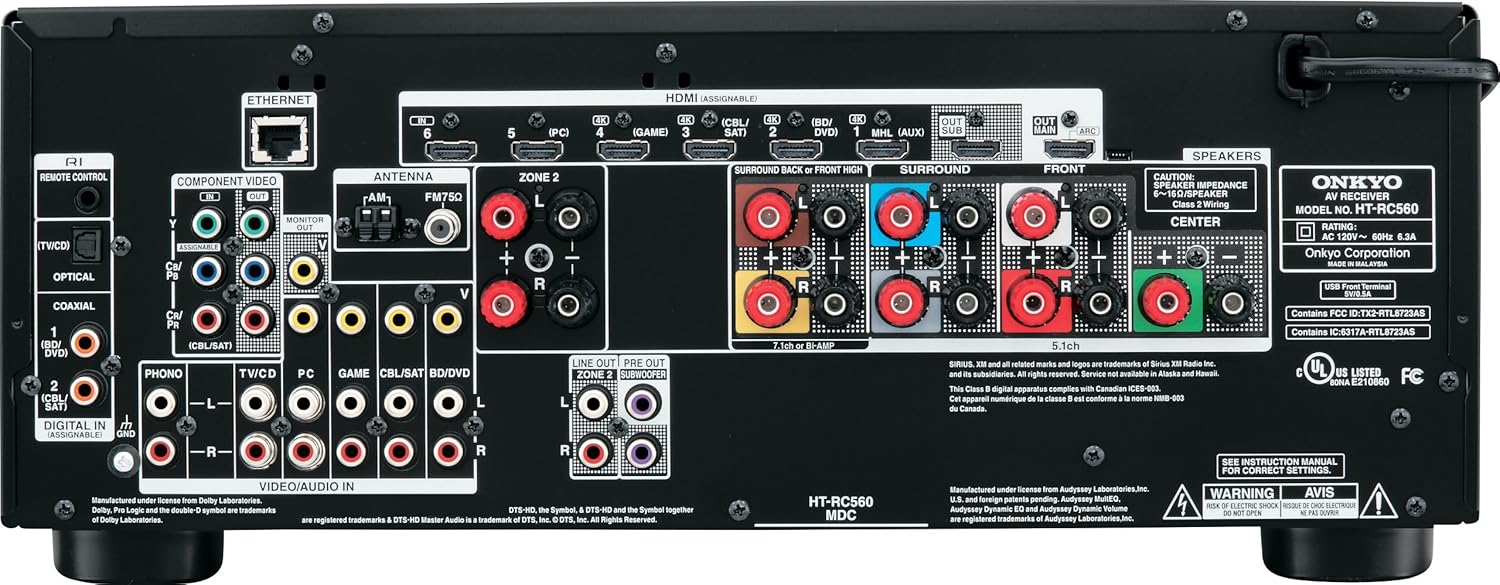
Figure 1: Rear Panel Connections. This image displays the rear panel of the Onkyo HT-RC560 receiver, highlighting the speaker terminals, HDMI inputs/outputs, optical/coaxial digital inputs, analog audio/video inputs, Ethernet port, and Zone 2 outputs. Use this diagram to correctly connect your audio and video sources, as well as your speakers.
3. Connecting Audio/Video Devices
Use HDMI cables to connect your source devices (e.g., Blu-ray player, game console, cable box) to the HDMI inputs on the receiver. The HT-RC560 features six 4K-ready HDMI inputs and two HDMI outputs. Connect one HDMI output to your TV or projector. For devices without HDMI, use optical, coaxial, or analog audio/video connections as appropriate.
4. Network Connection (Wi-Fi/Ethernet)
For network features, connect the receiver to your home network. You can use the built-in Wi-Fi or connect an Ethernet cable to the LAN port on the rear panel. Follow the on-screen setup wizard to configure network settings.
5. Initial Setup and Calibration
After connecting all devices, power on the receiver and your display. Follow the on-screen instructions for initial setup. Utilize the Audyssey MultiEQ system for automatic speaker calibration, which optimizes sound settings based on your room acoustics. This process involves placing a microphone at your listening position and following prompts.
Operating Instructions
1. Basic Operation with Remote Control
The included remote control provides access to all receiver functions. Use the input selector buttons (e.g., BD/DVD, CBL/SAT, GAME) to switch between connected devices. Adjust volume using the VOL +/- buttons. The remote also allows navigation through menus and playback controls.

Figure 2: Remote Control Layout. This image shows the layout of the Onkyo RC-866M remote control. It includes buttons for input selection, volume control, menu navigation, and playback functions. Familiarize yourself with these controls for efficient operation of your receiver.
2. Wi-Fi and Network Streaming
Once connected to your network, the receiver can stream audio files (MP3, WMA, WMA Lossless, FLAC, WAV, Ogg Vorbis, AAC, Apple Lossless, DSD, LPCM2, and Dolby TrueHD) from your PC or NAS. Access internet radio stations and streaming services through the receiver's interface or via the Onkyo Remote App for iOS and Android devices.
3. Bluetooth Connectivity
To stream audio wirelessly from a Bluetooth-enabled device (e.g., smartphone, tablet):
- Enable Bluetooth on your mobile device.
- Select "Bluetooth" as the input source on the receiver.
- On your mobile device, search for available Bluetooth devices and select "Onkyo HT-RC560" (or similar).
- Once paired, you can play audio from your device through the receiver.
4. Video Upscaling
The HT-RC560 features Qdeo™ processing technology by Marvell, which can upscale standard video content to 1080p or 4K resolution when connected to a compatible 4K display.
5. Zone 2 Audio
The receiver supports Powered Zone 2, allowing you to enjoy a separate audio source in another room using dedicated speakers connected to the Zone 2 speaker terminals. Alternatively, use the Zone 2 Line-Out for an external amplifier in the second zone.
Maintenance
1. Cleaning
Wipe the exterior of the receiver with a soft, dry cloth. Do not use abrasive cleaners, waxes, or solvents as they may damage the finish. Ensure the unit is powered off and unplugged before cleaning.
2. Ventilation
Proper ventilation is crucial for the longevity of your receiver. Ensure that the ventilation openings on the top and sides of the unit are not blocked. Operating the receiver in an enclosed space without adequate airflow can lead to overheating and potential damage. If the unit feels excessively hot, ensure it has sufficient space around it, or consider adding external cooling if necessary.
Troubleshooting
If you encounter issues with your HT-RC560 receiver, refer to the following common solutions:
- No Power: Ensure the power cord is securely plugged into both the receiver and a working electrical outlet. If the unit suddenly turns off and won't restart, unplug it from the wall, wait a few minutes, and then plug it back in. If the issue persists, contact customer support.
- No Audio/Video Output (HDMI):
- Verify all HDMI cables are securely connected between the source device, receiver, and TV.
- Ensure the correct input source is selected on the receiver and the correct HDMI input is selected on your TV.
- Try unplugging the receiver's power cord for a few minutes, then reconnecting it. This can often resolve temporary HDMI handshake issues.
- Test with different HDMI cables or try connecting the source directly to the TV to isolate the problem.
- Overheating: If the receiver becomes excessively hot, immediately power it off and unplug it. Check for proper ventilation as described in the Maintenance section. Ensure no objects are blocking the vents. Allow the unit to cool down completely before restarting. Continuous overheating can lead to component failure.
- Network Connection Issues:
- Ensure your Wi-Fi router is powered on and functioning correctly.
- Check the network settings on the receiver to ensure it's connected to the correct network and has a valid IP address.
- If using Wi-Fi, try moving the receiver closer to the router or using an Ethernet cable for a more stable connection.
- Restart your router and the receiver.
- Bluetooth Pairing Problems: Ensure the receiver is in Bluetooth pairing mode and your mobile device's Bluetooth is enabled and discoverable. Try restarting both devices.
Specifications
| Model Number | HT-RC560 |
| Product Dimensions | 17 x 13 x 7 inches |
| Item Weight | 21.6 pounds |
| Brand | Onkyo |
| Connectivity Technology | Wireless; Bluetooth |
| Controller Type | Android (also iOS via Onkyo Remote App) |
| Special Features | Built-in Wi-Fi & Bluetooth, Music streaming, Powerful bass and clear vocals, 4K Pass-through, 4K Upscaling with Qdeo™ |
| Compatible Devices | Personal Computer, Smartphone, Speaker, Tablet |
| Total HDMI Ports | 6 inputs, 2 outputs |
| Audio Output Mode | Stereo |
| Surround Sound Channel Configuration | 7.2 channel |
| Batteries | 2 AA batteries required (included for remote) |
| Date First Available | May 1, 2013 |
Warranty and Support
For warranty information and technical support, please refer to the official Onkyo website or contact Onkyo customer service directly. Keep your proof of purchase for warranty claims. Detailed contact information can typically be found in the product packaging or on the manufacturer's website.
Onkyo Website: www.onkyo.com


