1. Introduction
This manual provides essential instructions for the safe and effective use of your SentrySafe SFW123FUL Digital Keypad Fireproof and Waterproof Safe. This safe is designed to protect your valuable documents and possessions from fire and water damage. Please read this manual thoroughly before setting up and operating your safe.

Image 1.1: SentrySafe SFW123FUL with door open, revealing interior storage space and adjustable shelves.
2. Important Safety Information
- Moisture Control: Due to the fire-resistant insulation, the safe's interior may retain moisture. To prevent damage to sensitive items like documents, photographs, or electronics, it is recommended to use a desiccant or dehumidifier inside the safe. Replace or recharge the desiccant regularly.
- Battery Usage: Use only new, high-quality alkaline batteries for the digital keypad. Do not mix old and new batteries, or different types of batteries. Replace batteries annually or when the "LOW BATT" indicator appears.
- Placement: Position the safe on a level surface. For optimal security, consider bolting the safe to the floor or wall using the provided hardware. Ensure adequate clearance for the door to open fully (14.75 inches).
- Avoid Blocking Vents: Do not block any vents or openings on the safe, as this may affect its fire or water resistance properties.
- Children: Keep the safe locked and out of reach of children to prevent unauthorized access.
3. Package Contents
Verify that all items are present in your package:
- SentrySafe SFW123FUL Digital Keypad Safe
- User Manual (this document)
- Mounting Hardware (bolts for floor/wall mounting)
- Adjustable Shelf(es)
- Emergency Override Key (if applicable, check your specific model)
4. Setup Instructions
4.1. Unpacking and Initial Inspection
- Carefully remove the safe from its packaging.
- Inspect the safe for any signs of damage. If damaged, contact customer support immediately.
- Retain packaging materials for potential future transport or returns.
4.2. Battery Installation
The digital keypad requires batteries for operation.
- Locate the battery compartment on the keypad.
- Open the compartment cover.
- Insert four (4) new AA alkaline batteries, ensuring correct polarity (+/-).
- Close the battery compartment cover securely.

Image 4.2: Digital keypad for setting and entering your personal combination.
4.3. Setting Your Personal Combination
Your safe comes with a factory-set code. It is crucial to change this to a personal combination immediately.
- With the safe door open, press the "PROGRAM" button located inside the safe door.
- Enter your desired 5-8 digit personal combination on the keypad.
- Press the "PROGRAM" button again to confirm.
- Test your new combination with the door open before closing it.
- Important: Write down your combination and store it in a secure location away from the safe.
4.4. Mounting the Safe (Optional)
For enhanced security, the safe can be bolted to a floor or wall.
- Choose a suitable location, ensuring the surface is stable and can support the safe's weight.
- Open the safe door and locate the pre-drilled mounting holes on the bottom or back of the safe.
- Using the provided hardware, secure the safe to the floor or wall. Follow the instructions specific to your mounting hardware.
- Note: Bolting the safe to the floor or wall may affect its waterproof rating if the seals are compromised during installation. Consult the full manual for detailed instructions on maintaining water resistance during mounting.
5. Operating Instructions
5.1. Opening the Safe
- Enter your personal 5-8 digit combination on the digital keypad.
- The green "PROCEED" light will illuminate, and you will hear a beep.
- Within 5 seconds, turn the handle clockwise (or counter-clockwise, depending on model) to open the door.
5.2. Closing and Locking the Safe
- Close the safe door firmly.
- Turn the handle counter-clockwise (or clockwise) until it is fully engaged and the door is securely latched.
- The safe is now locked.
5.3. Using the Interior Light
The safe is equipped with an interior light for visibility in low-light conditions.
- The interior light typically activates automatically when the door is opened.
- It will turn off automatically after a short period or when the door is closed.

Image 5.3: Icon indicating the interior light feature.
5.4. Adjusting Shelves
The safe includes adjustable shelves to customize your storage space.
- To remove a shelf, lift it slightly and pull it out.
- To reposition, align the shelf with the desired support tabs and lower it into place.
6. Maintenance
6.1. Battery Replacement
Replace batteries annually or when the "LOW BATT" indicator illuminates on the keypad. Refer to Section 4.2 for battery installation steps.
6.2. Cleaning
Clean the exterior of the safe with a soft, damp cloth. Do not use abrasive cleaners or solvents, as these can damage the finish or keypad.
6.3. Moisture Management
To combat potential moisture buildup inside the safe, especially in humid environments:
- Place a desiccant packet or a small, rechargeable dehumidifier inside the safe.
- Check and replace or recharge the desiccant according to its manufacturer's instructions.
- Periodically air out the safe by opening the door for a short period in a dry environment.
7. Troubleshooting
| Problem | Possible Cause | Solution |
|---|---|---|
| Safe does not open with code. | Incorrect code entered. Low or dead batteries. Keypad malfunction. |
|
| "LOW BATT" indicator is on. | Batteries are low. | Replace all four AA alkaline batteries immediately (refer to Section 4.2). |
| Door does not close or latch properly. | Obstruction in the door frame. Locking bolts not fully retracted. |
|
| Moisture inside the safe. | High humidity, inherent moisture from fire-resistant material. | Place a desiccant or dehumidifier inside. Periodically air out the safe (refer to Section 6.3). |
8. Specifications
| Feature | Detail |
|---|---|
| Model | SFW123FUL |
| Brand | SentrySafe |
| Exterior Dimensions (H x W x D) | 17.8 in. x 16.3 in. x 19.3 in. (45.2 cm x 41.4 cm x 49.0 cm) |
| Interior Dimensions (H x W x D) | 13.8 in. x 12.6 in. x 11.9 in. (35.1 cm x 32.0 cm x 30.2 cm) |
| Capacity | 1.23 Cubic Feet (34.8 Liters) |
| Weight | 86.3 Pounds (39.1 kg) |
| Lock Type | Digital Keypad |
| Material | Alloy Steel |
| Fire Protection | UL Classified for 1 hour at 1700°F (927°C) |
| Water Protection | ETL Verified for 24 hours in 8 inches of water |
| Mounting Type | Wall Mount; Floor Mount |
| Special Features | Interior Lighting, Adjustable Shelf, Pry-Resistant Hinge Bar, Anti-theft Alarm |

Image 8.1: UL Classified fire protection for 1 hour at 1700°F.

Image 8.2: ETL Verified water protection for 24 hours in 8 inches of water.
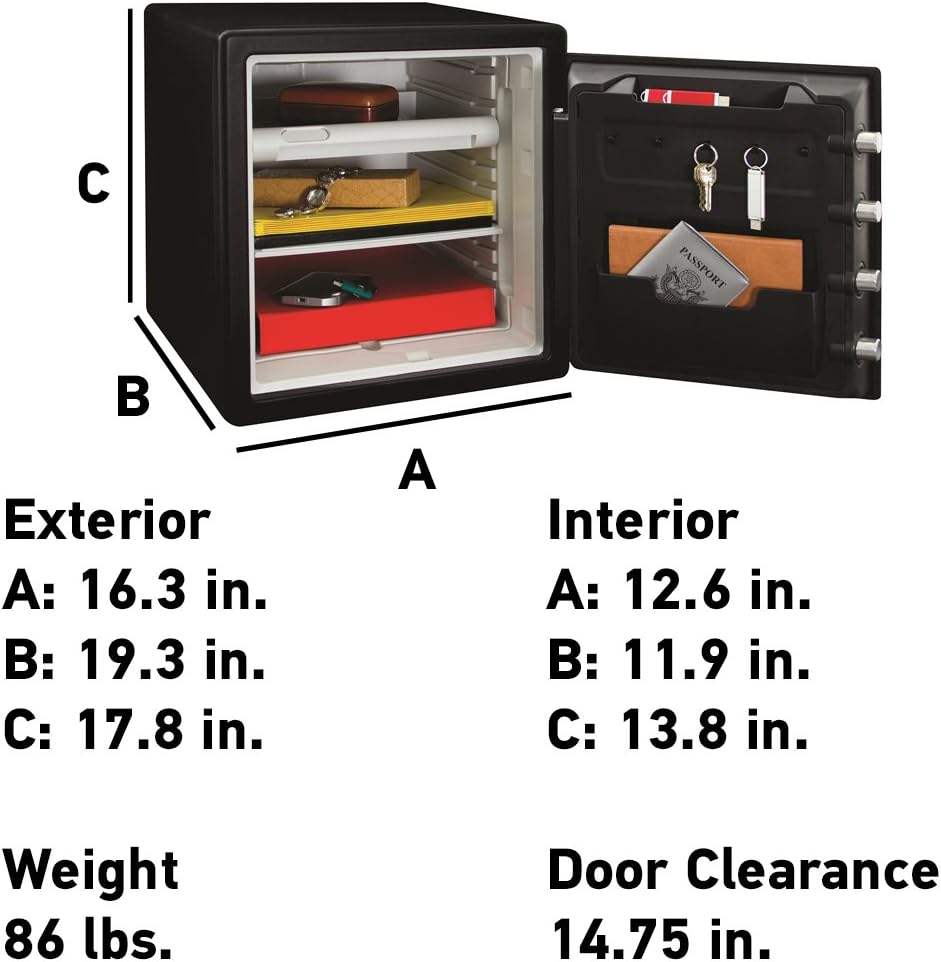
Image 8.3: Detailed dimensions for the SentrySafe SFW123FUL model.
9. Warranty and Support
9.1. Limited Warranty
Your SentrySafe SFW123FUL is covered by a Limited 1 Year Warranty. This warranty covers defects in materials and workmanship under normal use. For full warranty details and terms, please refer to the official SentrySafe website or contact customer support.
9.2. After-Fire Replacement Program
SentrySafe offers an After-Fire Replacement Program. If your safe is damaged in a fire, SentrySafe may provide a replacement safe free of charge. Registration of your safe on the SentrySafe website is typically required to be eligible for this program. Please visit the SentrySafe website for complete details and registration instructions.

Image 9.2: Information regarding the SentrySafe After-Fire Replacement Program.
9.3. Customer Support
For technical assistance, warranty claims, or general inquiries, please contact SentrySafe customer support. Contact information can typically be found on the official SentrySafe website or in the documentation included with your safe.
Online Support: Visit the official SentrySafe website for FAQs, troubleshooting guides, and contact forms.
Telephone Support: Refer to your product registration card or the SentrySafe website for current customer service phone numbers.


