Introduction
This manual provides essential instructions for the safe and effective setup, operation, and maintenance of the Victor 0384-2543 G250-540/510 Acetylene Torch Outfit. Please read this manual thoroughly before using the equipment to ensure proper handling and to prevent injury or damage.
Safety Information
WARNING: Welding and cutting processes can be hazardous. Always follow safety precautions to prevent serious injury or death.
- Always wear appropriate personal protective equipment (PPE), including welding helmet, safety glasses, gloves, and protective clothing.
- Ensure adequate ventilation in the work area to avoid inhaling fumes.
- Keep a fire extinguisher readily available.
- Never use oxygen or fuel gas from cylinders without proper regulators.
- Check all connections for leaks using a leak detection solution.
- Store gas cylinders upright and secured, away from heat sources.
- Do not allow oil or grease to come into contact with oxygen cylinders or equipment.
- Always open cylinder valves slowly.
- Refer to local and national safety standards for additional guidelines.
Package Contents
Verify that all components listed below are present in your Victor 0384-2543 G250-540/510 Acetylene Torch Outfit package:
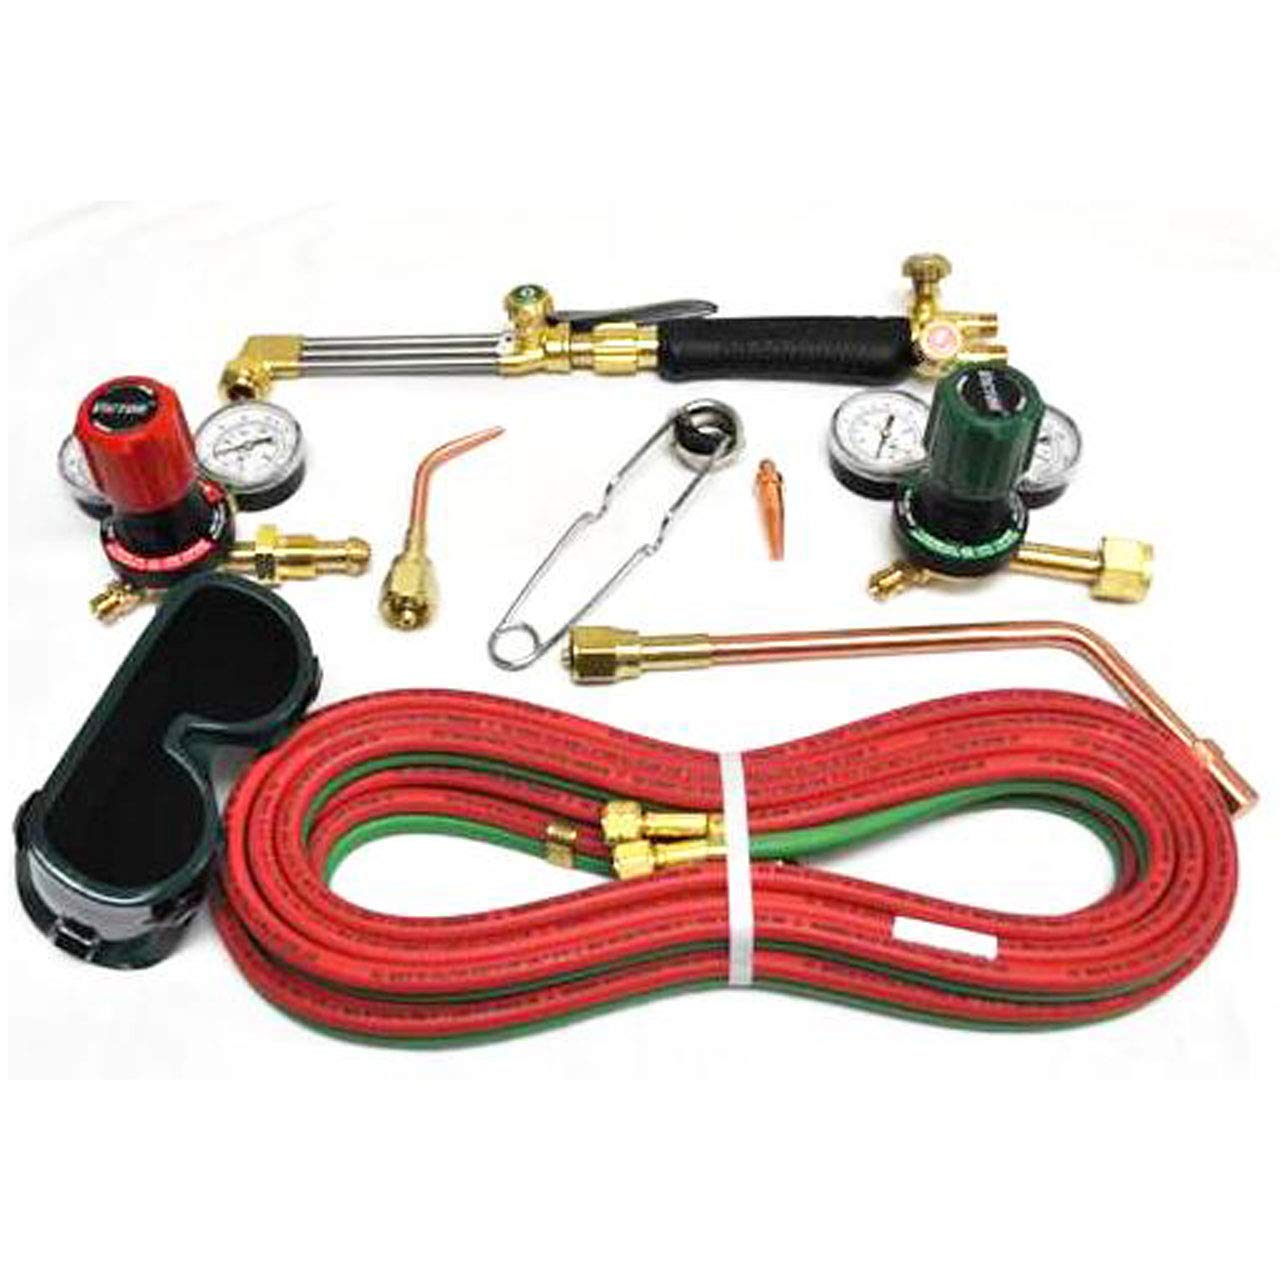
Figure 1: Overview of the Victor 0384-2543 G250-540/510 Acetylene Torch Outfit components.
- D250-15-510 Acetylene 250 Series Regulator
- D250-80-540 Oxygen 250 Series Regulator
- WH270FC-V Torch Handle with built-in flashback arrestors and check valves
- CA 270-V Cutting Attachment
- 0-UM-1 Welding Nozzle
- Series 3 Cutting Tip
- #6 MFA Heating Tip (Rosebud)
- 20' R Grade Hose (Oxygen and Acetylene)
- Striker
- Soft Sided Goggles
Setup Instructions
- Secure Cylinders: Ensure oxygen and acetylene cylinders are secured upright to prevent tipping.
- Clear Cylinder Valves: Briefly open and close the cylinder valves (cracking the valve) to clear any dust or debris from the outlets. Stand to the side of the valve when doing this.
- Attach Regulators:
- Attach the D250-80-540 Oxygen Regulator to the oxygen cylinder valve. The oxygen connection typically has right-hand threads. Tighten securely with a wrench.
- Attach the D250-15-510 Acetylene Regulator to the acetylene cylinder valve. The acetylene connection typically has left-hand threads (indicated by a groove on the nut). Tighten securely with a wrench.
- Connect Hoses:
- Connect the green hose (oxygen) to the oxygen regulator outlet and the oxygen inlet on the WH270FC-V Torch Handle.
- Connect the red hose (acetylene) to the acetylene regulator outlet and the acetylene inlet on the WH270FC-V Torch Handle.
- Ensure all hose connections are tight. Oxygen connections use right-hand threads; acetylene connections use left-hand threads.
- Attach Torch Components:
- For cutting, attach the CA 270-V Cutting Attachment to the WH270FC-V Torch Handle.
- For welding, attach the 0-UM-1 Welding Nozzle to the WH270FC-V Torch Handle.
- For heating, attach the #6 MFA Heating Tip (Rosebud) to the WH270FC-V Torch Handle.
- Ensure the attachment/nozzle is securely tightened to prevent gas leaks.
- Check for Leaks: Before opening cylinder valves, ensure all regulator adjusting screws are backed out (turned counter-clockwise until loose). Slowly open cylinder valves. Apply a leak detection solution to all connections. Bubbles indicate a leak. Tighten connections or replace faulty components if leaks are found.
Operating Instructions
A. Starting the Torch
- Open Cylinder Valves: Slowly open the oxygen cylinder valve fully. Slowly open the acetylene cylinder valve no more than 1/4 to 1/2 turn.
- Set Regulator Pressures:
- Turn the oxygen regulator adjusting screw clockwise to set the desired working pressure (refer to tip manufacturer's recommendations).
- Turn the acetylene regulator adjusting screw clockwise to set the desired working pressure (refer to tip manufacturer's recommendations).
- Purge Hoses: Briefly open the oxygen valve on the torch handle to purge air, then close. Repeat for the acetylene valve.
- Light the Torch:
- Slightly open the acetylene valve on the torch handle.
- Use the striker to ignite the gas.
- Slowly open the oxygen valve on the torch handle and adjust both oxygen and acetylene valves to achieve the desired flame (neutral, carburizing, or oxidizing).
B. Shutting Down the Torch
- Close Acetylene Valve: Close the acetylene valve on the torch handle.
- Close Oxygen Valve: Close the oxygen valve on the torch handle.
- Close Cylinder Valves: Close the oxygen cylinder valve, then close the acetylene cylinder valve.
- Bleed Hoses: Open the oxygen valve on the torch handle to release pressure from the oxygen regulator and hose until both regulator gauges read zero. Close the oxygen torch valve. Repeat for the acetylene side.
- Back Out Regulator Screws: Turn both oxygen and acetylene regulator adjusting screws counter-clockwise until they are loose. This relieves spring tension and prolongs regulator life.
Maintenance
- Regular Inspection: Periodically inspect hoses for cuts, cracks, or wear. Check all connections for tightness.
- Tip Cleaning: Use a tip cleaner to remove carbon deposits from welding and cutting tips. Never use hard objects that could damage the tip orifice.
- Leak Checks: Perform a leak check with a leak detection solution regularly, especially after changing cylinders or components.
- Storage: Store the torch outfit in a clean, dry place, protected from damage.
Troubleshooting
| Problem | Possible Cause | Solution |
|---|---|---|
| No gas flow from torch | Cylinder valve closed; Regulator adjusting screw not turned in; Clogged tip; Kinked hose. | Open cylinder valve; Turn in regulator adjusting screw; Clean tip; Straighten hose. |
| Unstable or popping flame | Incorrect gas pressure settings; Loose tip; Dirty tip; Flashback arrestor issue. | Adjust pressures; Tighten tip; Clean tip; Inspect flashback arrestors (if problem persists, seek professional service). |
| Gas leak at connections | Loose connection; Damaged O-ring or threads. | Tighten connection; Replace O-ring or component. |
Specifications
| Feature | Detail |
|---|---|
| Model Number | 0384-2543 G250-540/510 |
| Brand | Victor |
| Manufacturer | Victor Equipment |
| Outfit Type | Medium Duty Oxy-Acetylene |
| Cutting Capacity | Up to 1/2" (or 5" with optional tips) |
| Welding Capacity | Up to 5/64" (or 1.25" with optional tips) |
| Hose Length | 20 feet |
| Hose Grade | R Grade |
| Item Weight | Approximately 14.95 pounds |
| Product Dimensions | 12 x 5.75 x 2.4 inches (packaging/kit dimensions) |
| UPC | 716352567886 |
Warranty and Support
For warranty information, technical support, or service inquiries regarding your Victor 0384-2543 G250-540/510 Acetylene Torch Outfit, please contact Victor Equipment customer service directly. Retain your proof of purchase for warranty claims.
Contact information for Victor Equipment can typically be found on their official website or product packaging.


