1. Introduction
This manual provides detailed instructions for the installation, operation, and maintenance of the Jensen TRA4500 Self-contained Fender Mount Heavy Duty Radio and Speaker. The TRA4500 is designed for robust performance, featuring a full-range 5-inch by 7-inch speaker, a rubber mast antenna, and a durable ABS housing suitable for various environments. It offers 20 watts maximum power output and includes 18 FM and 12 AM station presets for versatile listening.
2. Key Features
- Integrated radio with full-range 5-inch by 7-inch speaker and rubber mast antenna.
- Maximum power output of 20 watts.
- 18 FM and 12 AM station presets for quick access to favorite stations.
- Auto scan and Preset Scan functions for convenient tuning.
- High impact, weather-resistant ABS housing for durability.
- 3.5 mm headphone jack for private listening.
- Two-wire hookup with automatic vehicle polarity detection for simplified installation.
- Compatible with 12 Volt positive or negative ground electrical systems.
3. What's in the Box
Upon unpacking, verify that all components are present:
- Jensen TRA4500 Radio Unit
- Integrated Speaker
- Rubber Mast Antenna
4. Setup and Installation
The TRA4500 is designed for fender mounting. Ensure the mounting surface is stable and can support the unit's weight. Refer to the dimensions diagram for proper placement and clearance.
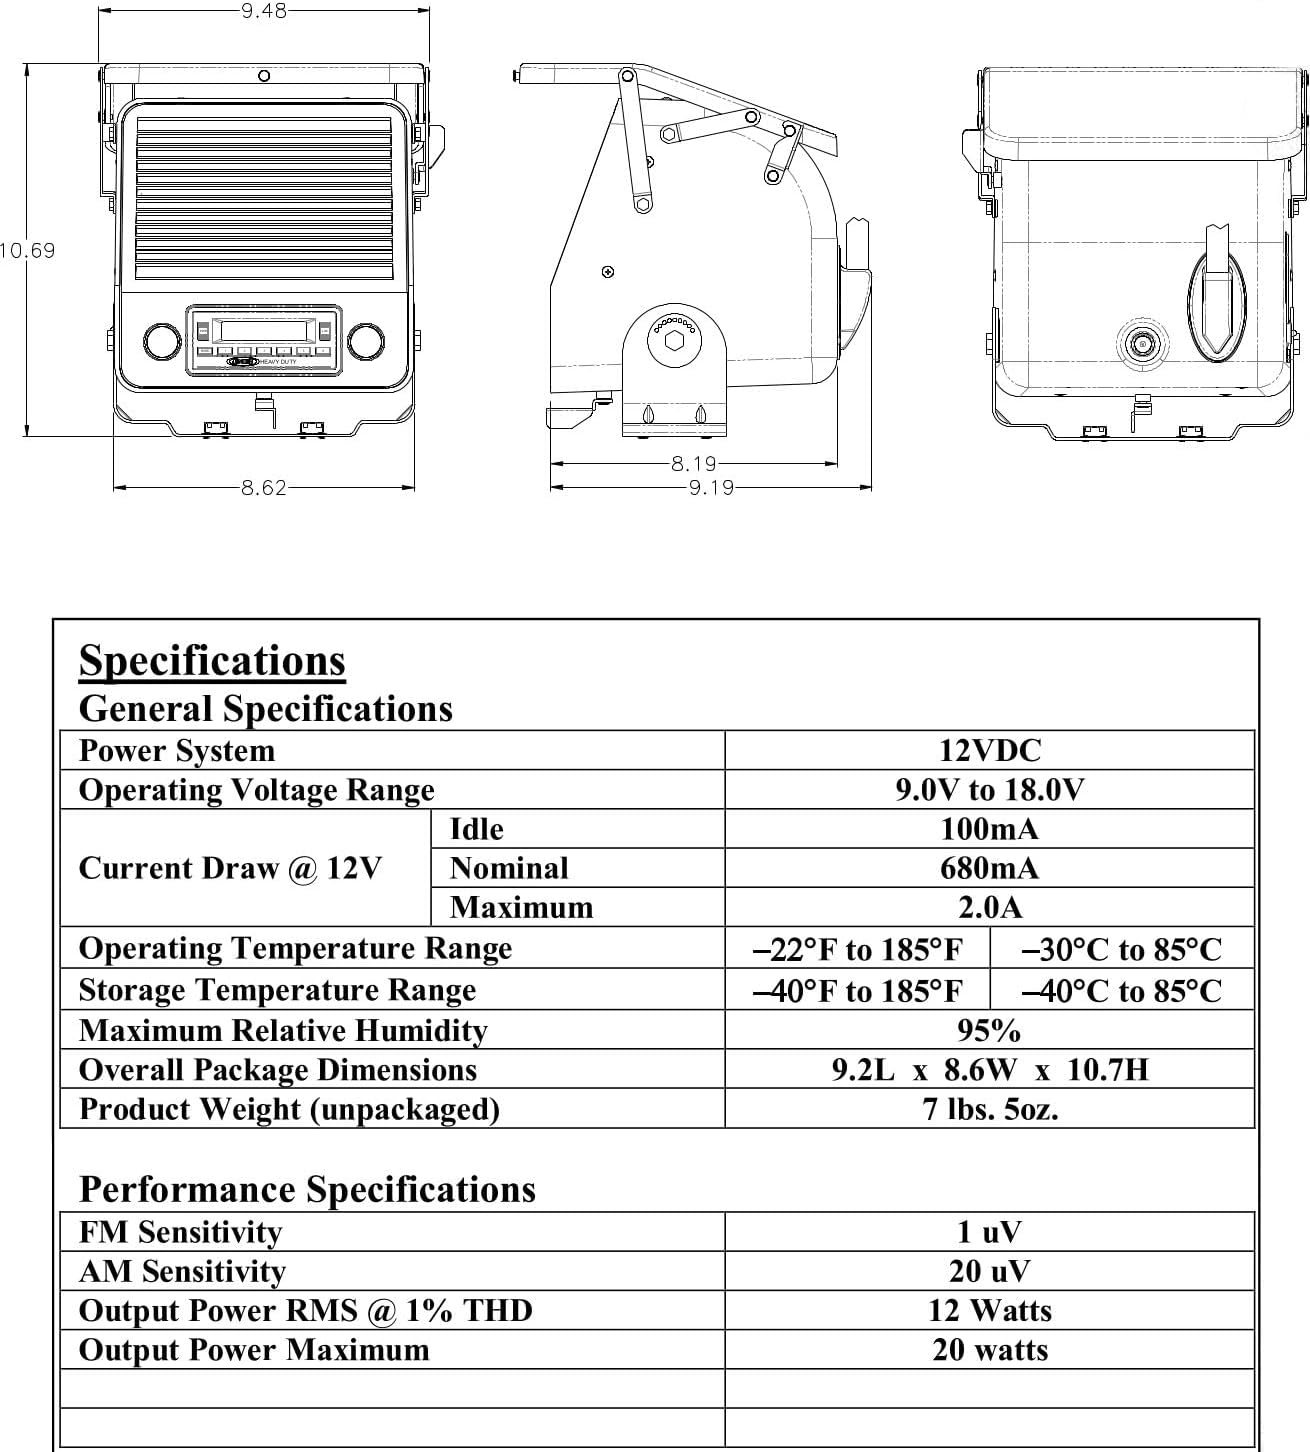
Figure 4.1: Jensen TRA4500 Dimensions. This diagram illustrates the overall dimensions of the unit, including length, width, and height, crucial for proper mounting and fitment on a vehicle fender.
4.1 Electrical Connection
The unit requires a 12VDC power source. It features a two-wire hookup with automatic vehicle polarity detection, simplifying the connection process. Ensure the power source is capable of providing sufficient current (up to 2.0A maximum) and is properly fused.
- Connect the positive wire to a switched 12VDC power source.
- Connect the negative wire to a suitable vehicle ground (chassis).
- The unit is compatible with both positive and negative ground systems.
5. Operating Instructions
Familiarize yourself with the controls on the front panel of the TRA4500.

Figure 5.1: Jensen TRA4500 Front Panel. This image displays the main controls including the power/volume knob, tuning/selection knob, display screen, and various function buttons for radio operation.
5.1 Power On/Off and Volume
Rotate the left knob (PWR/SEL) clockwise to power on the unit and adjust the volume. Rotate counter-clockwise to decrease volume and power off.
5.2 Radio Tuning and Presets
- Band Selection: Press the 'BAND' button to cycle through FM and AM bands.
- Manual Tuning: Use the right knob (AS/PS / DN / UP) to manually tune to desired frequencies.
- Auto Scan: Press and hold the 'AS/PS' button to automatically scan and store strong stations.
- Preset Scan: Briefly press the 'AS/PS' button to scan through stored presets.
- Storing Presets: Tune to a desired station, then press and hold one of the numbered preset buttons (1-6) until the display confirms storage. The unit supports 18 FM and 12 AM presets.
5.3 Audio Controls
The unit includes controls for Bass, Treble, and Loudness to customize audio output. Access these settings via the 'SEL' button (left knob) and adjust using the right knob.
5.4 Headphone Jack
A 3.5 mm headphone jack is provided for private listening. Inserting headphones will mute the integrated speaker.
6. Maintenance
The Jensen TRA4500 is built with a high-impact, weather-resistant ABS housing, requiring minimal maintenance.
- Cleaning: Use a soft, damp cloth to clean the exterior. Avoid abrasive cleaners or solvents.
- Antenna: Periodically check the rubber mast antenna for any damage or obstruction.
- Connections: Ensure all electrical connections remain secure and free from corrosion.
- Weather Cover: Keep the hinged front weather cover closed when not in use to protect the controls and display from elements.
7. Troubleshooting
If you encounter issues with your TRA4500, refer to the following common problems and solutions:
| Problem | Possible Cause | Solution |
|---|---|---|
| No Power | Loose power connection, blown fuse, incorrect wiring. | Check power and ground connections. Inspect vehicle fuse. Verify wiring polarity. |
| Poor Radio Reception | Antenna not fully extended, antenna damage, weak signal area. | Ensure antenna is fully extended. Check antenna for damage. Try tuning to a stronger station or move to an area with better reception. |
| No Sound from Speaker | Volume too low, headphones plugged in, speaker wire issue. | Increase volume. Disconnect headphones. Check speaker connections. |
| Buttons Unresponsive | Unit frozen, moisture in controls. | Try cycling power (turn off and on). Ensure weather cover is properly sealed. Allow unit to dry if exposed to moisture. |
If the problem persists after attempting these solutions, contact Jensen customer support for further assistance.
8. Specifications
| Category | Specification |
|---|---|
| Power System | 12VDC |
| Operating Voltage Range | 9V to 18V |
| Current Draw @ 12V (Idle) | 100mA |
| Current Draw @ 12V (Nominal) | 680mA |
| Current Draw @ 12V (Max) | 2.0A |
| FM Sensitivity | 1 uV |
| AM Sensitivity | 20 uV |
| Output Power RMS @ 1% THD | 12W |
| Output Power Maximum | 20W |
| Overall Dimensions (WxHxD) | 8.6 x 10.7 x 9.2 inches (21.8 x 27.2 x 23.4 cm) |
| Product Weight | 7.5 pounds (3.4 kg) |
| Housing Material | High impact, weather ABS |
| Connectivity | 3.5 mm Headphone Jack, Two-wire hookup |
| Tuner Technology | AM/FM, Digital |
9. Warranty and Support
Warranty information for the Jensen TRA4500 is typically provided with the product packaging or can be found on the official Jensen website. For technical support, service, or to inquire about warranty claims, please refer to the contact information provided by Jensen.
You can also visit the official Jensen store on Amazon for more information: Jensen Store


