1. Product Overview
The GBC 67.8400.10 is a color video intercom system designed for enhanced home security and communication. This system features a 4-inch LCD color monitor with a handset for clear audio-visual communication between the indoor unit and the outdoor camera. The outdoor camera is built with vandal-proof aluminum alloy, IP-44 weather protection, and includes night vision capabilities for round-the-clock surveillance. The system supports a simple 4-wire connection and is expandable with up to two additional indoor monitors.
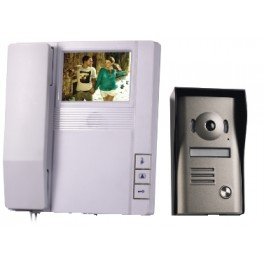
Figure 1: GBC 67.8400.10 Video Intercom System components.
Key Features:
- Outdoor Camera: IP-44 waterproof, CMOS color sensor with 92° viewing angle, vandal-proof aluminum alloy structure, rain cover, nameplate, and Night & Day function with Ø 5mm IR LEDs for night vision.
- Indoor Monitor: 4-inch flat LCD color screen with handset, external monitoring button, 14 selectable ringtones, and electric lock release button.
- Communication: Full duplex audio-visual communication.
- Installation: Simple 4-wire connection (15m cable included).
- Expandability: Supports up to 3 indoor monitors in total.
2. Setup and Installation
This section provides detailed instructions for installing your GBC 67.8400.10 video intercom system. Ensure all power is disconnected before beginning installation.
2.1. Package Contents:
- Indoor monitor unit
- 15VDC power adapter
- Monitor mounting bracket
- Outdoor camera unit
- 10-meter cable bundle
- Mounting screws
2.2. Wiring Diagram (4-Wire Connection):
The system uses a 4-wire connection for communication and power between the indoor monitor and the outdoor camera. The included 10-meter cable bundle facilitates this connection. For longer distances, ensure appropriate cable gauge is used, up to a maximum of 100 meters.
Connect the corresponding wires from the outdoor camera to the indoor monitor as per the color coding provided in the installation guide. The power adapter connects to the indoor monitor.
2.3. Mounting the Outdoor Camera:
- Choose a suitable location near your entrance, ensuring the camera has a clear view and is protected by the rain cover.
- Mark the drilling points using the outdoor unit's mounting bracket as a template.
- Drill holes and insert wall plugs.
- Secure the mounting bracket to the wall using the provided screws.
- Connect the 4-wire cable to the outdoor camera terminals.
- Attach the outdoor camera unit to the mounted bracket, ensuring it is securely fastened.
2.4. Mounting the Indoor Monitor:
- Select a convenient indoor location for the monitor, typically near an electrical outlet.
- Mark the drilling points using the indoor monitor's mounting bracket.
- Drill holes and insert wall plugs.
- Secure the mounting bracket to the wall.
- Connect the 4-wire cable from the outdoor camera to the indoor monitor terminals.
- Connect the 15VDC power adapter to the indoor monitor and plug it into an electrical outlet.
- Mount the indoor monitor onto its bracket.
Video 1: Practical product illustration. This video provides a general overview of a video intercom system, demonstrating its components and basic functionality.
Video 2: Product details. This video offers a closer look at the features and design of a video intercom system.
Video 3: How to install a 4-wire video intercom. While this video references a different model (MZ-V20), the general principles for installing a 4-wire video intercom system may be applicable. Please refer to the specific wiring diagram in your product manual for exact connections.
3. Operating Instructions
Familiarize yourself with the functions of your GBC 67.8400.10 video intercom for optimal use.
3.1. Receiving a Call:
- When a visitor presses the call button on the outdoor camera, the indoor monitor will ring with your selected melody.
- The image from the outdoor camera will automatically appear on the 4-inch screen.
- To answer the call, lift the handset from the indoor monitor. You can then communicate in full duplex (speak and listen simultaneously).
3.2. Monitoring Outside:
- To view the outdoor area without a visitor pressing the call button, press the dedicated monitor button on the indoor unit. The outdoor camera's feed will display on the screen.
3.3. Opening the Door/Gate:
- During a call or while monitoring, press the electric lock release button on the indoor monitor to open a connected door or gate. Ensure your electric lock is independently powered.
3.4. Selecting Ringtones:
- The indoor monitor offers 14 selectable ringtones. Refer to the monitor's interface or specific buttons for changing the ringtone.
3.5. Night Vision:
- The outdoor camera automatically activates its Night & Day function with IR LEDs in low-light conditions, providing clear black and white images for visibility at night.
4. Maintenance
Regular maintenance ensures the longevity and optimal performance of your video intercom system.
4.1. Cleaning:
- Use a soft, damp cloth to clean the surfaces of both the indoor monitor and the outdoor camera.
- Avoid using abrasive cleaners, solvents, or chemical sprays, as these can damage the finish or electronic components.
- For the outdoor camera lens, use a lens cleaning cloth to avoid scratches.
4.2. Environmental Considerations:
- While the outdoor camera is IP-44 rated for weather protection, ensure the rain cover is properly installed to minimize direct exposure to heavy rain or snow.
- Periodically check the mounting screws for both units to ensure they remain tight and secure.
5. Troubleshooting
If you encounter any issues with your GBC 67.8400.10 video intercom, refer to the following common problems and solutions:
| Problem | Possible Cause | Solution |
|---|---|---|
| No image on indoor monitor. | Loose cable connection, power issue, camera malfunction. | Check all 4-wire connections. Ensure the power adapter is plugged in and the monitor is receiving power. Verify the outdoor camera is functioning. |
| No sound during communication. | Loose audio wire, volume settings. | Check audio wire connections. Adjust volume settings on the indoor monitor. |
| Door/gate not opening. | Incorrect wiring to electric lock, electric lock power issue. | Verify the wiring to the electric lock. Ensure the electric lock has its own power supply and is functioning correctly. |
| Outdoor camera image is blurry or dark at night. | Dirty lens, IR LEDs obstructed or malfunctioning. | Clean the camera lens. Ensure no obstructions are blocking the IR LEDs. |
This system is designed for ease of use and does not require complex programming. If issues persist after following these steps, please contact customer support.
6. Specifications
| Feature | Detail |
|---|---|
| Model Number | 67.8400.10 |
| Brand | GBC |
| Indoor Monitor Screen | 4-inch LCD Color |
| Outdoor Camera Sensor | CMOS Color, 92° viewing angle |
| Night Vision | Yes, with Ø 5mm IR LEDs |
| Outdoor Unit Protection | IP-44, Vandal-Proof Aluminum Alloy |
| Connectivity | Wired (4-wire connection) |
| Max Cable Length | 100 meters (with appropriate cable gauge) |
| Expandability | Up to 3 indoor monitors total |
| Monitor Dimensions | 175x223x57 mm |
| Camera Dimensions | 97x142x42 mm (including rain cover) |
| Power Supply | 15VDC (adapter included) |
| Material | Aluminum |
| Item Weight | 2 Kilograms |
7. Warranty and Support
7.1. Warranty Information:
For detailed warranty information regarding your GBC 67.8400.10 video intercom system, please refer to the warranty card included in your product packaging or visit the official GBC website. Warranty terms and conditions may vary by region.
7.2. Customer Support:
If you require technical assistance, have questions about installation, or need further support, please contact GBC customer service. Contact details can typically be found on the product packaging, the official GBC website, or through your retailer.
For online resources and FAQs, please visit the GBC Store on Amazon.


