
1. Introduction and Overview
This instruction manual provides essential information for the safe and effective use of your Grey Pneumatic 9026MD 26 Piece 1 Inch Drive Deep Metric Socket Set. This set is designed for professional and heavy-duty applications, offering a comprehensive range of deep metric sockets for various fastening tasks. Please read this manual thoroughly before using the product to ensure proper operation, maintenance, and to prevent potential hazards.
2. Product Components
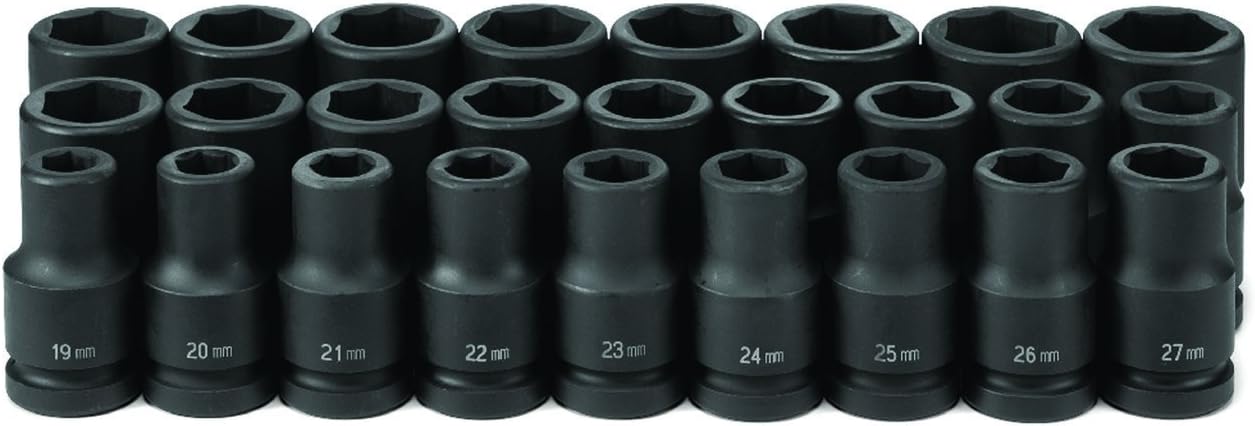
The Grey Pneumatic 9026MD set includes 26 deep metric sockets, each with a 1-inch drive size. These sockets are constructed from durable alloy steel, designed for impact use. The set covers a range of metric sizes from 19mm to 44mm.
- 26 x 1" Drive Deep Metric Sockets (Sizes: 19mm, 20mm, 21mm, 22mm, 23mm, 24mm, 25mm, 26mm, 27mm, 28mm, 29mm, 30mm, 31mm, 32mm, 33mm, 34mm, 35mm, 36mm, 37mm, 38mm, 39mm, 40mm, 41mm, 42mm, 43mm, 44mm)
- Storage Case (may vary by packaging)
3. Setup
- Unpack the Set: Carefully remove all sockets from their packaging. Inspect each socket for any signs of damage or manufacturing defects. Do not use damaged sockets.
- Select Drive Tool: Choose an appropriate 1-inch drive tool, such as a ratchet, breaker bar, or impact wrench, suitable for the task at hand. Ensure the drive tool is in good working condition.
- Identify Socket Size: Select the correct metric socket size (e.g., 19mm, 20mm) that matches the fastener you intend to work with. The size is clearly marked on each socket.
- Attach Socket: Firmly attach the selected socket onto the square drive of your chosen drive tool. Ensure it is fully seated and secure to prevent slippage during operation.
4. Operating Instructions
Always prioritize safety when using hand tools. Wear appropriate personal protective equipment (PPE), such as safety glasses, to protect against flying debris.
- Safety First: Always wear eye protection. Ensure your work area is well-lit and clear of obstructions.
- Secure Fastener: Place the socket squarely onto the head of the fastener. Ensure the socket is fully engaged to prevent rounding of the fastener or damage to the socket.
- Apply Force: Apply steady and controlled force to the drive tool. For tightening, turn clockwise; for loosening, turn counter-clockwise. Avoid sudden jerking motions.
- Impact Use: When using with an impact wrench, ensure the impact wrench is set to the correct torque and direction. These sockets are designed for impact use, but excessive force or improper use can still cause damage.
- Avoid Over-tightening: Do not over-tighten fasteners, as this can strip threads or damage components. Use a torque wrench for precise torque specifications when required.
- Remove Socket: Once the task is complete, carefully remove the socket from the fastener and then from the drive tool.
5. Maintenance
Proper maintenance extends the life of your socket set and ensures continued performance.
- Cleaning: After each use, wipe down sockets with a clean cloth to remove dirt, grease, and debris. For stubborn grime, use a mild solvent and ensure sockets are thoroughly dried afterward.
- Lubrication: Periodically apply a light coat of rust-preventative oil to the sockets, especially if stored in humid environments.
- Inspection: Regularly inspect each socket for signs of wear, cracks, chips, or deformation. Pay close attention to the drive end and the hex opening. Discard any damaged sockets immediately, as they can be dangerous to use.
- Storage: Store the socket set in its original case or a suitable tool organizer in a dry, clean environment to prevent rust and loss.
6. Troubleshooting
This section addresses common issues that may arise during the use of your socket set.
- Socket slips on fastener:
- Ensure the correct size socket is being used.
- Verify the socket is fully seated on the fastener head.
- Inspect the fastener head for damage or rounding.
- Inspect the socket for wear or damage to the hex opening. Replace if damaged.
- Socket stuck on drive tool:
- Apply a small amount of penetrating oil to the connection point.
- Gently wiggle and pull the socket off. Avoid excessive force that could damage the tool or socket.
- Socket appears damaged (cracked, chipped):
- Immediately cease use of the damaged socket.
- Damaged sockets can shatter under load, causing injury. Replace the socket.
7. Specifications
| Feature | Detail |
|---|---|
| Brand | Grey Pneumatic |
| Model Number | 9026MD (also GP-1) |
| Part Number | 9026MD |
| Item Weight | 61.1 pounds |
| Material | Alloy Steel |
| Number of Pieces | 26 |
| Drive Size | 1 inch |
| Measurement System | Metric |
| Socket Sizes | 19mm to 44mm (Deep) |
8. Warranty and Support
Grey Pneumatic products are manufactured to high standards and are typically backed by a manufacturer's warranty against defects in materials and workmanship. For specific warranty details, including duration and coverage, please refer to the warranty information provided with your purchase or visit the official Grey Pneumatic website.
For technical assistance, product inquiries, or warranty claims, please contact Grey Pneumatic customer support through their official channels. Keep your purchase receipt as proof of purchase for any warranty-related services.