1. Introduction
This manual provides essential instructions for the safe operation, maintenance, and troubleshooting of your DuroMax XP7HPE 208cc Electric Start Gas Engine. This 4-stroke OHV engine is designed for multi-use applications, including powering lawn and garden equipment, go-karts, pressure washers, log splitters, and water pumps. Please read this manual thoroughly before operating the engine to ensure proper use and to prevent injury or damage.

Image 1.1: Front view of the DuroMax XP7HPE 208cc Electric Start Gas Engine, showcasing its blue casing and key components like the air filter and fuel tank.
2. Safety Information
WARNING: Failure to follow these safety instructions could result in serious injury or death.
- Carbon Monoxide Hazard: Engine exhaust contains carbon monoxide, a colorless, odorless, poisonous gas. Never operate the engine indoors or in poorly ventilated areas. Ensure adequate ventilation when operating.
- Fuel Safety: Gasoline is highly flammable and its vapors are explosive. Handle fuel with extreme care. Store gasoline in approved containers in a well-ventilated area away from ignition sources. Do not refuel a hot or running engine.
- Hot Surfaces: The engine and exhaust system become very hot during operation and remain hot for a period after shutdown. Avoid contact with hot surfaces to prevent burns.
- Moving Parts: Keep hands, feet, hair, and clothing away from moving parts such as the flywheel, fan, and recoil starter to prevent entanglement and injury.
- Electrical Safety: Ensure all electrical connections are secure and insulated. Do not operate the engine in wet conditions.
- Proposition 65 Warning: This product can expose you to chemicals including carbon monoxide, which is known to the State of California to cause cancer and birth defects or other reproductive harm. For more information go to www.P65Warnings.ca.gov.
3. Product Overview and Key Components
The DuroMax XP7HPE engine features a robust design for reliable performance. Key components include:
- 208cc 4-Stroke OHV Engine: Provides efficient power output.
- Electric Start Key Switch Box: For convenient starting.
- Recoil Start: Manual pull-start option.
- Large 1 Gallon Fuel Tank: Allows for extended operation.
- Dual, Semi-dry, Oil Bath Air Cleaner: Ensures clean air intake.
- Transistorized Magneto Ignition System: For reliable spark.
- 3/4" Diameter Shaft: Standard size for various applications.
- EPA and CARB Approved: Meets environmental standards.

Image 3.1: Side view of the engine, highlighting the carburetor and the air filter assembly, crucial for engine performance.
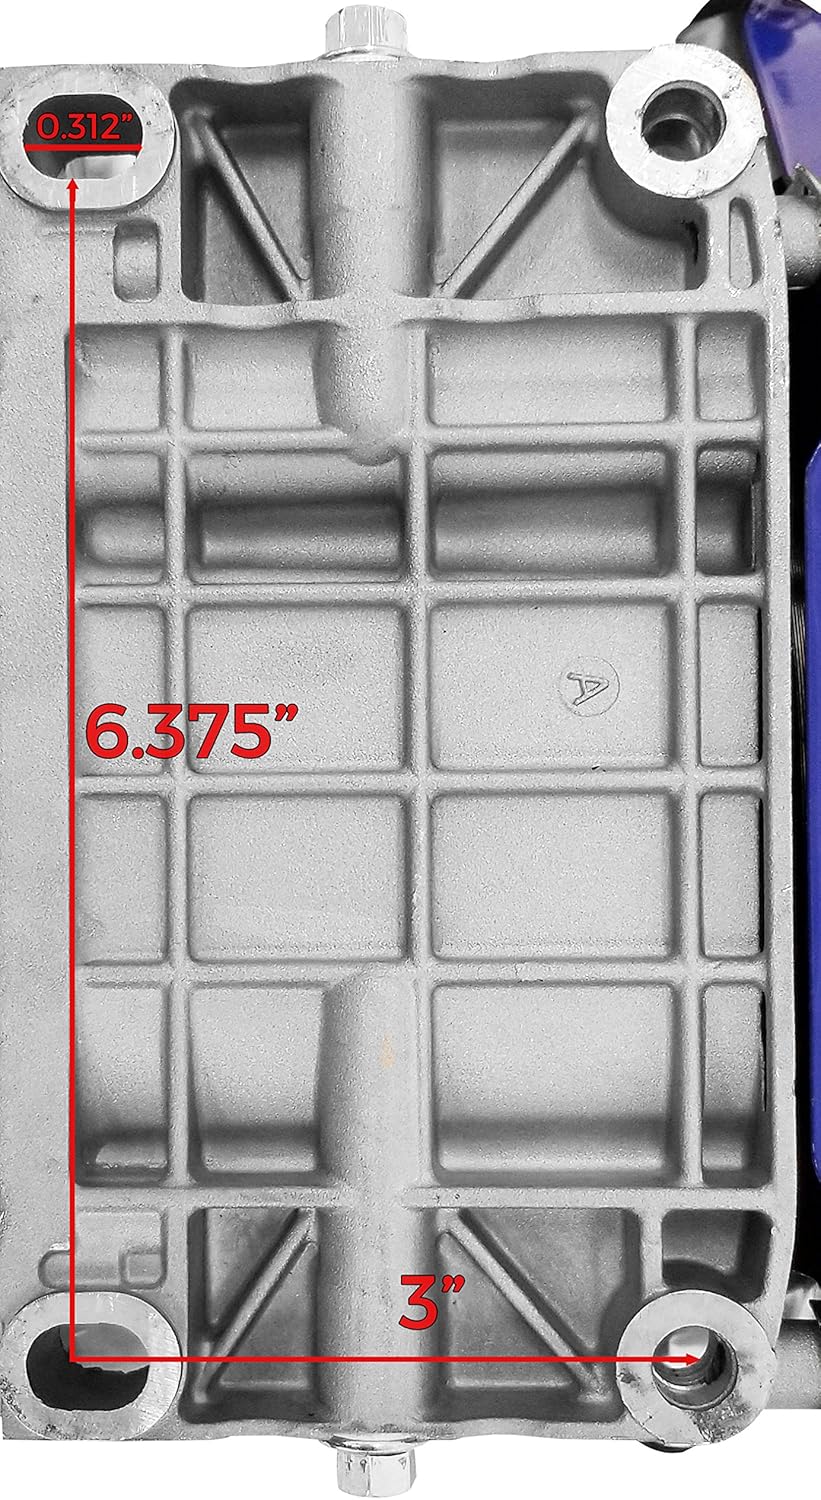
Image 3.2: Top view of the engine, displaying the fuel tank and the oil fill cap, essential for fuel and oil management.
4. Setup and Installation
4.1 Unpacking and Inspection
Carefully remove the engine from its packaging. Inspect for any shipping damage. Ensure all components listed in the packing list are present.
4.2 Adding Engine Oil
The engine is shipped without oil. Before first use, add 0.6 liters (20 oz) of 30W engine oil. Locate the oil fill cap/dipstick (typically yellow) and fill to the upper mark on the dipstick. Do not overfill.
Image 4.1: Top view of the engine, indicating the location of the fuel tank and the oil fill cap for initial setup.
4.3 Adding Fuel
Fill the fuel tank with fresh, unleaded 87 octane gasoline. Do not use E85 or mixed fuels. Ensure the fuel cap is securely tightened after refueling.
4.4 Battery Connection (for Electric Start)
Connect the battery cables to the engine's electric start terminals. Ensure correct polarity (red to positive, black to negative). Secure connections to prevent vibration-induced disconnections.

Image 4.2: Side view of the engine, illustrating the electric start motor and associated wiring connections.
4.5 Engine Mounting
Mount the engine securely to a stable, level surface using appropriate hardware. Refer to the engine mount diagram for bolt patterns and dimensions.

Image 4.3: Diagram illustrating the engine's mounting bolt pattern and dimensions for secure installation.

Image 4.4: Bottom view of the engine, clearly showing the four mounting points for attachment to equipment.
5. Operation
5.1 Pre-Operation Check
- Check engine oil level.
- Check fuel level.
- Inspect air filter.
- Ensure all connections are secure.
5.2 Starting the Engine
- Turn the fuel valve to the 'ON' position.
- Move the choke lever to the 'CLOSED' position (for cold starts). For warm starts, the choke may not be necessary.
- Move the throttle lever to the 'FAST' position.
- Electric Start: Turn the ignition key to the 'START' position. Release the key once the engine starts.
- Recoil Start: Grasp the recoil starter handle and pull slowly until resistance is felt, then pull quickly and firmly. Repeat if necessary.
- Once the engine starts, gradually move the choke lever to the 'OPEN' position as the engine warms up.
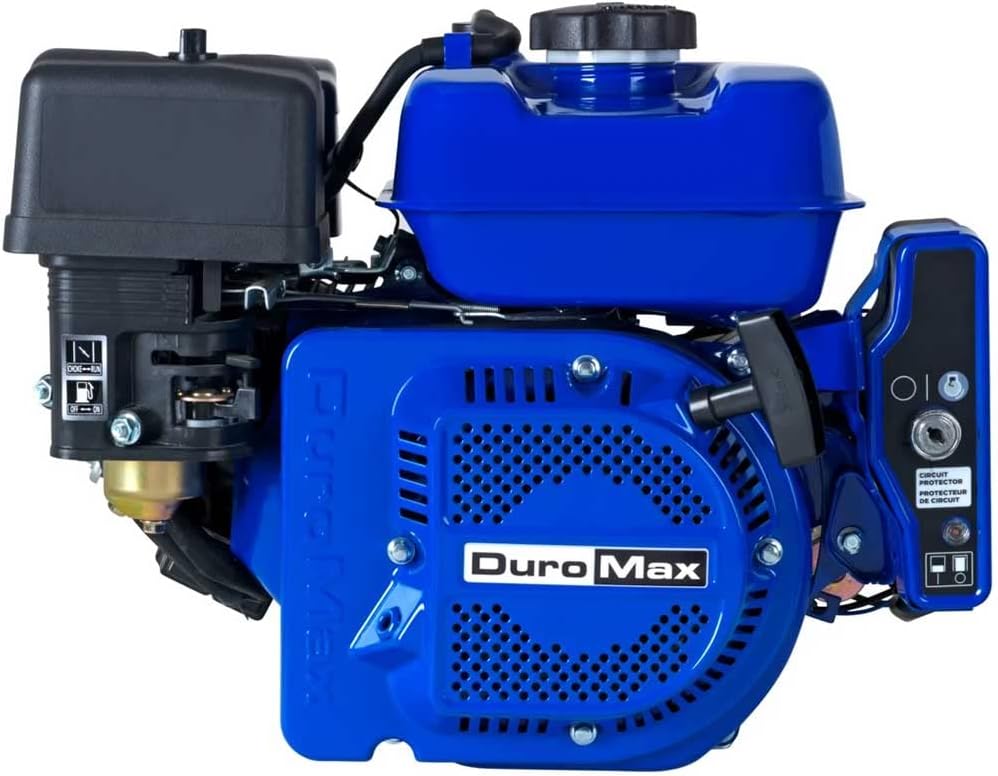
Image 5.1: Side view of the engine, highlighting the recoil starter mechanism for manual engine ignition.
5.3 Stopping the Engine
- Move the throttle lever to the 'SLOW' or 'IDLE' position.
- Turn the ignition key to the 'OFF' position (for electric start models) or move the engine switch to 'OFF'.
- Turn the fuel valve to the 'OFF' position.
6. Maintenance
Regular maintenance is crucial for the longevity and optimal performance of your engine.
6.1 Maintenance Schedule
| Item | Every Use | Every 25 Hrs / Monthly | Every 100 Hrs / Annually |
|---|---|---|---|
| Check Engine Oil Level | ✓ | ||
| Clean Air Filter | ✓ | ||
| Change Engine Oil | ✓ | ||
| Inspect Spark Plug | ✓ | ||
| Inspect Fuel Line | ✓ |
6.2 Oil Change Procedure
Drain old oil when the engine is warm. Remove the oil drain plug and allow oil to drain completely. Replace the drain plug and refill with 0.6 liters (20 oz) of recommended engine oil (e.g., SAE 30W or 10W-30).
6.3 Air Filter Cleaning
Remove the air filter cover and element. Clean the element with warm, soapy water, rinse thoroughly, and allow to air dry completely. Reinstall the dry filter element and cover.
7. Troubleshooting
This section addresses common issues you might encounter with your engine.
| Problem | Possible Cause | Solution |
|---|---|---|
| Engine will not start | No fuel, stale fuel, incorrect choke position, low oil, spark plug issue, battery dead (electric start) | Add fresh fuel, adjust choke, check oil level, inspect/clean/replace spark plug, charge/replace battery |
| Engine runs poorly | Dirty air filter, stale fuel, incorrect throttle, spark plug issue | Clean air filter, replace fuel, adjust throttle, inspect/clean spark plug |
| Excessive vibration | Loose mounting bolts, unbalanced load, internal engine issue | Tighten mounting bolts, ensure load is balanced, consult service center if persistent |
| Electric start not charging battery | Faulty charging system, loose connections, battery issue | Check connections, test charging system components, test battery |
8. Specifications
| Feature | Specification |
|---|---|
| Model | XP7HPE |
| Engine Type | 4-Stroke, OHV |
| Displacement | 208cc (196ml) |
| Bore x Stroke | 68mm x 54mm |
| Max Output | 3600 RPM |
| Max Torque | 13.2 Nm / 9.7 ft-lb |
| Shaft Size | 3/4" Diameter, 2-3/8" Long, 3/16" Keyway |
| Shaft End | 5/16" Size 24 UNF - Drilled and Tapped |
| Fuel Type | Unleaded Gasoline (87 Octane) |
| Fuel Tank Capacity | 1 Gallon |
| Oil Capacity | 0.6 Liters (20 oz) |
| Start System | Electric Start, Recoil Start |
| Ignition System | Transistorized Magneto |
| Air Cleaner | Dual, Semi-dry, Oil Bath |
| Product Dimensions (L x W x H) | 17.3" x 16.7" x 17.12" |
| Item Weight | 44 Pounds |
| Emissions Compliance | EPA and CARB Approved |

Image 8.1: Diagram summarizing key specifications and features of the DuroMax XP7HPE engine.

Image 8.2: Close-up view of the engine's output shaft, indicating its 4-inch length for compatibility assessment.
9. Warranty Information
DuroMax products are typically covered by a limited warranty. For specific warranty terms, conditions, and registration procedures, please refer to the warranty card included with your product or visit the official DuroMax website. Keep your proof of purchase for warranty claims.
10. Customer Support
For technical assistance, parts, or service inquiries, please contact DuroMax customer support. You can find contact information on the official DuroMax website or through your product documentation.
DuroMax Power Equipment
Website: www.duromaxpower.com (Example link, please verify official website)


