
1. Introduction
This manual provides essential instructions for the installation, operation, and maintenance of your Hormann Emergency Release NET3. This device is designed to allow manual operation of your garage door opener in the event of a power failure, especially crucial for garages without a secondary access point. Please read these instructions carefully before proceeding with installation or use to ensure safe and correct functionality.
The Hormann Emergency Release NET3 features a 1.5-meter cable and is compatible with all double-walled Hormann door types and other manufacturers' doors that require a 13 mm bore for release from a round cylinder.
2. Safety Information
WARNING: Failure to follow these safety instructions could result in serious injury or property damage.
- Always disconnect power to the garage door opener before attempting any installation or maintenance.
- Ensure the garage door is in a stable position before working on the opener or emergency release mechanism.
- This emergency release is intended for use only when the garage door opener is disengaged. Do not attempt to use it while the opener is actively moving the door.
- Keep children and pets away from the garage door area during installation and operation.
- If you are unsure about any part of the installation process, consult a qualified garage door technician.
- Regularly inspect the cable for any signs of wear or damage. Replace immediately if damage is found.
3. Package Contents
Verify that all components are present and undamaged:
- Hormann Emergency Release NET3 (13 mm x 1.5 m String)
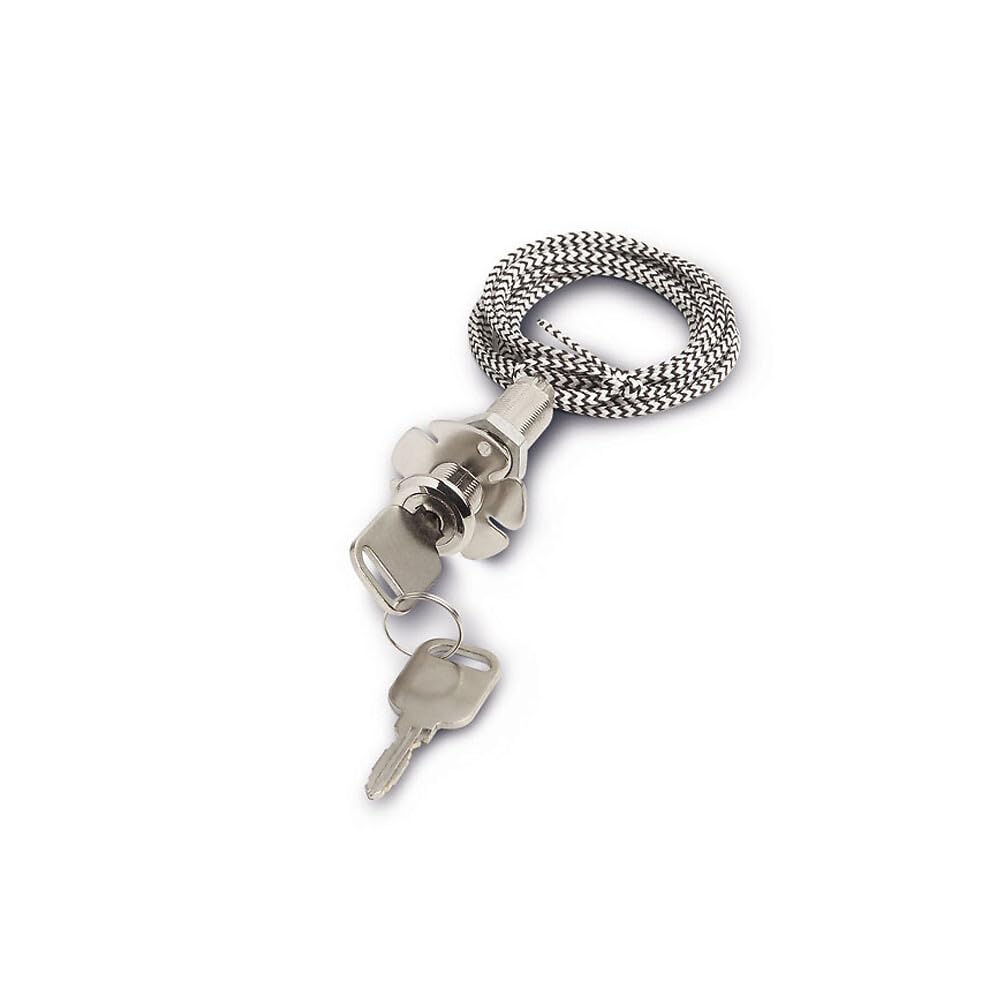
Figure 1: Hormann Emergency Release NET3. This image shows the emergency release mechanism, including the cable and the housing designed for external access.
4. Setup and Installation
This emergency release is essential for garages that lack a secondary entrance, allowing manual operation of the garage door from the outside during power outages.
4.1 Tools Required
- Drill
- 13 mm drill bit
- Measuring tape
- Pencil or marker
4.2 Installation Steps
- Choose Location: Select an appropriate location on your garage door panel for the emergency release. It should be easily accessible from the outside but not interfere with the door's operation. Ensure the chosen spot is suitable for drilling a 13 mm hole.
- Drill Hole: Using a 13 mm drill bit, carefully drill a hole through the garage door panel at the marked location. Ensure the hole is clean and free of burrs.
- Insert Release Mechanism: Insert the emergency release cylinder through the drilled hole from the outside of the garage door.
- Secure Mechanism: From the inside of the garage, secure the emergency release mechanism according to the specific instructions provided with your garage door opener or the release unit itself. This typically involves a nut or clip to hold it firmly in place.
- Attach to Opener: Route the 1.5-meter cable from the emergency release to the manual release lever of your garage door opener. Attach the end of the cable to the opener's release lever. Ensure there is enough slack for the door to operate freely, but not so much that the cable can snag.
- Test Functionality: After installation, test the emergency release. Pull the string from the outside to ensure it disengages the garage door opener from the door. Re-engage the opener and test the door's normal operation.

Figure 2: Component Measurement. This image illustrates the approximate length of a component, indicating it is 2.3 inches (5 cm) long, which is relevant for understanding the depth required for installation.
5. Operation
5.1 Manual Release in Power Outage
In the event of a power failure or malfunction of your garage door opener, you can use the emergency release to manually open or close your garage door from the outside.
- Locate Release: Find the emergency release keyhole on the exterior of your garage door.
- Insert Key: Insert the provided key into the lock cylinder and turn it to unlock the mechanism.
- Pull Cable: Gently pull the emergency release string. This action will disengage the garage door from the opener's trolley, allowing you to manually lift or lower the door.
- Operate Door: Carefully lift or lower the garage door by hand. Be aware that the door will be heavy and may require significant effort.
- Re-engage Opener: Once power is restored or the issue is resolved, re-engage the garage door opener by pushing the release lever back into its engaged position. Ensure the door is fully closed before re-engaging.
Note: Always ensure the garage door is fully closed before re-engaging the opener to prevent damage to the system.
6. Maintenance
Regular maintenance ensures the longevity and reliable operation of your emergency release system.
- Annual Inspection: At least once a year, inspect the emergency release cable for any signs of fraying, kinks, or damage. Ensure the connection points are secure.
- Test Functionality: Periodically test the emergency release by disengaging the opener and manually operating the door. This confirms the system is working correctly.
- Lubrication: Apply a small amount of silicone-based lubricant to the lock cylinder if it becomes stiff or difficult to turn.
- Cleaning: Keep the exterior of the release mechanism clean and free from dirt or debris.
7. Troubleshooting
| Problem | Possible Cause | Solution |
|---|---|---|
| Emergency release string does not disengage opener. | Cable is improperly connected or too loose. | Check the cable connection to the opener's release lever. Adjust tension if necessary, ensuring it's taut enough to pull the lever but not so tight it prematurely disengages. |
| Key is difficult to turn in the lock cylinder. | Dirt or corrosion in the lock mechanism. | Apply a small amount of graphite or silicone-based lubricant into the keyhole and work the key gently. |
| Cable appears frayed or damaged. | Wear and tear over time. | Replace the emergency release unit immediately to ensure reliable operation. |
8. Specifications
- Brand: Hormann
- Model: NET3
- Part Number: 437149
- Cable Length: 1.5 meters (approximately 59 inches)
- Bore Diameter: 13 mm (for round cylinder release)
- Material: Alloy Steel
- Item Weight: 0.06 Kilograms
- Color: Multicoloured (referring to components)
- Required Assembly: No (referring to the unit itself, but installation is required)
9. Warranty and Support
For warranty information and technical support, please refer to the official Hormann website or contact your authorized Hormann dealer. Keep your purchase receipt as proof of purchase for any warranty claims.
Hormann Official Website: www.hormann.us (or relevant regional site)
For further assistance, please contact Hormann customer service.

