1. Introduction
Thank you for choosing the Leader Accessories Travel Trailer RV Cover. This manual provides essential information for the proper installation, use, and maintenance of your RV cover to ensure its longevity and effective protection for your recreational vehicle. This cover is designed for travel trailers measuring 27 to 30 feet in length.
1.1. Product Overview
The Leader Accessories RV Cover is engineered with a durable 5-layer top panel and 110g non-woven fabric sides, offering enhanced protection against various environmental elements. Key features include windproof upgrades, zippered access panels, and a breathable design to prevent moisture buildup.
1.2. What's in the Box
- 1x Travel Trailer Cover
- 1x Toss Bag (for easy installation)
- 1x Storage Bag
- 4x Tire Covers
- 6x Gutter Covers with Sponge
- 2x Reinforced Straps
- 1x Ladder Cap Cover
- 1x Tongue Jack Cover
- 1x Adhesive Repair Patch (39"L x 15"W)
- 1x User Manual

Figure 1: The Leader Accessories RV Cover installed on a travel trailer, alongside all included accessories such as tire covers, straps, and repair patches.
2. Setup and Installation
Proper installation is crucial for the cover's performance and longevity. Always ensure your RV is clean and free of sharp edges before installation.
2.1. Measuring Your RV
To ensure proper fitment, accurately measure the length of your RV. This measurement should include the bumper but not the hitch. If your RV has a roof-mounted AC unit, add 1 foot to the total length. Do not rely solely on the RV model number or manufacturer-stated length, as actual dimensions may vary.

Figure 2: A visual guide demonstrating how to measure your RV for the correct cover size, along with a size chart for various RV lengths.
2.2. Pre-Installation Steps
- Clean Your RV: Wash and dry your RV thoroughly to prevent dirt and debris from scratching the surface under the cover.
- Cover Sharp Edges: Use the included gutter covers with sponge for sharp areas like gutters, ladder rungs, and antenna bases to prevent tearing.
- Identify Front and Rear: Locate the 'Front' and 'Rear' labels on the cover.
2.3. Installation Procedure
- Unroll the Cover: Place the rolled-up cover on the roof of your RV, ensuring the 'Front' label is facing the front of the vehicle. Carefully unroll the cover from front to back.
- Drape Down Sides: Gently pull the sides of the cover down over the RV. Avoid dragging the cover across sharp edges.
- Secure Straps: Utilize the weighted buckle toss-bag to easily pass the bottom straps under the RV. Connect and tighten all front, end, and side buckle straps. The adjustable tension panels and elasticized hem corners will help achieve a custom fit.
- Install Tire and Jack Covers: Place the tire covers over your RV tires and the tongue jack cover over the front jack for additional protection.
3. Features and Operation
3.1. Durable Material Construction
The RV cover features an upgraded 5-ply non-woven fabric top panel, blended with Anti-UV Composite and a waterproof membrane. The sides are constructed from 110g non-woven fabric. This multi-layer design provides superior resistance to water, UV rays, and tearing, contributing to the longevity of both the cover and your RV.

Figure 3: An illustration detailing the five distinct layers of the RV cover's top fabric, highlighting its water-resistant, anti-UV, and anti-tearing properties.

Figure 4: Detailed view of the RV cover's fabric, showcasing the exterior texture designed for tear resistance and the soft interior lining.
3.2. Windproof Upgrade
The cover incorporates a windproof upgrade with two extra-long straps and a front cross-strap panel. These features, combined with inner waterproof straps and buckles at the bottom, enhance the cover's ability to withstand strong winds and prevent displacement. The air vent system further reduces wind stress and allows for maximum evaporation of moisture.

Figure 5: A visual comparison of an RV cover before and after the windproof upgrade, highlighting the cross-strap panel, secure strap rings, and windproof ribbon for enhanced stability.
3.3. Access Panels
Three zippered panels provide convenient access to the RV doors and engine areas without removing the entire cover. This allows for easy inspection and entry whenever needed.

Figure 6: An RV cover featuring a rollable door, secured by zippers and Velcro, allowing easy access to the RV's interior without removing the entire cover.
3.4. Continuous Ventilation
The breathable material and integrated air vents promote continuous airflow, reducing condensation and preventing moisture buildup under the cover. This helps keep your RV dry and protected from mold and mildew.
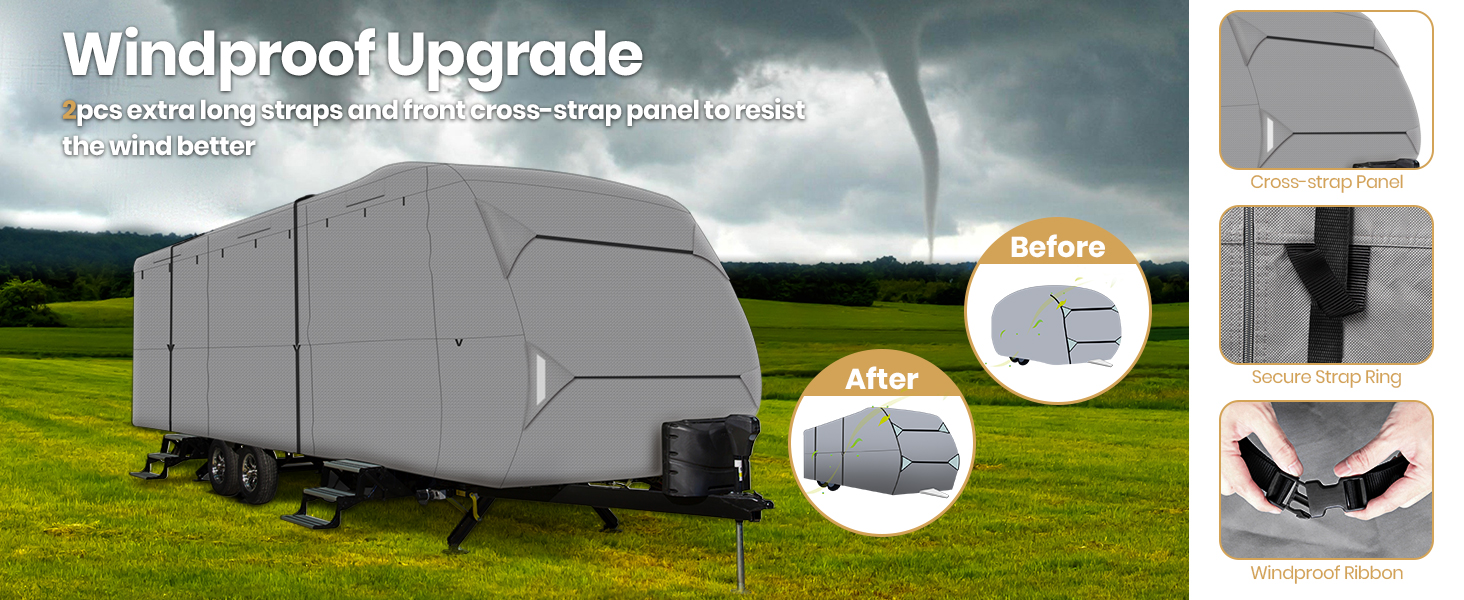
Figure 7: An illustration demonstrating the continuous ventilation system of the RV cover, with air flowing through vents at the front and back to keep the vehicle dry.
3.5. All-Season Protection
This RV cover is designed to provide comprehensive protection throughout the year, safeguarding your travel trailer from rain, UV radiation, wind, and snow.

Figure 8: Icons visually representing the all-year-round protection offered by the RV cover, including rainproof, UV-proof, windproof, and snowproof capabilities.
4. Maintenance
Regular maintenance will extend the life of your RV cover and ensure continued protection for your vehicle.
4.1. Cleaning the Cover
To clean the cover, use a mild soap solution and a soft brush or sponge. Rinse thoroughly with water and allow it to air dry completely before folding and storing. Avoid harsh chemicals or abrasive cleaning tools.
4.2. Repairing Minor Damage
The included adhesive repair patch can be used to fix small tears or punctures. Ensure the area around the damage is clean and dry before applying the patch firmly. For larger damage, professional repair may be necessary.

Figure 9: A close-up of the gutter cover with an integrated sponge, designed to protect the RV cover from tearing on sharp corners and edges.
4.3. Storage
When not in use, fold the cover neatly and store it in the provided storage bag in a cool, dry place, away from direct sunlight and extreme temperatures.
5. Troubleshooting
- Cover Blowing Off: Ensure all straps are securely fastened and tightened. The windproof upgrade features are designed to mitigate this, but extreme weather may still pose a challenge. Double-check that the cover size matches your RV's dimensions.
- Tears or Abrasions: Inspect your RV for any sharp edges or protrusions that might be causing wear. Use the included gutter covers and repair patch as needed.
- Moisture Under Cover: Verify that the air vents are not obstructed and that the cover is installed correctly to allow for proper airflow. Ensure the RV was dry before covering.
6. Specifications
| Specification | Detail |
|---|---|
| Model Number | 90101 |
| Fitment | Travel Trailers 27'-30' |
| Dimensions (L x W x H) | 366 x 102 x 104 inches |
| Material (Top) | 5-ply non-woven fabric with Anti-UV Composite & waterproof membrane |
| Material (Sides) | 110g non-woven fabric |
| Water Resistance Level | Water Repellent |
| Color | Grey |
| Item Weight | 34.8 pounds |
| UPC | 810348020383, 810348022028 |
7. Warranty and Support
This product includes an adhesive repair patch for minor repairs. For any questions or support regarding your Leader Accessories RV Cover, please refer to the contact information provided with your purchase or visit the official Leader Accessories store on Amazon: Leader Accessories Store.


