1. Safety Information
Please read all instructions carefully before installing and operating your BOSS Audio Systems CER700.2 amplifier. Failure to follow these guidelines may result in personal injury or damage to the amplifier or vehicle.
- Always disconnect the vehicle's negative battery terminal before beginning any installation.
- Ensure proper grounding of the amplifier to the vehicle chassis.
- Use appropriate gauge wiring for power, ground, and speaker connections to prevent overheating and ensure optimal performance.
- Mount the amplifier securely in a dry, well-ventilated area, away from direct sunlight, heat sources, and moisture.
- Do not operate the amplifier if it is damaged or malfunctioning. Refer to the troubleshooting section or contact qualified service personnel.
- Avoid listening to audio at excessively high volumes for prolonged periods, as this can cause hearing damage.
2. Package Contents
Verify that all items are present in your package:
- BOSS Audio Systems CER700.2 Amplifier
- Remote Subwoofer Level Control
- Mounting Hardware
- User Manual (this document)
3. Product Overview
The BOSS Audio Systems CER700.2 Chaos Erupt is a 1400-Watt, 2-channel Class AB full-range amplifier designed to deliver powerful and clear audio. It features a MOSFET power supply for efficient operation and offers versatile input and crossover options to integrate seamlessly into various car audio systems.

Figure 1: BOSS Audio Systems CER700.2 Chaos Erupt Amplifier (Top View)
Key Features:
- Full-Range, Class A/B Topology
- MOSFET Power Supply
- 2/1 Channel Configuration
- Low and High Level Inputs
- Variable Low Pass Crossover
- Remote Subwoofer Level Control
4. Setup and Installation
Proper installation is crucial for optimal performance and safety. If you are unsure about any steps, consult a professional car audio installer.
4.1 Mounting the Amplifier
Choose a mounting location that is dry, well-ventilated, and protected from direct sunlight or excessive heat. Ensure there is enough space around the amplifier for proper airflow. Secure the amplifier using the provided mounting hardware.
4.2 Power and Ground Connections
Connect the amplifier to the vehicle's electrical system as follows:

Figure 2: Amplifier Rear Panel with Power and Speaker Connections
- Power (+12V): Connect a heavy-gauge power cable (e.g., 8-gauge or 4-gauge depending on system power) from the vehicle's positive battery terminal to the +12V terminal on the amplifier. Install an in-line fuse holder within 18 inches of the battery.
- Ground (GND): Connect a heavy-gauge ground cable of the same length as the power cable from the GND terminal on the amplifier to a clean, unpainted metal surface on the vehicle chassis. Ensure a good electrical connection.
- Remote (REM): Connect a remote turn-on wire (typically 18-gauge) from your head unit's remote output to the REM terminal on the amplifier. This turns the amplifier on and off with your head unit.
4.3 Speaker Connections
Connect your speakers to the amplifier's speaker terminals. The CER700.2 is a 2-channel amplifier, allowing for stereo speaker connections or bridged mono operation for a subwoofer.
4.4 Input Connections
The CER700.2 supports both low-level (RCA) and high-level inputs.
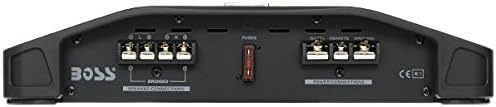
Figure 3: Amplifier Front Panel with Input and Control Settings
- Low-Level Inputs (RCA): Use RCA cables to connect the amplifier's INPUT (R/L) jacks to the RCA pre-out jacks on your head unit. This is the preferred method for best audio quality.
- High-Level Inputs: If your head unit does not have RCA outputs, you can use the high-level inputs. Connect the speaker wires from your head unit directly to the amplifier's high-level input terminals.
4.5 Remote Subwoofer Level Control
Connect the remote subwoofer level control to the 'REMOTE' port on the amplifier. This allows for convenient adjustment of the subwoofer output level from the driver's seat.

Figure 4: Remote Subwoofer Level Control
4.6 Amplifier Features Overview (General)
This video provides a general overview of features found on Belva BX-Series car audio amplifiers, which share some common functionalities with the BOSS Audio Systems CER700.2. It can be useful for understanding general amplifier controls and settings.
Video 1: General overview of amplifier features (Belva BX-Series). Note: This video is for a related product series and not specifically the BOSS CER700.2.
5. Operating the Amplifier
Once installed, adjust the amplifier settings for optimal sound performance.
5.1 Gain Control (Input Level)
The GAIN control matches the amplifier's input sensitivity to the output of your head unit. Start with the gain at minimum (MIN) and slowly increase it until you hear distortion, then back off slightly. This is not a volume control.
5.2 Bass Boost
The BASS BOOST control allows you to increase the bass output at a specific frequency. Use this sparingly to avoid distortion and potential speaker damage. Adjust from 0dB to 18dB.
5.3 Low Pass Filter (LPF)
The LPF control sets the upper frequency limit for the amplifier's output. Frequencies above this setting will be attenuated. This is typically used for subwoofers to ensure they only reproduce low frequencies. The CER700.2 features a variable LPF.
5.4 Phase Shift Control
The PHASE control allows you to adjust the phase of the subwoofer output from 0 to 180 degrees. This helps to align the subwoofer's output with the main speakers, preventing cancellation and improving bass impact. Adjust this setting by ear for the best integration.
6. Maintenance
Regular maintenance ensures the longevity and performance of your amplifier.
- Cleaning: Periodically wipe the amplifier's exterior with a soft, dry cloth. Do not use harsh chemicals or abrasive cleaners.
- Ventilation: Ensure that the amplifier's cooling fins are free from dust and debris to maintain proper heat dissipation.
- Connections: Occasionally check all power, ground, and speaker connections to ensure they are secure and free from corrosion.
7. Troubleshooting
If you experience issues with your amplifier, refer to the table below for common problems and solutions.
| Problem | Possible Cause | Solution |
|---|---|---|
| No Power (Power LED Off) | Blown fuse; poor power/ground connection; no remote turn-on signal. | Check in-line fuse and amplifier fuses; verify power, ground, and remote wire connections. |
| No Sound (Power LED On) | Input cables disconnected; speaker wires disconnected or shorted; gain set too low. | Check RCA/high-level input connections; inspect speaker wiring for shorts; increase gain slowly. |
| Distorted Sound | Gain set too high; improper crossover settings; poor speaker connection. | Reduce gain; adjust LPF settings; check speaker wiring. |
| Amplifier Overheats (Protection LED On) | Insufficient ventilation; impedance too low; prolonged high-volume operation. | Ensure proper airflow around amplifier; check speaker impedance; reduce volume. |
8. Specifications
| Feature | Description |
|---|---|
| Model | CER700.2 |
| Topology | Full-Range, Class A/B |
| Power Supply | MOSFET |
| Channels | 2/1 Channel |
| Peak Power | 1400 Watts |
| Input Types | Low Level (RCA), High Level |
| Crossover | Variable Low Pass Filter (LPF) |
| Bass Boost | Variable (0dB to 18dB) |
| Phase Shift | 0-180 Degrees |
| Remote Control | Remote Subwoofer Level Control Included |
| Product Dimensions (L x W x H) | 13 x 11 x 2 inches |
| Item Weight | 7.95 pounds |
9. Warranty and Support
BOSS Audio Systems products are engineered for reliability and performance. For specific warranty information, please refer to the warranty card included with your product or visit the official BOSS Audio Systems website. For technical support or service inquiries, please contact BOSS Audio Systems customer service.