1. Introduction
The Rademacher Troll Comfort 3D 5635 is a sophisticated 3-wire roller shutter switch designed for convenient and automated control of your roller shutters. This device features an integrated timer function, allowing for programmed opening and closing times, and is supplied with a matching frame for seamless integration into your living space. This manual provides essential information for the safe installation, operation, and maintenance of your device.
2. Safety Instructions
Please read these safety instructions carefully before installation and operation. Failure to follow these instructions may result in electric shock, fire, or serious injury.
- Electrical Safety: Always disconnect the main power supply at the circuit breaker before performing any installation, wiring, or maintenance work.
- Qualified Personnel: Installation and electrical connections should only be carried out by a qualified electrician in accordance with local electrical codes and regulations.
- Voltage: Ensure the operating voltage of the device (230V) matches your local power supply.
- Moisture: Do not expose the device to moisture, water, or extreme humidity. Install only in dry indoor environments.
- Damage: Do not operate the device if it appears damaged. Contact customer support for assistance.
- Children: Keep the device and its components out of reach of children.
3. Package Contents
Verify that all components are present and undamaged upon unpacking:
- 1 x Troll Comfort 3D Control Unit
- 1 x Frame (Ultra White)
4. Setup and Installation
The Rademacher Troll Comfort 3D 5635 is designed for 3-wire electrical systems, which typically means it operates without a neutral conductor directly at the switch point. This makes it suitable for retrofitting in many existing installations.
4.1 Wiring Diagram Overview

Image Description: A close-up view of a person's hands connecting electrical wires to the back of the Rademacher Troll Comfort 3D module. The module is black with visible screw terminals for wire connections. This image illustrates the initial wiring step of the installation process.
4.2 Installation Steps
- Disconnect Power: Before starting any work, ensure the power supply to the relevant circuit is completely disconnected at the main circuit breaker. Use a voltage tester to confirm no power is present.
- Prepare Wall Box: Ensure the wall box is clean and free of debris. If replacing an existing switch, carefully remove the old unit.
- Connect Wires: Identify the Live (L), Up (for opening), and Down (for closing) wires. Connect these wires to the corresponding screw terminals on the Troll Comfort 3D module. Refer to the detailed wiring diagram provided in the full product manual for precise terminal assignments.
- Mount Module: Carefully insert the wired module into the wall box. Secure it using the mounting screws provided, ensuring it sits flush with the wall surface.
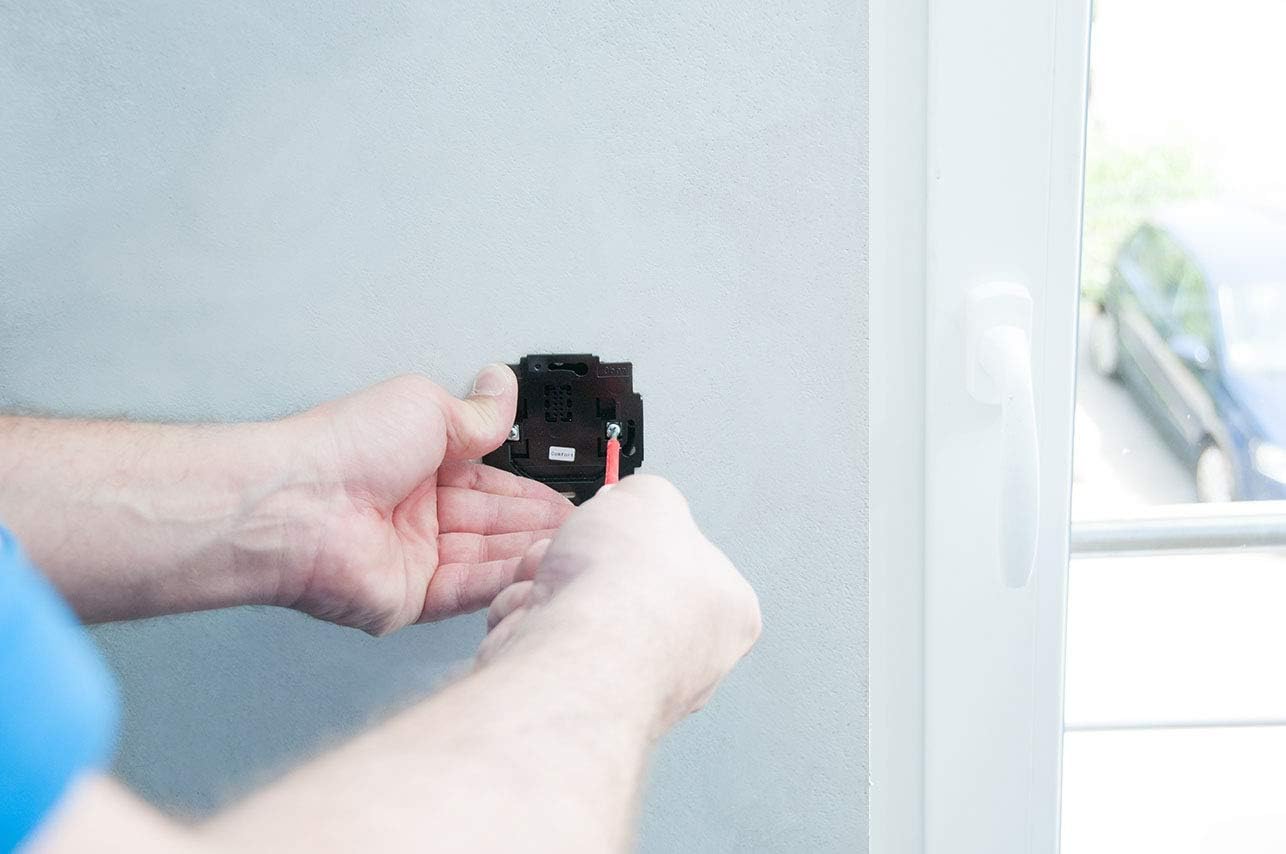
Image Description: A person's hands are shown securing the black Rademacher Troll Comfort 3D module into a wall-mounted electrical box using a screwdriver. The module is now wired and being fixed into its permanent position.
- Attach Frame and Control Panel: Place the ultra-white frame over the mounted module. Then, carefully align the control panel with the module's pins and press it firmly into place until it clicks. Ensure the pins are not bent during this process.

Image Description: A person's hands are shown carefully pressing the white control panel, which features a display and buttons, onto the previously installed Rademacher Troll Comfort 3D module. This completes the physical installation of the switch.
- Restore Power: Once the installation is complete and all components are securely in place, restore power at the main circuit breaker.
- Initial Setup: Upon first power-up, the device will typically enter an initial setup mode. Follow the on-screen prompts and refer to the detailed programming instructions in the full product manual to configure basic settings such as current time, date, and motor travel limits.
5. Operating Instructions
The Troll Comfort 3D offers both manual control and advanced programmable functions for your roller shutters.
5.1 Manual Control
- Up Button (▲): Press to open the roller shutter. Press again to stop movement.
- Down Button (▼): Press to close the roller shutter. Press again to stop movement.
- OK Button: Used to confirm selections in the menu.
- M Button: Used to access the main menu for programming.
5.2 Programming Functions
The device features a clear display and intuitive buttons for programming various functions. The menu structure is numerical, requiring reference to the full product manual for specific function codes.
- Daily/Weekly Programs: Set specific times for your roller shutters to open and close automatically on a daily or weekly schedule.
- Astro Function: Automatically adjusts opening and closing times based on sunrise and sunset, adapting to seasonal changes.
- Random Function: Simulates presence by varying programmed times slightly, enhancing security.
- Ventilation Position: Program a specific intermediate position for ventilation.
- Memory Function: Stores programmed settings even after a power outage (gear reserve approx. 8 hours).
To access programming, press the 'M' button. Navigate through the numbered menus using the up/down arrows and confirm selections with 'OK'. Detailed instructions for each programming option are available in the comprehensive manual.

Image Description: An illustrative diagram depicting a living room with two windows, each equipped with a roller shutter and a Rademacher control unit. This shows how multiple units can be integrated into a home environment for comprehensive shutter control.
6. Maintenance
The Rademacher Troll Comfort 3D 5635 requires minimal maintenance.
- Cleaning: Clean the surface of the control panel with a soft, dry, or slightly damp cloth. Do not use abrasive cleaners, solvents, or harsh chemicals, as these can damage the display and casing.
- No User-Serviceable Parts: The device contains no user-serviceable parts. Do not attempt to open or repair the unit yourself. Unauthorized repairs will void the warranty and may pose safety risks.
7. Troubleshooting
If you encounter issues with your Troll Comfort 3D, refer to the following common problems and solutions:
| Problem | Possible Cause | Solution |
|---|---|---|
| Device does not respond / Display is off | No power supply | Check the circuit breaker and ensure power is restored. Verify wiring connections. |
| Roller shutter moves in the wrong direction | Motor direction incorrectly set | Access the programming menu (refer to full manual) to reverse the motor direction setting. |
| Programmed times are not executed | Incorrect time/date setting or program disabled | Check the current time and date settings. Ensure the desired program is activated in the menu. |
| Display shows an error code | Internal fault or specific issue | Refer to the full product manual for a list of error codes and their corresponding solutions. If the problem persists, contact customer support. |
If the problem cannot be resolved using the above steps, please contact Rademacher customer support or a qualified electrician.
8. Specifications
Technical details for the Rademacher Troll Comfort 3D 5635:
| Feature | Detail |
|---|---|
| Brand | Rademacher |
| Model Number | 5635-UW |
| Part Number | 36500712 |
| Product Dimensions (L x W x H) | 18.5 x 10.5 x 6.5 cm |
| Weight | 260 Grams |
| Color | Ultra White |
| Material | Aluminum |
| Operating Voltage | 230 Volt |
| Current Rating | 8 Ampere |
| Control Method | Programmable, Local Buttons |
| Protection Class | II |
| Gear Reserve (for timekeeping) | Approx. 8 hours |
| Connector Type | Screw Terminal |
| Operating Mode | ON-OFF |

Image Description: A detailed table comparing various models within the Rademacher RollHome control series, including the Troll Comfort 3D 5635. It lists features such as daily/weekly programs, astro function, memory function, protection class, and technical data like supply voltage and standby consumption.
9. Warranty and Support
Rademacher products are manufactured to high-quality standards and come with a manufacturer's warranty. For specific warranty terms and conditions, please refer to the documentation included with your purchase or visit the official Rademacher website.
For technical support, troubleshooting assistance, or inquiries regarding your Troll Comfort 3D 5635, please contact Rademacher customer service:
- Website: www.rademacher.de (Please check for local country-specific websites)
- Contact Information: Refer to the 'Contact' section on the official website for phone numbers or email support.
When contacting support, please have your product model number (5635) and part number (36500712) ready.