1. Introduction
The Imperial 4-inch Dryer Box is designed to provide a safe and efficient solution for dryer venting. By recessing the dryer duct connection into the wall, this product eliminates crushed exhaust hoses, reduces lint buildup, and allows your dryer to be placed flush against the wall. This not only saves space but also contributes to energy efficiency and reduces potential fire hazards associated with restricted airflow.
2. Product Overview
The Imperial 4-inch Dryer Box is a metal enclosure that fits into your wall, providing a dedicated space for the dryer exhaust duct. Its design ensures a clear path for airflow, which is crucial for dryer performance and safety.
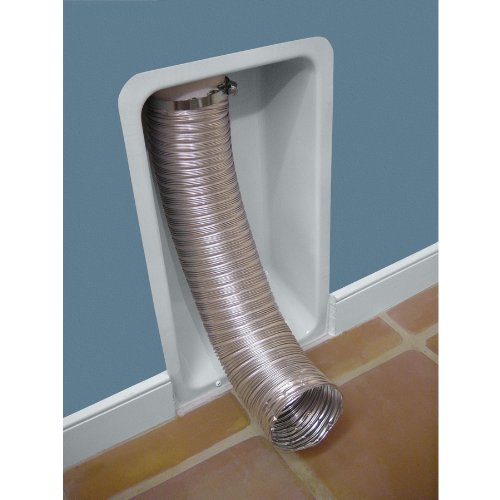
Figure 1: Imperial 4-inch Dryer Box recessed into a wall with a flexible dryer duct. This image illustrates the Imperial 4-inch Dryer Box recessed into a wall, with a flexible dryer duct extending from its opening. The box is designed to protect the duct and allow the dryer to sit closer to the wall.
3. Installation Instructions
Proper installation of the Imperial Dryer Box is essential for optimal performance and safety. It is recommended that installation be performed by a qualified individual.
3.1 Important Considerations
- Wall Stud Compatibility: This dryer box is designed for installation in walls with 6-inch stud walls. It is not suitable for standard 4-inch stud walls. Verify your wall construction before proceeding.
- Ensure all local building codes and regulations for dryer venting are followed.
- Use appropriate safety gear, including eye protection and gloves, during installation.
3.2 Installation Steps
- Locate Installation Area: Identify the precise location behind your dryer where the box will be installed. Ensure there are no electrical wires, plumbing, or other obstructions within the wall cavity.
- Mark and Cut Opening: Carefully measure the dimensions of the dryer box. Mark the outline on the wall surface. Using an appropriate cutting tool (e.g., drywall saw), cut out the marked opening. Ensure the opening is slightly larger than the box to allow for easy insertion, but small enough for the flange to cover the edges.
- Insert Dryer Box: Insert the Imperial Dryer Box into the cut opening. The front flange of the box should sit flush against the wall surface.
- Secure Dryer Box: Secure the dryer box to the wall studs using appropriate fasteners (screws or nails) through the pre-drilled holes in the flange. Ensure the box is level and firmly attached.
- Connect Dryer Duct: Connect the dryer exhaust duct (typically a 4-inch flexible or rigid duct) to the collar inside the dryer box. Secure the connection with a metal clamp to prevent air leaks. Ensure the duct extends sufficiently to connect to the dryer's exhaust port.
- Seal Gaps: If necessary, use caulk or sealant around the edges of the dryer box flange where it meets the wall to create an airtight seal.
- Connect Dryer: Once the box and duct are securely installed, connect the dryer's exhaust port to the duct extending from the box. Push the dryer into its final position, ensuring the duct is not crushed or kinked.
4. Usage and Benefits
Once installed, the Imperial Dryer Box operates passively to enhance your laundry area. Its primary benefits include:
- Space Saving: Allows the dryer to be placed flush against the wall, reclaiming valuable space in your laundry room.
- Improved Airflow: Prevents the dryer exhaust hose from being crushed or kinked, ensuring optimal airflow. This helps shorten drying times and improves energy efficiency.
- Reduced Fire Hazard: By maintaining proper airflow and preventing lint buildup in restricted areas, the risk of dryer fires is significantly reduced.
- Neat Appearance: The paintable metal finish allows the box to blend seamlessly with your wall, providing a clean and organized look.
5. Maintenance
Regular maintenance of your dryer venting system, including the dryer box, is crucial for safety and efficiency.
- Inspect Annually: At least once a year, disconnect your dryer and inspect the dryer duct and the interior of the dryer box for lint accumulation.
- Clean Lint: Use a vacuum cleaner with a narrow attachment or a specialized dryer vent brush to remove any lint buildup from the duct and inside the dryer box.
- Check Connections: Ensure all duct connections remain secure and free of leaks. Re-tighten clamps if necessary.
- Exterior Cleaning: The paintable metal finish can be wiped clean with a damp cloth as needed.
6. Troubleshooting
If you experience issues with your dryer's performance after installing the dryer box, consider the following:
- Long Drying Times: This often indicates restricted airflow. Check for lint buildup in the dryer vent system (including the box and duct) and ensure the duct is not crushed or kinked anywhere along its path.
- Dryer Overheating: Restricted airflow can cause the dryer to overheat. Immediately clean the vent system and ensure proper ventilation.
- Improper Installation: Verify that the dryer box was installed correctly, especially ensuring it is flush with the wall and the duct connections are secure. Re-check wall stud compatibility (6-inch studs required).
- Air Leaks: Inspect all duct connections for air leaks, which can reduce efficiency. Seal any gaps with appropriate tape or sealant.
If problems persist after troubleshooting, consult a professional appliance technician or HVAC specialist.
7. Specifications
| Feature | Detail |
|---|---|
| Manufacturer | Imperial |
| Part Number | 319847 |
| Item Model Number | VTL0027 |
| Product Dimensions | 4.25 x 11.75 x 20.12 inches |
| Item Weight | 1 pound |
| Color | White |
| Material | Metal |
| Item Package Quantity | 1 |
| Batteries Required? | No |


