1. Introduction
This manual provides detailed instructions for the installation, operation, and maintenance of your Alpine MRV-M500 Mono V-Power Digital Amplifier. Please read this manual thoroughly before using the product to ensure proper function and safety.
The Alpine MRV-M500 is a high-performance 1-channel digital amplifier designed to deliver powerful and clear audio. It features a compact design, Class D digital platform, and convenient snap-on terminal covers for simplified installation.
2. What's in the Box
- Alpine MRV-M500 Mono V-Power Digital Amplifier
- Owner's Manual (this document)
- Installation Hardware (screws, etc.)
3. Product Overview
Familiarize yourself with the various components and connections of your MRV-M500 amplifier.

Figure 3.1: Top view of the Alpine MRV-M500 amplifier, showcasing its sleek black chassis and central blue indicator light.

Figure 3.2: Angled top view of the amplifier, highlighting its compact design and the Alpine branding.

Figure 3.3: Close-up of the power terminal side, showing the 30A fuses, Battery, Remote, and Ground connections.
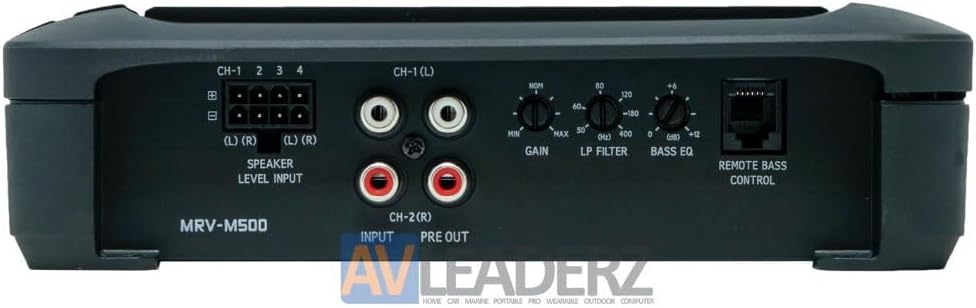
Figure 3.4: Close-up of the input and control panel, featuring RCA inputs, gain control, LP filter, bass EQ, and remote bass control port.
4. Setup and Installation
Proper installation is crucial for optimal performance and safety. It is recommended that installation be performed by a qualified professional.
4.1. Mounting the Amplifier
- Choose a mounting location that is dry, well-ventilated, and away from direct sunlight or heat sources.
- Ensure the mounting surface is sturdy enough to support the amplifier's weight.
- Use the provided mounting hardware to secure the amplifier.
4.2. Wiring Connections
Refer to Figure 3.3 and 3.4 for terminal locations.
- Power Connection (BATT): Connect a suitable gauge power cable from the vehicle's positive battery terminal to the BATT terminal on the amplifier. Ensure an inline fuse (not supplied) is installed close to the battery.
- Ground Connection (GND): Connect a short, heavy-gauge ground cable from the GND terminal on the amplifier to a clean, unpainted metal point on the vehicle's chassis.
- Remote Turn-On (REM): Connect a remote turn-on wire from your head unit's remote output to the REM terminal. This turns the amplifier on/off with your head unit.
- Input Connection:
- RCA Input: Connect RCA cables from your head unit's subwoofer pre-out to the amplifier's RCA input jacks.
- Speaker Level Input: If your head unit does not have RCA pre-outs, use the speaker level input harness (if provided) to connect directly to your head unit's speaker outputs.
- Speaker Output: Connect your subwoofer speaker wires to the speaker output terminals. Ensure correct polarity (+ to + and - to -). The MRV-M500 is a mono amplifier, designed for a single subwoofer or multiple subwoofers wired to a compatible impedance.
5. Operating Instructions
Adjust the amplifier settings for optimal audio performance.
5.1. Gain Control
- The Gain control matches the amplifier's input sensitivity to the output level of your head unit.
- Start with the gain set to minimum (MIN).
- Increase your head unit's volume to about 75% of maximum.
- Slowly increase the amplifier's gain until you hear distortion, then back it off slightly.
5.2. Low Pass Filter (LP FILTER)
- The LP Filter controls the upper frequency limit of the audio signal sent to the subwoofer.
- Adjust this knob to set the crossover frequency (e.g., 50Hz to 400Hz). A common starting point for subwoofers is around 80Hz.
5.3. Bass EQ
- The Bass EQ provides a boost to specific bass frequencies.
- Use this control sparingly to enhance bass output. Excessive boost can lead to distortion and potential speaker damage.
5.4. Remote Bass Control
- If equipped with an optional remote bass control, connect it to the 'REMOTE BASS CONTROL' port. This allows for convenient adjustment of bass levels from the driver's seat.
6. Maintenance
- Keep the amplifier clean and free from dust and debris. Use a soft, dry cloth for cleaning.
- Ensure adequate ventilation around the amplifier to prevent overheating.
- Regularly check all wiring connections for tightness and corrosion.
- If a fuse blows, replace it only with a fuse of the same type and rating (30A).
7. Troubleshooting
If you experience issues with your amplifier, consult the following table before contacting support.
| Problem | Possible Cause | Solution |
|---|---|---|
| No Power | Blown fuse; loose power/ground/remote wire; no remote signal. | Check and replace fuse; verify all connections are secure; check remote turn-on wire from head unit. |
| No Sound | Loose input/output connections; incorrect gain setting; amplifier in protect mode. | Check RCA/speaker level inputs and speaker outputs; adjust gain; check for short circuits in speaker wiring. |
| Distorted Sound | Gain set too high; incorrect LP filter setting; poor quality input signal. | Reduce gain; adjust LP filter; ensure head unit output is clean. |
| Amplifier Overheats | Insufficient ventilation; improper impedance load. | Relocate amplifier to a better-ventilated area; ensure speaker impedance matches amplifier's capabilities. |
8. Specifications
| Feature | Detail |
|---|---|
| Model Number | MRV-M500 (ALP-MRV-M500) |
| Brand | Alpine |
| Number of Channels | 1 (Mono) |
| RMS Power (2Ω, 14.4V, ≤1% THD+N) | 500W x 1 |
| RMS Power (4Ω, 14.4V, ≤1% THD+N) | 300W x 1 |
| Maximum Output Power | 500 Watts |
| Voltage | 14.4 Volts |
| Dimensions (L x W x H) | 10.2 x 4.2 x 10 inches |
| Item Weight | 0.01 ounces |
| Mounting Type | Car Mount |
| Material | Electronic Components |
| UPC | 672773758619, 793276012401 |
9. Warranty & Support
For warranty information and technical support, please refer to the warranty card included with your product or visit the official Alpine website. Keep your proof of purchase for any warranty claims.
10. Important Safety Information
WARNING: This product may contain chemicals known to the State of California to cause cancer and birth defects or other reproductive harm. For more information, go to www.P65Warnings.ca.gov.
Always ensure proper installation and wiring to prevent electrical hazards. Disconnect the vehicle's battery before performing any wiring or installation procedures. Failure to follow these instructions may result in serious injury or damage to the product or vehicle.


