
DeVilbiss FLG-HVG-315
Contents
DeVilbiss FLG-HVG-315 HVLP Gravity Feed Spray Gun User Manual
Model: FLG-HVG-315
1. Introduction
Thank you for choosing the DeVilbiss FLG-HVG-315 HVLP Gravity Feed Spray Gun. This manual provides essential information for the safe and efficient operation, maintenance, and troubleshooting of your new spray gun. Please read this manual thoroughly before operating the equipment to ensure proper use and to prevent injury or damage.
2. Safety Information
Always follow these safety precautions to reduce the risk of injury or property damage:
- Read All Instructions: Familiarize yourself with the spray gun's operation before use.
- Wear Personal Protective Equipment (PPE): Always wear appropriate eye protection (safety glasses or goggles), respiratory protection (respirator suitable for paint fumes), gloves, and protective clothing.
- Ventilation: Use in a well-ventilated area to prevent the accumulation of flammable vapors and to minimize exposure to harmful fumes.
- Flammable Materials: Do not spray near open flames, pilot lights, or any ignition sources. Ensure proper grounding if required by local codes.
- Pressure: Never exceed the maximum recommended air pressure for the spray gun (23 psi).
- Cleaning: Disconnect air supply before cleaning or performing maintenance. Use appropriate cleaning solvents and dispose of them responsibly.
- Children and Pets: Keep children and pets away from the work area.
- Electrical Safety: If using electrically powered air compressors, ensure they are properly grounded and follow their safety instructions.
3. Product Components
The DeVilbiss FLG-HVG-315 spray gun typically includes the following main components:
- Spray Gun Body: The main housing that holds all components.
- Fluid Nozzle: Controls the flow of paint. (Size: 1.5mm)
- Air Cap: Shapes the spray pattern.
- Fluid Needle: Regulates the amount of fluid released.
- Gravity Feed Cup: Holds the paint and feeds it to the gun by gravity. (Capacity: 24 oz)
- Air Inlet: Connection point for the air hose (1/4 inch NPT).
- Fluid Control Knob: Adjusts the fluid flow.
- Fan Control Knob: Adjusts the spray pattern width.
- Air Pressure Adjustment Knob: Regulates air pressure at the gun (if present).
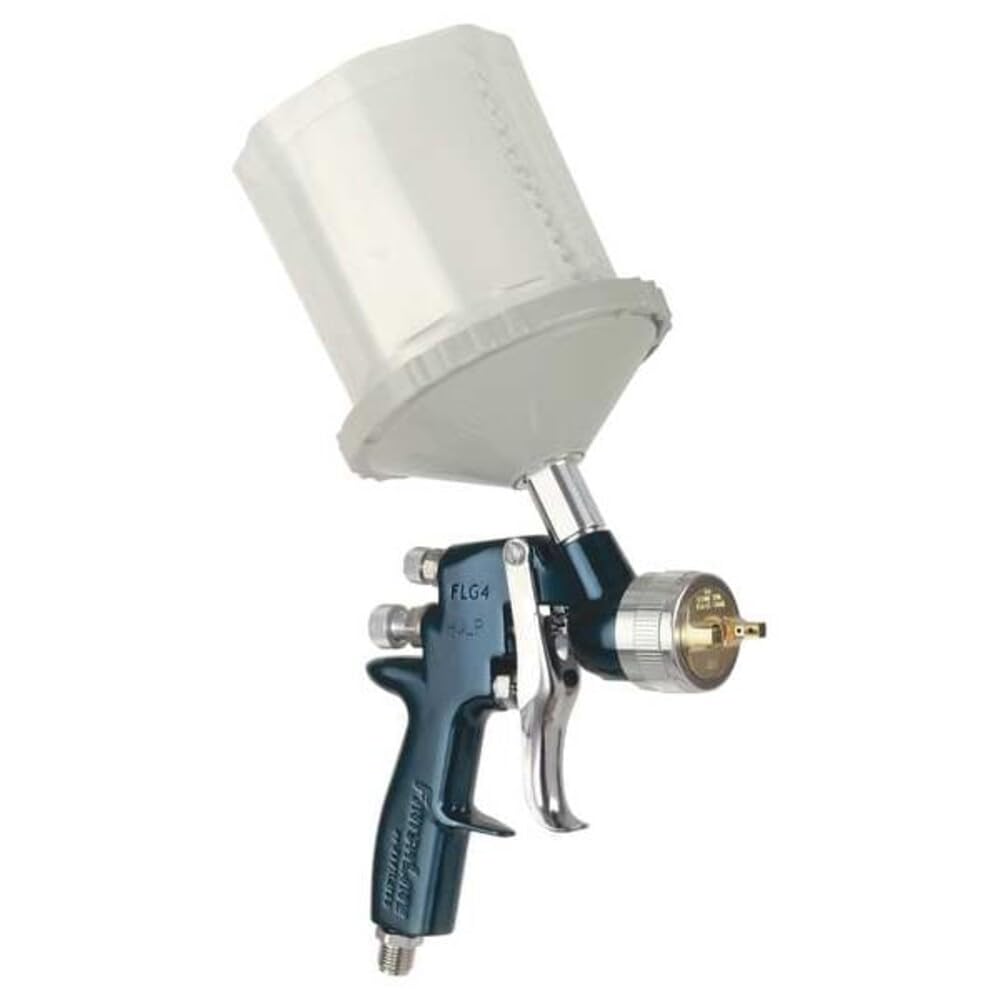
Image: The DeVilbiss FLG-HVG-315 HVLP Gravity Feed Spray Gun with its attached 24 oz gravity cup. The gun features a silver body with control knobs visible.
4. Setup and Preparation
4.1. Initial Inspection
Before first use, inspect all components for any damage that may have occurred during shipping. Ensure all parts are present and securely fastened.
4.2. Air Supply Connection
- Ensure your air compressor is capable of supplying 13.5 CFM at 23 PSI.
- Attach a suitable air hose (minimum 3/8 inch I.D. recommended) to the 1/4 inch NPT air inlet on the spray gun.
- It is recommended to use an air filter/regulator unit between the compressor and the spray gun to ensure clean, dry air at the correct pressure.
4.3. Fluid Cup Attachment
Securely attach the 24 oz gravity feed cup to the top of the spray gun. Ensure the seal is tight to prevent leaks.
4.4. Preparing the Coating Material
Prepare your paint or coating material according to the manufacturer's instructions. This typically involves thinning to the recommended viscosity and straining the material to remove any particles that could clog the gun. The optimum range for this gun is medium viscosity materials.
- Mix paint thoroughly.
- Thin paint as per paint manufacturer's specifications for HVLP application.
- Strain paint through a fine-mesh filter into the gravity cup.
- Fill the cup to an appropriate level, typically not more than 3/4 full, to prevent spills.
5. Operation
5.1. Initial Adjustments
- Air Pressure: Set the air pressure at the gun to 23 PSI (maximum). Adjust as needed for desired atomization.
- Fluid Control: Turn the fluid control knob clockwise until it stops, then back it out 2-3 full turns as a starting point. This controls the amount of paint flow.
- Fan Control: Turn the fan control knob fully counter-clockwise for a wide fan pattern (up to 12 inches), or clockwise for a narrower pattern.
5.2. Spraying Technique
- Test Pattern: Always test your spray pattern on a piece of scrap material before applying to your workpiece. Adjust air pressure, fluid flow, and fan pattern until you achieve an even, consistent spray.
- Distance: Hold the gun perpendicular to the surface, typically 6-8 inches away. Maintain a consistent distance throughout the stroke.
- Movement: Use smooth, even strokes, moving your entire arm, not just your wrist. Overlap each pass by about 50% to ensure even coverage.
- Triggering: Begin moving the gun before pulling the trigger and release the trigger before stopping the movement. This prevents paint buildup at the start and end of strokes.
- Coats: Apply multiple thin coats rather than one thick coat to avoid runs and sags. Allow appropriate flash-off time between coats as recommended by the paint manufacturer.
6. Maintenance and Cleaning
Proper cleaning and maintenance are crucial for the longevity and performance of your spray gun.
6.1. After Each Use
- Empty Cup: Empty any remaining paint from the gravity cup.
- Flush Gun: Pour a small amount of appropriate cleaning solvent into the cup. Spray the solvent through the gun until it runs clear. (Ensure proper ventilation and PPE).
- Disassemble: Disconnect the air supply. Remove the air cap, fluid nozzle, and fluid needle.
- Clean Components: Clean the air cap, fluid nozzle, and fluid needle thoroughly with a brush and solvent. Do not use metal tools to clean the nozzle or air cap holes, as this can damage them. Use a soft brush or plastic picks.
- Clean Gun Body: Wipe down the exterior of the gun body.
- Reassemble: Reassemble the gun, ensuring all parts are tightened correctly. Do not overtighten.
6.2. Storage
Store the clean, dry spray gun in a protective case or a clean, dry environment to prevent dust and damage.
7. Troubleshooting
| Problem | Possible Cause | Solution |
|---|---|---|
| Pulsating Spray / Spitting |
|
|
| Uneven Spray Pattern |
|
|
| Excessive Overspray |
|
|
| Runs or Sags |
|
|
8. Specifications
| Model Number | FLG-HVG-315 |
| Fluid Delivery Type | Gravity |
| Nozzle Size | 1.5 mm (0.059 in) |
| Air Consumption | 13.5 CFM @ 23 PSI |
| Maximum Pressure | 23 PSI |
| Pattern Size | Up to 12 inches |
| Cup Capacity | 24 oz (710 ml) |
| Air Inlet | 1/4 inch NPT |
| Recommended Uses | Painting |
| Material | Plastic (cup), Metal (gun body) |
| Item Weight | 3 pounds |
| Dimensions (W x H) | 6.5"W x 6.3"H |
9. Warranty and Support
For specific warranty information and customer support, please refer to the documentation included with your purchase or visit the official DeVilbiss website. Keep your proof of purchase for warranty claims.
For technical assistance or replacement parts, please contact DeVilbiss customer service through their official channels.
Ask a question about this manual
Ask about setup, troubleshooting, compatibility, parts, safety, or missing instructions. Manuals+ will review the question and use this page’s manual context to help answer it.