
1. Introduction
This manual provides essential information for the safe and efficient operation of your Elna Explore 340 sewing machine. Please read these instructions carefully before using the machine for the first time and keep this manual for future reference.
The Elna Explore 340 is a versatile and user-friendly sewing machine designed for various sewing projects. It features a lightweight, transportable design, a 4-piece feed mechanism for smooth fabric handling, an automatic one-step buttonhole, 25 stitch patterns, a built-in needle threader, and a drop feed mechanism.

An overview of the Elna Explore 340 sewing machine, showcasing its compact design and control panel.
2. Setup
2.1 Unpacking and Placement
- Carefully remove the machine from its packaging.
- Place the machine on a stable, flat surface. Ensure adequate lighting for your workspace.
- Connect the power cord and foot controller to the machine and a suitable power outlet.
2.2 Identifying Components
Familiarize yourself with the main parts of your sewing machine. Key components include the stitch selector dial, stitch length/width dial, needle plate, presser foot, and free arm.
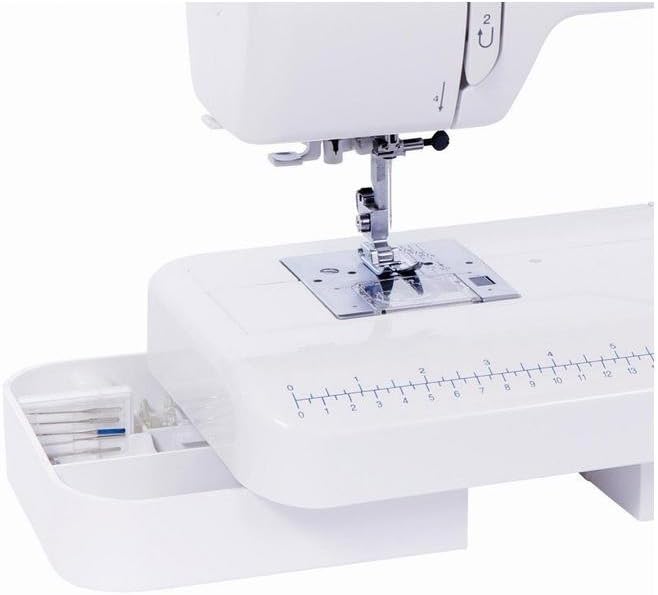
Detail view of the removable free arm, revealing the accessory storage tray underneath, useful for sewing cuffs and small items.
2.3 Winding the Bobbin
- Place an empty bobbin onto the bobbin winder spindle.
- Follow the threading path indicated on the machine for bobbin winding.
- Push the bobbin winder spindle to the right.
- Gently press the foot controller to start winding. The machine will automatically stop when the bobbin is full.
- Return the spindle to the left and remove the wound bobbin.
2.4 Threading the Machine
- Raise the presser foot lever.
- Place a spool of thread on the spool pin.
- Follow the numbered threading path from the spool pin down to the needle.
- Use the built-in needle threader for easy needle threading.
- Pull the bobbin thread up through the needle plate opening.

A close-up of the built-in needle threader, illustrating how it assists in quickly threading the needle.
3. Operating Instructions
3.1 Stitch Selection
The Elna Explore 340 offers 25 stitch patterns, including utility, decorative, and an automatic buttonhole. Use the upper control dial to select your desired stitch pattern. Refer to the stitch chart for visual guidance.

A visual guide displaying the 25 available stitch patterns, including utility and decorative stitches, and the automatic buttonhole.

The two main control dials on the machine: the upper dial for selecting stitch patterns and the lower dial for adjusting stitch length and width.
3.2 Adjusting Stitch Length and Width
Use the lower control dial to adjust the stitch length and width according to your chosen stitch pattern and fabric type. Experiment with scrap fabric to find the optimal settings.
3.3 Sewing with the Free Arm
To sew cylindrical items like cuffs, sleeves, or trouser legs, remove the accessory storage box to expose the free arm. This feature allows for easier manipulation of small, circular fabric pieces.
3.4 Automatic One-Step Buttonhole
- Attach the automatic buttonhole foot.
- Place the button you intend to use into the buttonhole foot's holder.
- Select the buttonhole stitch pattern on the dial.
- Lower the buttonhole lever.
- Begin sewing. The machine will automatically create a buttonhole sized to your button.

The specialized buttonhole foot attached to the machine, ready for creating automatic one-step buttonholes.
3.5 Drop Feed Mechanism
The drop feed mechanism allows you to lower the feed dogs for specialized techniques such as free-motion quilting or darning. Consult your machine's specific instructions for engaging and disengaging this feature.
3.6 Handling Various Fabrics
The 4-piece feed mechanism is designed to handle a wide range of fabrics, from delicate silks to heavier materials like leather, ensuring consistent feeding and stitch quality.

The presser foot and needle mechanism actively stitching fabric, demonstrating the machine in operation.
4. Maintenance
4.1 Cleaning
Regular cleaning is crucial for maintaining your machine's performance. Use a soft brush to remove lint and dust from the bobbin case area and feed dogs. Periodically remove the needle plate to clean underneath.
4.2 Needle Replacement
Replace the needle frequently, especially after 8-10 hours of sewing or if it becomes bent or dull. Always use the correct needle type and size for your fabric.
4.3 General Care
When not in use, keep your machine covered with the included hard cover to protect it from dust and damage.
5. Troubleshooting
If you encounter issues with your Elna Explore 340, refer to the following common problems and solutions:
- Skipped Stitches: Ensure the needle is inserted correctly, not bent, and is the appropriate type for your fabric. Re-thread the machine.
- Thread Breaking: Check for correct threading, proper tension settings, a burr on the needle or thread path, or a damaged needle.
- Fabric Not Feeding: Verify that the presser foot is lowered and the feed dogs are not dropped (unless intentionally for free-motion sewing).
- Machine Jamming: Remove all threads and the bobbin. Check for any tangled threads in the bobbin case or under the needle plate. Re-thread carefully.
For persistent issues, contact Elna customer support or a qualified service technician.
6. Specifications
| Feature | Detail |
|---|---|
| Model Number | 340 |
| Product Dimensions | 7.48 x 14.17 x 12.2 inches |
| Item Weight | 14.3 pounds (6.5 kg) |
| Stitch Patterns | 25 |
| Buttonhole Type | Automatic One-Step |
| Feed Mechanism | 4-piece |
| Needle Threader | Built-in |
| Bobbin Type | Drop-in |
| Free Arm | Yes |
| Manufacturer | Elna |
| Color | White |
7. Warranty and Support
The Elna Explore 340 sewing machine comes with a 2-year warranty. Please retain your proof of purchase for warranty claims.
For technical assistance, spare parts, or warranty service, please contact your authorized Elna dealer or visit the official Elna website for support information.


