1. Introduction
Thank you for purchasing the Ivation Oversized LED Digital Wall Clock. This manual provides essential information for the proper setup, operation, and maintenance of your new clock. Please read these instructions thoroughly before use and retain them for future reference.
2. Package Contents
Verify that all items listed below are included in your package:
- Ivation 24-Inch Oversized LED Digital Wall Clock
- Remote Control
- AC Power Adapter (10 ft cord)
- Mounting Hardware (screws and wall anchors)

3. Product Features
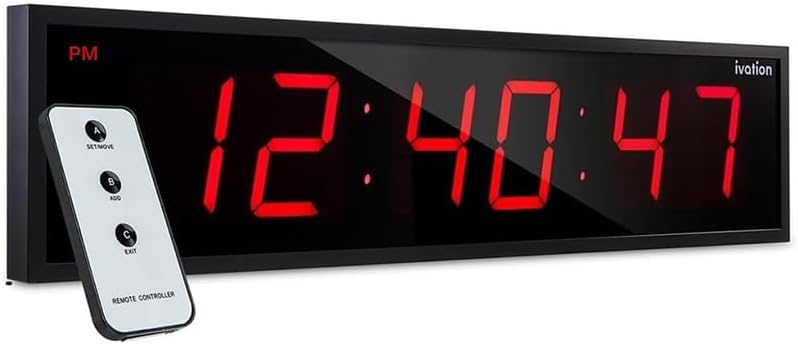
- Large LED Display: Features jumbo 3.25-inch digits for enhanced visibility.
- Adjustable Brightness: 6 levels of brightness can be adjusted via remote control or back-panel buttons.
- Time Memory: Built-in battery retention preserves time and settings during power outages.
- Versatile Mounting: Designed for both shelf placement and wall mounting with included hardware.
- Remote Control: Conveniently adjust settings from a distance.
- Display Options: Shows hours, minutes, and seconds, with AM/PM indicator and 12/24-hour format options.


4. Setup
4.1 Power Connection
- Locate the AC power adapter.
- Plug the small end of the adapter into the power input port on the back of the clock.
- Plug the larger end of the adapter into a standard electrical outlet. The clock display will illuminate.
4.2 Mounting Options
The clock can be placed on a shelf or mounted on a wall.
Shelf Placement:
Simply place the clock on a flat, stable surface. Ensure it is positioned where the display is clearly visible and the power cord can reach an outlet without strain.
Wall Mounting:
- Identify a suitable location on the wall.
- Using the clock's mounting holes as a guide, mark the positions for drilling.
- Drill pilot holes and insert the provided wall anchors if necessary.
- Insert the screws into the anchors/wall, leaving a small portion exposed.
- Carefully align the clock's mounting holes with the screws and slide the clock down to secure it.
5. Operating Instructions
The clock can be operated using the buttons on the back panel or the included remote control.

5.1 Setting the Time
Use the remote control or the buttons on the back of the clock (A, B, C) to set the time.
- Press the SET/MOVE button (A on remote) to enter time setting mode. The hour digits will begin to flash.
- Press the ADD button (B on remote) to adjust the hour. Continue pressing until the desired hour is displayed. Note: When setting the hours, the clock cycles through 1-12 AM, 1-12 PM, and then 1-24 in 24-hour mode. Stop pressing when your desired format and hour are shown.
- Press SET/MOVE again to move to the minute digits. The minute digits will flash.
- Press the ADD button to adjust the minutes.
- To synchronize seconds with an external time source (e.g., internet time), set the clock approximately one minute ahead. Then, press and hold the EXIT button (C on remote) until the external time source matches the clock's display, then release. Note: Button A does not directly set seconds.
- Press EXIT to save the settings and exit time setting mode.
5.2 Adjusting Brightness
The clock features 6 adjustable brightness levels.
- Use the remote control or the back-panel controls to cycle through the brightness levels. Specific buttons for brightness adjustment may vary; typically, one of the 'ADD' or 'SET/MOVE' buttons, when not in setting mode, might control brightness. Refer to the remote for specific markings if available.
5.3 12/24 Hour Format
The time format is selected during the time setting process.
- When setting the hour (as described in 5.1), repeatedly press the ADD button. The display will cycle through 12-hour (with AM/PM indicator) and 24-hour formats. Stop pressing when your preferred format is shown.
5.4 Flashing Colons
The colons between the hour and minute digits can be set to flash or remain static.
- To stop the colons from flashing, press and hold button A (on the back of the clock or the 'SET/MOVE' button on the remote) until they become static.
- To resume flashing, press and hold button A again until they flash.
6. Maintenance
To ensure the longevity and optimal performance of your Ivation Digital Wall Clock, follow these simple maintenance guidelines:
- Cleaning: Use a soft, dry cloth to wipe the clock's surface. Avoid abrasive cleaners, solvents, or chemical sprays, as these can damage the display or casing.
- Placement: Keep the clock away from direct sunlight, extreme temperatures, and high humidity.
- Power: Always use the provided AC power adapter. Disconnect power before cleaning or if the clock will not be used for an extended period.
7. Troubleshooting
If you encounter issues with your clock, refer to the following troubleshooting steps:
7.1 Clock Not Displaying / No Power
- Ensure the power adapter is securely plugged into both the clock and a working electrical outlet.
- Test the outlet with another device to confirm it is supplying power.
- Check the power adapter for any visible damage.
7.2 Time Inaccuracy
- Reset the time following the instructions in Section 5.1.
- If the clock consistently gains or loses time significantly, contact customer support.
7.3 LED Segments Not Working
- Unplug the clock, wait 30 seconds, and plug it back in to perform a soft reset.
- If segments remain unlit or partially lit, this may indicate a hardware issue.
7.4 Remote Control Not Responding
- Ensure there are no obstructions between the remote and the clock's sensor.
- Verify the remote's battery is functional and correctly inserted.
- Be aware that other infrared remote controls (e.g., for TVs) might interfere with the clock's remote. Try operating the clock's remote away from other active devices.
8. Specifications
| Brand | Ivation |
| Model Number | 0124RED |
| Display Type | Digital LED |
| Color | Red |
| Product Dimensions | 24"W x 6"H |
| Digit Height | 3.25 inches |
| Power Source | Corded Electric |
| Mounting Type | Wall Mount, Shelf Mount |
| Item Weight | 3.76 pounds |
| Material | Plastic, Metal Frame |
9. Warranty and Support
This Ivation Digital Wall Clock comes with a Limited Warranty. For specific details regarding warranty coverage, terms, and conditions, please refer to the warranty information provided at the time of purchase or contact Ivation customer support.
For further assistance, troubleshooting, or to inquire about replacement parts, please visit the official Ivation support website or contact their customer service department.
An official user manual in PDF format may also be available for download from the manufacturer's website or via the following link: Ivation Digital Wall Clock User Manual (PDF)


