
Nilight 10041P
Contents
Nilight 10041P 2.5" Mini Projector Lens for H1 Bulb Headlights Retrofit Instruction Manual
Model: 10041P | Brand: Nilight
1. Product Overview
The Nilight 2.5-inch Mini Projector Lens is designed for H1 bulb headlight retrofits, allowing for custom headlamp conversions. This kit provides both low and high beam functionality within a compact design, suitable for installations in tight spaces or for upgrading fog lamps.
The projector lens features a 2.5-inch clear lens and is designed for Left-Hand Drive (LHD) vehicles. It includes a chrome shroud for a finished appearance.
2. What's in the Box
- 2x 2.5" Mini Bi-xenon Projector Lenses (low/high beams)
- 2x Sets of Installation Accessories (lock rings, H7/H4 adapter plates, rubber crush washers)
- 2x Chrome Shrouds
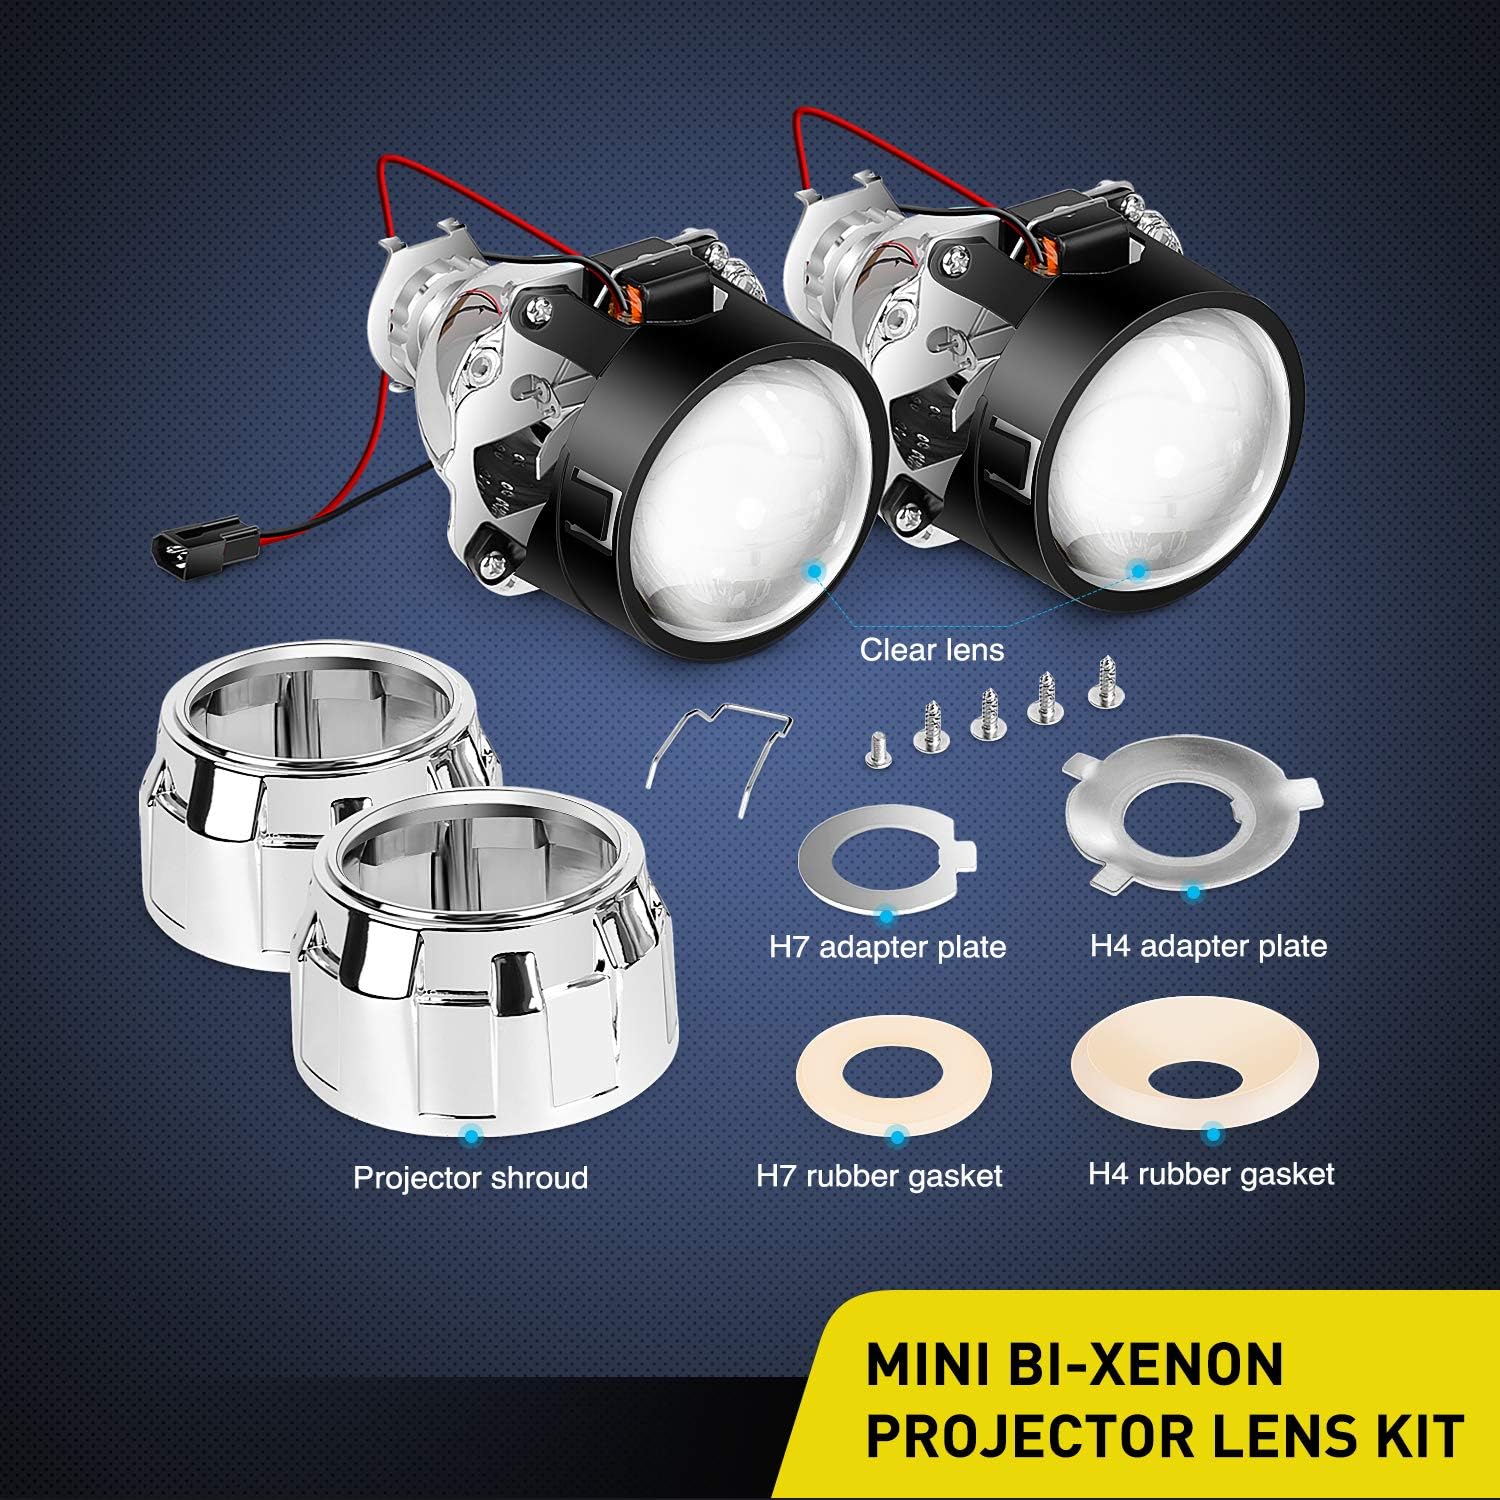
Image: The complete contents of the Nilight 2.5-inch Mini Bi-xenon Projector Lens Kit, including two projector lenses, two chrome shrouds, H7 and H4 adapter plates, and rubber gaskets.
3. Product Dimensions
The projector lens unit has the following approximate dimensions:
- Lens Diameter: 2.5 inches
- Overall Length: 5.2 inches
- Mounting Base Diameter: 1.4 inches

Image: A diagram illustrating the dimensions of the 2.5-inch Mini Projector Lens, showing its length, lens diameter, and mounting base measurements.
4. Setup and Installation
Professional installation is highly recommended for this product. Ensure your vehicle's headlights are compatible with H1 bulbs and the provided H4/H7 adapter plates.
4.1 Adapter Plates
The kit includes adapter plates for H4 and H7 bulb types to facilitate installation into various headlight housings.

Image: A visual representation of the H7 and H4 adapter plates, along with lock rings, screws, and rubber crush washers, used for securing the projector lens.
4.2 Installation Steps
- Remove the existing headlight bulb and any retaining clips from the headlight housing.
- Insert the projector lens into the headlight housing from the front, ensuring it is seated correctly.
- Secure the projector lens from the rear using the appropriate adapter plate (H4 or H7) and lock ring.
- Connect the bi-xenon high beam control wires (red and black) to your vehicle's high beam circuit.
- Install the H1 HID bulb (not included) into the projector lens, securing it with the bulb clip.
- Attach the chrome shroud to the front of the projector lens, ensuring it is properly aligned.

Image: A six-panel image demonstrating the installation process of the projector lens into a headlight assembly, from inserting the lens to wiring and securing the bulb.
5. Operating Instructions
The bi-xenon projector lens provides both low and high beam functions from a single H1 HID bulb (not included). The internal 'gobo' mechanism controls the light output.
- Low Beam: When the low beam is active, a part of the light is blocked by the gobo, creating a focused, small spot light pattern.
- High Beam: When the high beam is active, the gobo opens, allowing all light to pass through the projector lens. This reflects a high beam with a wider angle and brighter, further-reaching spot light.

Image: Diagrams illustrating the light distribution for low beam and high beam settings when using the mini bi-xenon projector lens, compared to a headlight without a projector lens.
5.1 Glare Control
The projector lens is designed to provide controlled high and low beam light output, minimizing glare for oncoming traffic while maximizing illumination for the driver.

Image: A visual demonstrating the effectiveness of high and low beam glare control provided by the projector lens, showing reduced glare for other vehicles.
5.2 Beam Pattern Comparison
Observe the distinct cutoff line and spread of light provided by the projector lens for both low and high beam settings, enhancing visibility and safety.

Image: A side-by-side comparison showing the low beam and high beam light patterns projected onto a road at night, highlighting the difference in illumination and reach.
6. Maintenance
- Regularly inspect the projector lenses for any dirt, dust, or condensation. Clean with a soft, dry cloth if necessary.
- Ensure all wiring connections remain secure and free from corrosion.
- Check the alignment of your headlights periodically to ensure optimal beam pattern and to avoid blinding other drivers.
7. Troubleshooting
- Dim or Flickering Light: Check the HID bulb and ballast (if used) for proper connection and functionality. Ensure adequate power supply.
- Incorrect Beam Pattern: Verify that the projector lens is securely mounted and correctly oriented within the headlight housing. Adjust headlight aim if needed.
- No High Beam Function: Confirm that the bi-xenon control wires are correctly connected to the vehicle's high beam circuit and that the solenoid is functioning.
8. Specifications
| Feature | Detail |
|---|---|
| Brand | Nilight |
| Model Number | 10041P |
| Light Source Type | Xenon (requires H1 HID bulb) |
| Included Components | 2.5" Mini Projector Lens, Installation Accessories, Shrouds |
| Fit Type | Universal Fit |
| Color Temperature (Lens) | 4000 Kelvin (Note: Actual light color depends on HID bulb used) |
| Auto Part Position | Inner |
| Operating Life | 2500 hours |
| Number of Pieces | 8 (total components in kit) |
| UPC | 608090100879 |
9. Warranty and Support
This product comes with a 2 Years Warranty from Nilight. For warranty claims or technical support, please refer to the manufacturer's official website or contact their customer service.
Return Policy: 30-day refund/replacement policy through Amazon.
Documents and downloads
Ask a question about this manual
Ask about setup, troubleshooting, compatibility, parts, safety, or missing instructions. Manuals+ will review the question and use this page’s manual context to help answer it.