
ViewSonic PJD5234
ViewSonic PJD5234 XGA DLP Projector
User Manual
Introduction
This manual provides essential information for the safe and efficient operation of your ViewSonic PJD5234 XGA DLP Projector. Please read this manual thoroughly before using the projector and keep it for future reference. The PJD5234 is designed to deliver clear and bright images for various applications, from business presentations to educational settings, offering advanced features like HDMI connectivity, 3D Blu-ray readiness, and DynamicEco technology.
Setup
Follow these steps to set up your projector for the first time.
1. Unpacking
Carefully remove all components from the packaging. Ensure all items listed below are present:
- ViewSonic PJD5234 projector
- Power cord
- VGA cable
- Remote control with batteries
- Quick start guide
- ViewSonic Wizard CD (with User Guide)
2. Placement
Position the projector on a stable, flat surface or mount it to the ceiling. Ensure adequate ventilation around the projector to prevent overheating. The projector is suitable for both tabletop use and ceiling mounting in classrooms and corporate offices.

Figure 1: Front and side view of the ViewSonic PJD5234 projector, showcasing its compact design and lens.
3. Connecting Devices
Connect your source devices (e.g., laptop, Blu-ray player) to the projector using the appropriate cables. The PJD5234 offers a variety of input options:
- HDMI: For high-definition digital video and audio.
- VGA (PC): For connecting computers. The projector has dual VGA inputs.
- Composite Video: For standard definition video.
- S-Video: For improved standard definition video.
- Audio In: For connecting external audio sources.
- RS232: For projector control via a computer system.

Figure 2: Rear panel of the projector, illustrating the available input and output ports including HDMI, VGA, S-Video, Composite, and audio connections.
4. Initial Power On
After connecting all necessary cables, plug the power cord into an electrical outlet and then into the projector. Press the Power button on the projector or the remote control to turn on the unit.
Operating Instructions
This section details the basic operation and key features of your projector.
1. Power On/Off and Source Selection
Press the Power button to turn the projector on or off. Use the Source button on the projector's control panel or remote to cycle through available input sources (HDMI, VGA1, VGA2, Video, S-Video).

Figure 3: Top view of the projector, highlighting the control panel with buttons for power, source selection, menu navigation, and keystone correction.
2. Focus and Zoom Adjustment
Adjust the image clarity using the focus ring around the projector lens. Use the zoom ring (1.1x optical zoom) to adjust the image size to fit your screen or projection area.
3. Keystone Correction
If the projected image appears trapezoidal, use the keystone correction feature to square the image. This can be adjusted via the control panel or remote control.
4. DynamicEco Technology
The DynamicEco feature allows you to instantly dim the screen brightness by 70% by pressing the DynamicEco button on the remote control. This feature is useful for shifting audience focus away from the screen or for saving power when the projector is temporarily not in use. When idle, the projector can auto-activate DynamicEco.
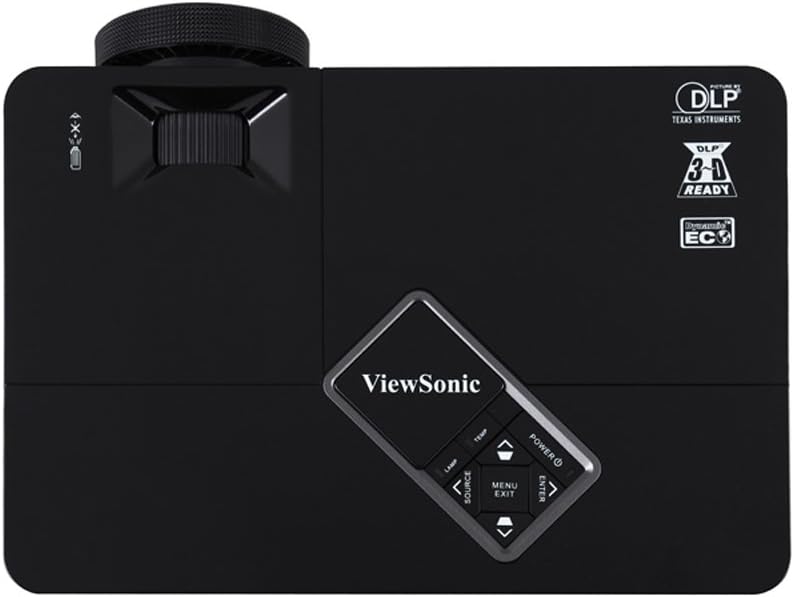
Figure 4: The remote control for the PJD5234, featuring dedicated buttons for power, source selection, menu navigation, and the DynamicEco function.
5. 3D Blu-ray Ready
The PJD5234 supports 3D content directly from 3D Blu-ray players via its HDMI input. To experience 3D visuals, you will need compatible 3D active shutter glasses (e.g., ViewSonic PGD-series), 3D content, and a 3D-enabled video card if connecting from a PC.
6. Integrated Speaker
The projector includes an integrated speaker suitable for multimedia applications and presentations with audio. For enhanced audio, connect external speakers to the audio output port.
Maintenance
Proper maintenance ensures the longevity and optimal performance of your projector.
1. Filter-less Design
The ViewSonic PJD5234 features a filter-less design, eliminating the need for regular filter cleaning or replacement. This significantly reduces maintenance requirements and lowers the total cost of ownership.
2. Lamp Life
The projector's advanced lamp technology provides a long lamp life of up to 6,000 hours in Eco-mode. Actual lamp life may vary based on usage and environmental factors. Replacing the lamp should be done according to the instructions in the full user guide on the included CD.
3. Cleaning
To clean the projector's exterior, use a soft, dry cloth. For the lens, use a lens cleaning cloth and solution specifically designed for optical surfaces. Avoid using abrasive cleaners or solvents.
Troubleshooting
This section provides solutions to common issues you might encounter.
- No Image on Screen:
- Ensure the power cord is securely connected and the projector is turned on.
- Verify that the correct input source is selected (e.g., HDMI, VGA).
- Check the connection cable between the projector and the source device.
- Ensure the source device (e.g., laptop) is outputting a signal.
- Image is Blurry:
- Adjust the focus ring on the projector lens.
- Ensure the projection surface is flat and smooth.
- Image is Trapezoidal:
- Use the keystone correction feature to adjust the image shape.
- Ensure the projector is placed perpendicular to the screen.
- No Sound:
- Check the volume level on the projector and the source device.
- If using HDMI, ensure the source device is sending audio through HDMI.
- If using external speakers, ensure they are properly connected and powered.
- Projector Overheating:
- Ensure there is adequate ventilation around the projector. Do not block air vents.
- Operate the projector in an environment with appropriate ambient temperature.
For more detailed troubleshooting, refer to the comprehensive user guide on the ViewSonic Wizard CD.
Specifications
Key technical specifications for the ViewSonic PJD5234 projector:
| Feature | Specification |
|---|---|
| Model Number | PJD5234 |
| Display Resolution | XGA 1024 x 768 |
| Brightness | 2800 ANSI Lumens |
| Contrast Ratio | 15000:1 (with DynamicEco) |
| Connectivity Technology | HDMI, VGA, Composite, S-Video, RS232 |
| Special Feature | Integrated speakers, 3D Blu-ray ready, DynamicEco |
| Item Weight | 4.7 pounds |
| Product Dimensions | 8 x 11.6 x 3.7 inches |
| Lamp Life | Up to 6,000 hours (Eco-mode) |
| Aspect Ratio | 4:3 Native |
Warranty and Support
Warranty Information
ViewSonic offers an industry-leading warranty for the PJD5234 projector:
- 3-year limited warranty on parts and labor.
- 1-year warranty on the lamp.
- Free 1st year Express Exchange service (requires product registration).
For complete warranty terms and conditions, please refer to the documentation included with your product or visit the official ViewSonic website.
Customer Support
If you require technical assistance or have questions regarding your ViewSonic PJD5234 projector, please contact ViewSonic customer support. Support contact information can typically be found on the ViewSonic website or in the quick start guide.
You can also refer to the full user manual available in PDF format for detailed instructions and information: ViewSonic PJD5234 User Manual (PDF)
Related documentsPJD5234


Ask a question about this manual
Ask about setup, troubleshooting, compatibility, parts, safety, or missing instructions. Manuals+ will review the question and use this page’s manual context to help answer it.