
1. Setup
1.1 Unpacking and Initial Inspection
Carefully remove the Janome CoverPro 900CPX machine from its packaging. Ensure all components and accessories are present. Place the machine on a stable, flat surface.

Image 1.1: Front view of the Janome CoverPro 900CPX Coverstitch Machine, illustrating its compact design and accessible controls.
1.2 Power Connection
Connect the power cord to the machine's power input located at the rear. Plug the other end into a standard electrical outlet. Connect the foot controller to its designated port.

Image 1.2: Rear view of the machine, highlighting the power switch, power cord input, and foot controller port.
1.3 Thread Spool Setup
Place the thread spools onto the spool pins located on the machine's top. Ensure the thread unwinds smoothly from each spool.
1.4 Threading the Machine
Follow the color-coded threading guides on the machine. Each thread path is clearly marked to ensure correct tension and stitch formation. Refer to the internal threading diagram for detailed steps.
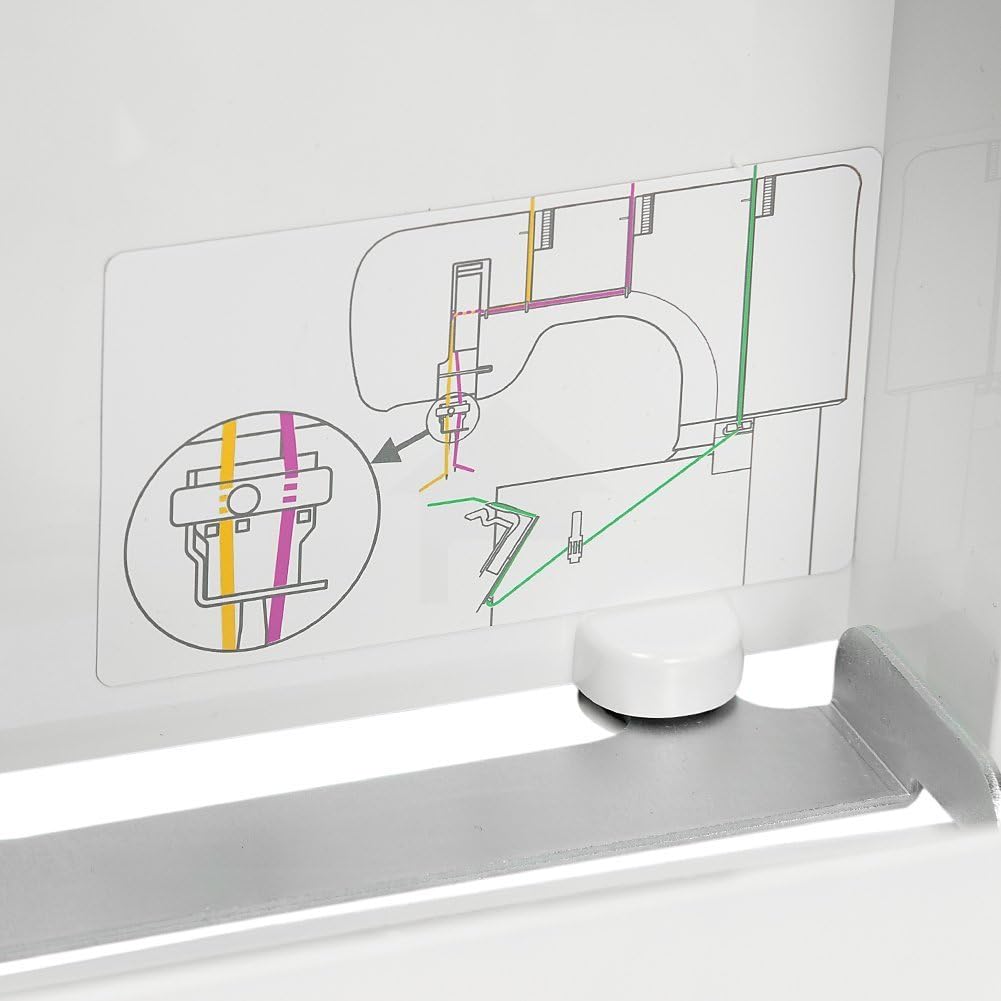
Image 1.3: Internal threading diagram, showing the color-coded paths for each thread to ensure proper setup.
2. Operating the Machine
2.1 Basic Controls
The Janome CoverPro 900CPX features several dials for adjusting stitch parameters. These include tension dials for each thread and a differential feed dial.

Image 2.1: Close-up view of the tension adjustment dials (top) and the differential feed adjustment dial (bottom), essential for controlling stitch quality on various fabrics.
2.2 Needle and Presser Foot
The machine uses specific needles designed for coverstitch applications. Ensure the presser foot is lowered before beginning to sew.

Image 2.2: Detailed view of the needle plate, presser foot, and needle area, showing the mechanism for fabric feeding and stitch formation.
2.3 Stitching Guidelines
To begin stitching, place the fabric under the presser foot. Lower the presser foot lever. Gently press the foot controller to start the machine. Guide the fabric evenly through the machine. To stop, release the foot controller and raise the presser foot.
3. Maintenance
3.1 Cleaning
Regularly clean lint and dust from the needle plate area, feed dogs, and tension discs using the provided brush. Disconnect the machine from power before cleaning.
3.2 Needle Replacement
Replace needles frequently, especially when working with different fabric types or if stitches appear irregular. Use only recommended needle types for the Janome CoverPro 900CPX.
3.3 Accessories
The machine comes with a set of essential accessories for maintenance and basic operation.

Image 3.1: Included accessories kit, featuring screwdrivers, tweezers, a lint brush, and a pack of needles for maintenance and adjustments.
4. Troubleshooting
4.1 Common Issues and Solutions
- Skipped Stitches: Check needle installation, ensure the correct needle type is used, and re-thread the machine.
- Broken Thread: Verify correct threading, check for burrs on thread guides, and ensure tension is not too high.
- Uneven Stitches: Adjust differential feed settings according to fabric type. Check tension settings for all threads.
- Machine Not Starting: Ensure the power cord is securely connected and the power switch is on. Check foot controller connection.
5. Specifications
5.1 Product Dimensions
The Janome CoverPro 900CPX is designed with specific dimensions for optimal workspace integration.

Image 5.1: Diagram illustrating the dimensions of the Janome CoverPro 900CPX: 10 inches deep, 14 inches wide, and 14 inches high.
5.2 General Specifications
- Brand: Janome
- Model: 900CPX
- Color: White
- Product Dimensions: 10"D x 14"W x 14"H
- UPC: 732212170690, 787718506320, 012532390047
6. Warranty and Support
6.1 Product Support
For detailed warranty information, technical assistance, or service inquiries, please refer to the official Janome website or contact their customer support directly. Keep your purchase receipt for warranty claims.